Welcome, Guest
Username: Password: Remember me

TOPIC: New To Glassics

Re:New To Glassics 12 years 5 months ago #63903

My camera broke! I was going to take pictures of the parts I sprayed. I put the camera in my back pocket with my cell phone, (bad idea). When I took the camera out, the sreen was all cracked. Anyway, I'm due for upgrade. I was an old camera. 5.1 Mgpxl.

I sprayed all the parts with high heat paint, the ones used for barbeques. But, it was like rough primer and when I started to work with the parts they got dirt marks all over them. So, I had an idea. I think it was 4stroke said that he sprayed his motor with regular paint and the exhaust manifold didn't even discolor. So, I thought, why not use the high heat for primer and get some good metal paint and spray over it. WOW! It worked great. I sprayed a few parts, let dry, and after handling them with dirty hand, the dirt came off easily with 409. Too bad I don't have a camera. Anyway, it should be here in 4 to 6 days. Thanks for the tip.

Please Log in or Create an account to join the conversation.

Re:New To Glassics 12 years 5 months ago #63953

  • 4stroke
  • 4stroke's Avatar
  • Offline
  • Expert Boarder
  • Expert Boarder
  • Posts: 291
  • Karma: 16
  • Thank you received: 1
I too had to upgrade the camera a few years ago when the Sony crapped out. I was able to revive the Sony after buying a Cannon. I did find when inside one of these to watch where you put you fingers as they have a hell of bite, like plug wires! I also found it seems to be getting harder to find one that takes AA batteries.

Glad the paint worked out, I had no trouble with the recent one or an earlier one I painted. Still trying to figure out what the hell happen to the last one. It's got great compression and no blowby. I did find a stuck oil relief valve (I think), the common denominator between both times it was running is the oil pump. When I removed the valve cover and plugs then spun it with the starter, holy crap talk about oil. My thoughts are it's dumping so much oil into the top end it can't drain back to the pan fast enough. :unsure:

Please Log in or Create an account to join the conversation.

Dick Johnson

1989 16ft Sylvan

'57 Evinrude 18 (finally found a decent one)
'58 Johnson 5.5
'72 Johnson 6.0
'61 Homelite
'64 Johnson 18
'65 Homelite 55
'66 Homelite 55
'68 Bearcat 55 (3)
'70 Bearcat 55 (2)
'71 Bearcat 85 (Sold)

Re:New To Glassics 12 years 4 months ago #65492

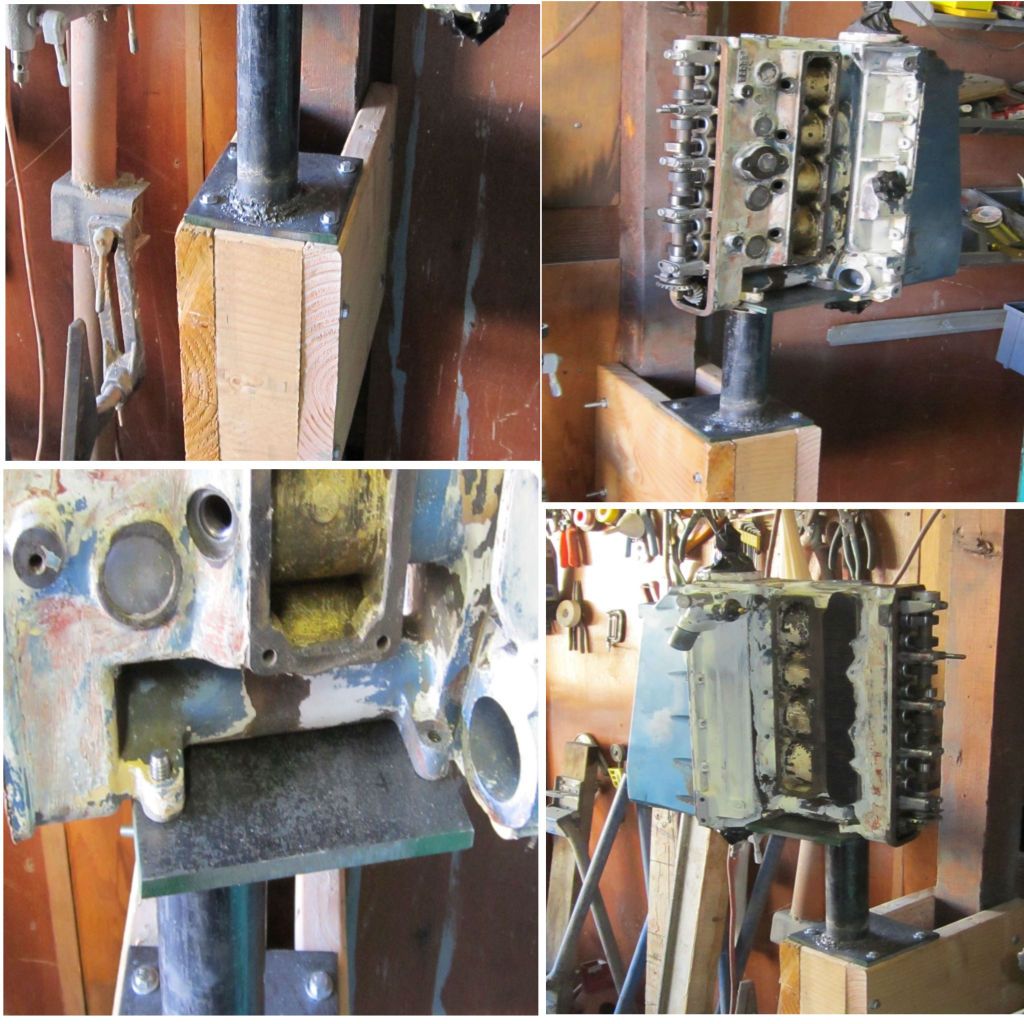
I wanted to wait until I finished the motor stand project to take photos. I had to think of something to put the motor on, so, I can work on it easily. Now, I don't have to walk around the motor, 'cause the motor swivels almost 360*. I think I'm gonna break the hoist down as to give me some more room. I'll clean it up some more, paint it, and then begin to rewire. The parts for the stand were ten bucks. The pipe was free.

Please Log in or Create an account to join the conversation.

Re:New To Glassics 11 years 8 months ago #76079

Well, I've started up again. Couple of questions. I've started putting the engine back together and inside of the water jacket, the paint is peeling off. I scraped off the parts that were peeling and left the rest. I also made sure that the pass-thru was clear on the bottom. Do the water jacket have to be re-coated? If yes, with what? I'm using paint that is used for bar-b-ques for the engine and parts. They have a color that is very close to the antique white I'm using for the outside.

Please Log in or Create an account to join the conversation.

Re:New To Glassics 11 years 8 months ago #76129

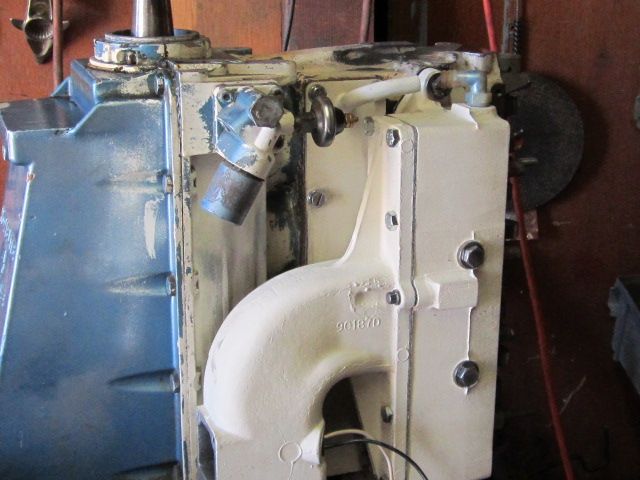
I'm starting to put the motor back together. In the diagram, the water jacket cover outlet tube goes on the bottom on the starter side. The plate with the long threaded posts on it. On the other side, in my previous photos, it looks like it goes on top. But, the manual looks different. Does it matter?

Please Log in or Create an account to join the conversation.

Re:New To Glassics 11 years 8 months ago #76133

I took another look at the photos a little closer and saw the the water jacket tube is on top and connects to the manifold with a little elbow. They line up perfectly. I took the plate off and re-installed it. I'm gonna put the carb mounting plate next then work on the other side installing the starter and most of the electrical which I will dive into this week.
Anybody know why my preview button doesn't work?

Please Log in or Create an account to join the conversation.

Re:New To Glassics 11 years 8 months ago #76188

Anyway, I look at the water jacket plate and the give away was the holes inside the chamber. The small ones are on the bottom. I guess that's so the pressure builds for water to cool the top of the motor. I repainted the starter and some other parts and when they dry, I'll install them tomorrow. As I see it, I'm gonna try for engine start about the end of May. Actually all I need is a gas tank. But, I'll certainly have a bazillion questions by then.

Please Log in or Create an account to join the conversation.

Re:New To Glassics 11 years 8 months ago #76375

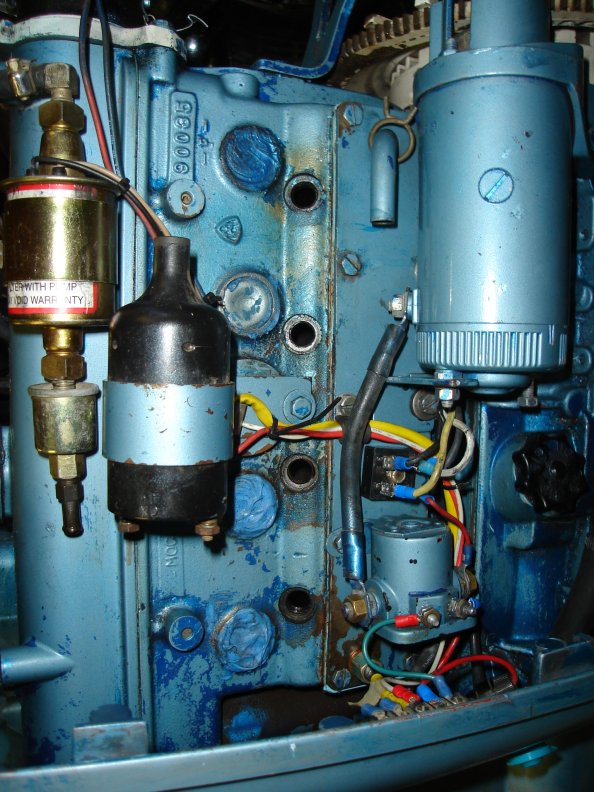
For the past couple of days, I've been working on the electrical system. A couple of questions.
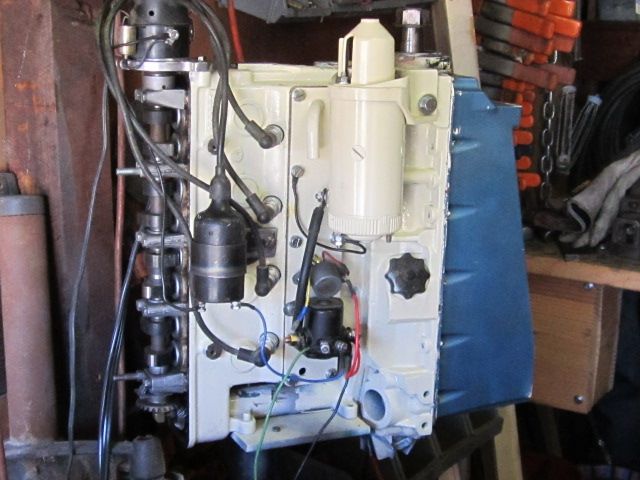
1. The stator has three connections. The diagram is not that clear. Does the red wire(rectifier) the middle connection on the stator?
2. The outer wires(AC) are 12 guage. The connect to the rectifier to the yellow wires(14) guage. Is there a reason why the rectifier wire are thinner than the stator wires or do I have the wrong rectifier?

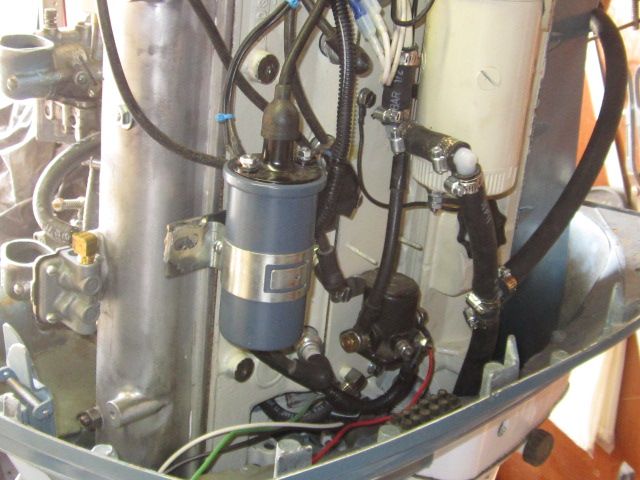
The wires that are hanging down from the solenoid go to the junction block.

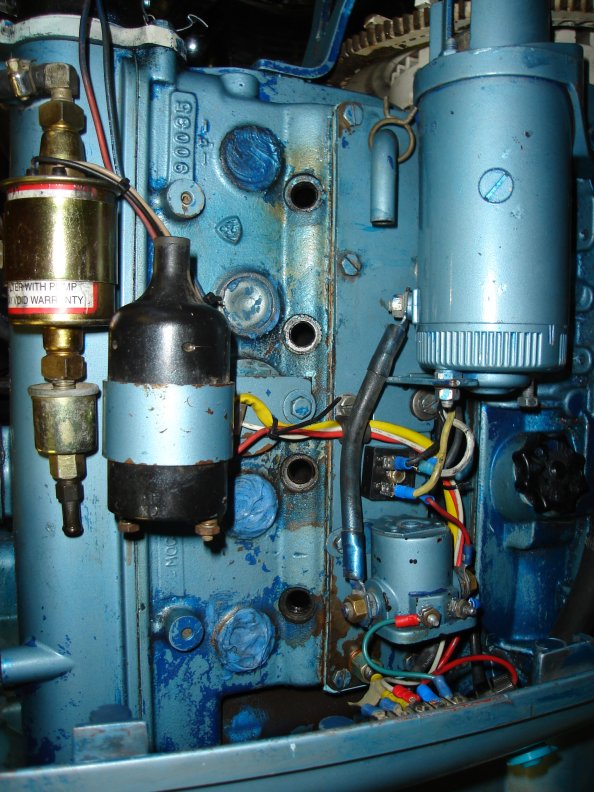
You can see the rectifier just above the solenoid. This is the one that came with the motor.
Last question. I can't remember if this motor came with a hi-lo switch . Does it need one or a voltage regulator?

Please Log in or Create an account to join the conversation.

Re:New To Glassics 11 years 8 months ago #76380

  • billr
  • billr's Avatar
  • Offline
  • Moderator
  • Moderator
  • Posts: 621
  • Karma: 51
  • Thank you received: 0
Wrong rectifier.
You can make it work, but that is one of the rectifiers that Ed uses on his motors.
I have the correct ones.
Yes it likely had the hi/lo switch, but it is not really needed.
The late all blue Bearcat motors did away with the hi/lo switch and used the single winding output from the stator by default.
Do you have a factory wiring diagram?

Please Log in or Create an account to join the conversation.

Re:New To Glassics 11 years 8 months ago #76387

Thanks for the reply, Bill. Yes, I have the factory wiring diagram. I'll probably have to get a new rectifier. How much are they?

Please Log in or Create an account to join the conversation.

Re:New To Glassics 11 years 8 months ago #76396

  • 4stroke
  • 4stroke's Avatar
  • Offline
  • Expert Boarder
  • Expert Boarder
  • Posts: 291
  • Karma: 16
  • Thank you received: 1
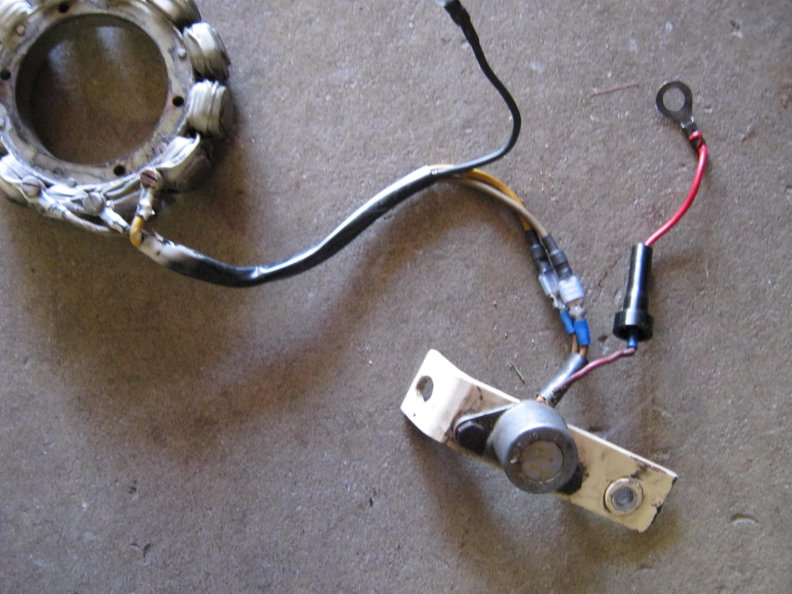
What you have is an OMC rectifier, red wire goes to the hot side of the starter solenoid, gray and yellow wires from the alternator hook up to the other two wires on the rectifier. The black wire is your Hi side, hooked up to one side of an on/off switch the other side of switch hooks up to the gray wire connection on the rectifier. Otherwise it connects to nothing and you don't have the HI side, or you can hook up the black wire w/o the switch and run Hi amps all the time. If the rectifier tests okay it should work. Radio Shack makes a bridge rectifier that I've used on anything from motorcycles to outboards and it's identical to the last Bearcat units. About $4

Please Log in or Create an account to join the conversation.

Dick Johnson

1989 16ft Sylvan

'57 Evinrude 18 (finally found a decent one)
'58 Johnson 5.5
'72 Johnson 6.0
'61 Homelite
'64 Johnson 18
'65 Homelite 55
'66 Homelite 55
'68 Bearcat 55 (3)
'70 Bearcat 55 (2)
'71 Bearcat 85 (Sold)

Re:New To Glassics 11 years 8 months ago #76399

  • 4stroke
  • 4stroke's Avatar
  • Offline
  • Expert Boarder
  • Expert Boarder
  • Posts: 291
  • Karma: 16
  • Thank you received: 1
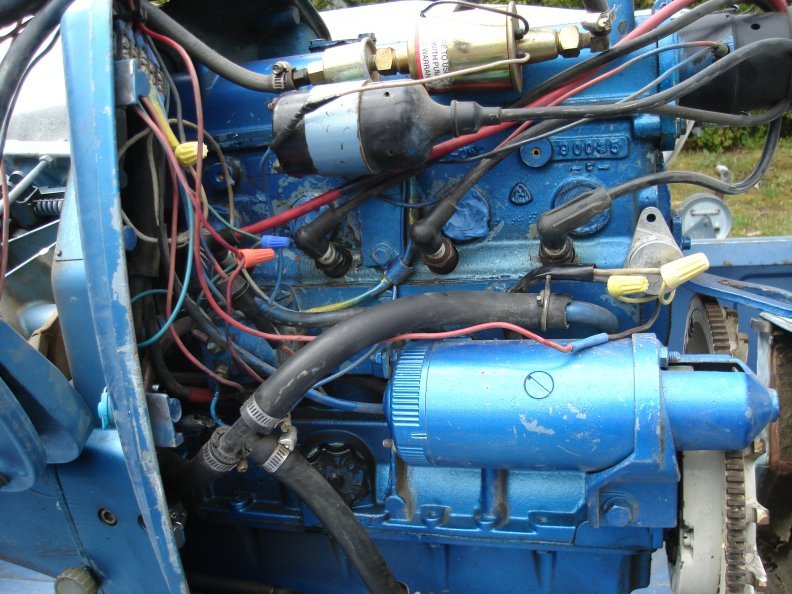
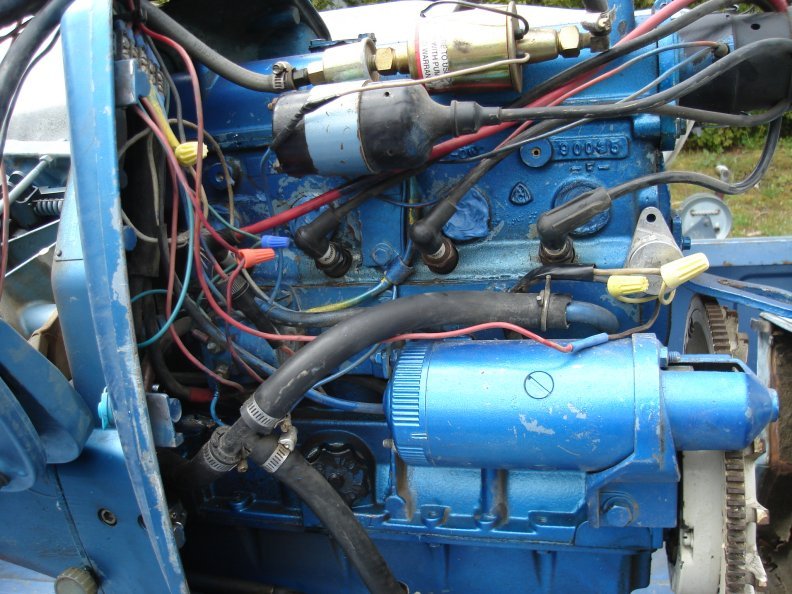
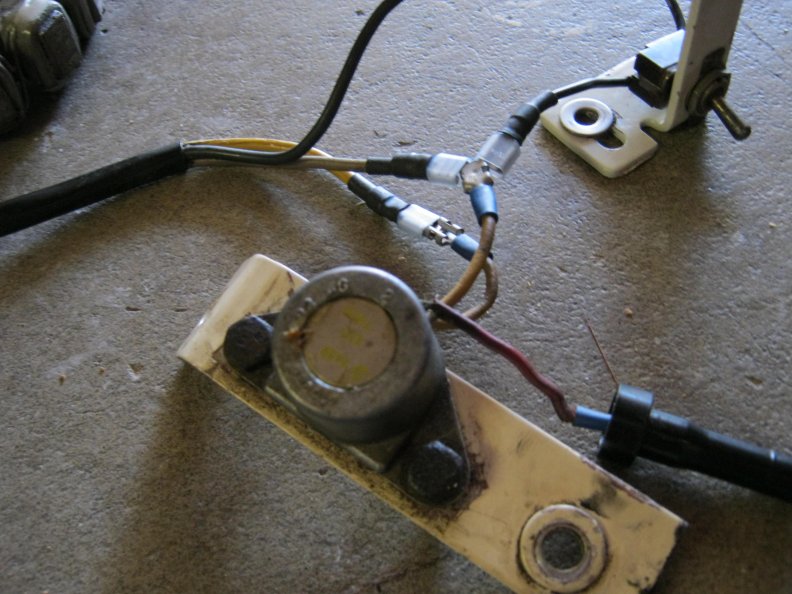
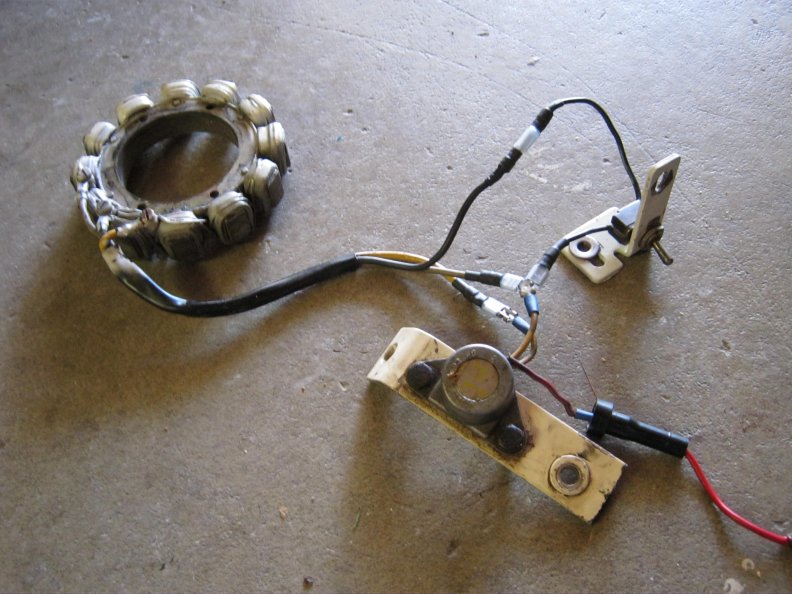
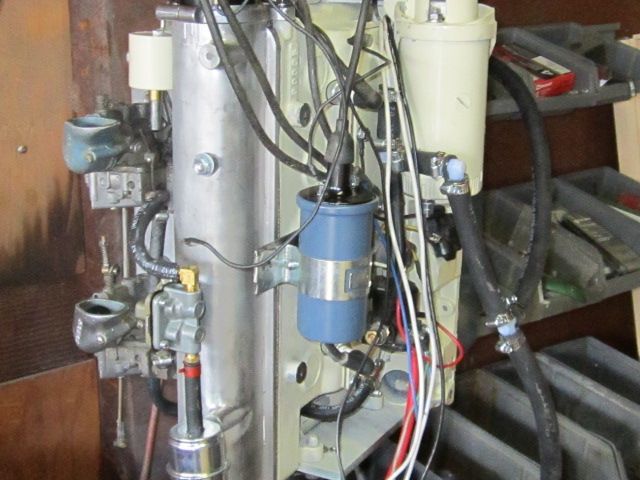
A couple pictures of before and after wiring on my 2nd Bearcat. You can see it had an OMC rectifier on it when I purchased it.

Attachments:

Please Log in or Create an account to join the conversation.

Dick Johnson

1989 16ft Sylvan

'57 Evinrude 18 (finally found a decent one)
'58 Johnson 5.5
'72 Johnson 6.0
'61 Homelite
'64 Johnson 18
'65 Homelite 55
'66 Homelite 55
'68 Bearcat 55 (3)
'70 Bearcat 55 (2)
'71 Bearcat 85 (Sold)

Re:New To Glassics 11 years 8 months ago #76402

4 stroke, thanks. I had a feeling you could use something from Radio Shack. There's one across the street from me. I'm gonna continue on next week, and hopefully start this monster by the end of May. I still have to repaint the lower end and the pan. I wanna do that before I put the motor back. All the wires have been replaced by new wire.

Please Log in or Create an account to join the conversation.

Re:New To Glassics 11 years 8 months ago #76423

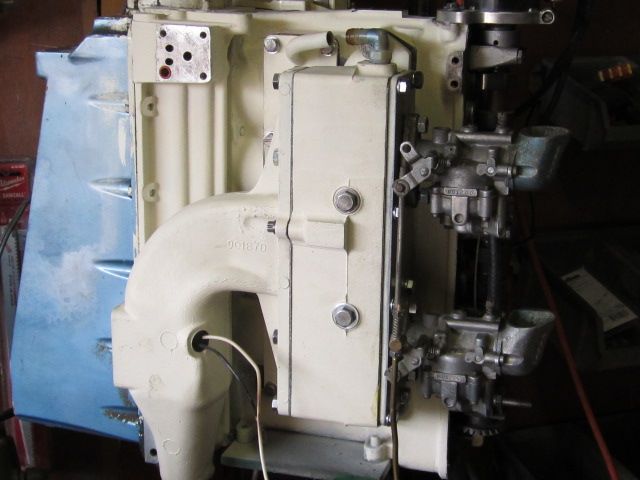
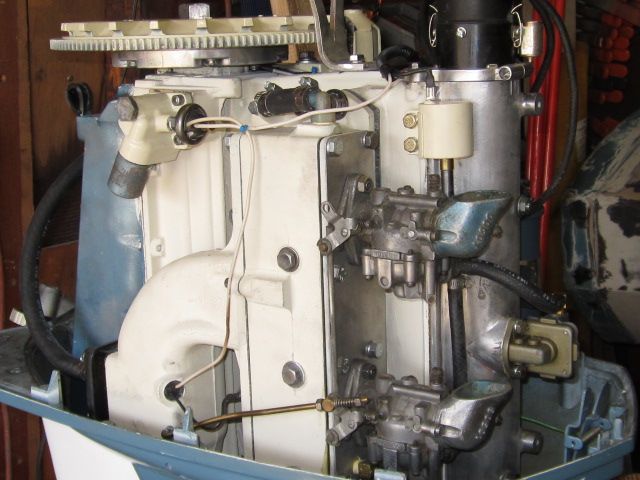
I worked on the motor a little today. I mounted the carbs, temporarily, to see what it would look like. I have the rebuilder kits for the carbs. There used to be a carb cleaner called tyme. Very caustic, but, it cleaned well. You can still get it, but, not in California. Can anyone recommend a cleaner that will work good?

You can't see in the photo, but, when I took apart the therm housing, there was nothing inside. Shouldn't there be? Anyway, with a little coaxing, I got the water jacket tube to line up with the exhaust water housing tube. Little by little.

Please Log in or Create an account to join the conversation.

Re:New To Glassics 11 years 8 months ago #76583

  • 4stroke
  • 4stroke's Avatar
  • Offline
  • Expert Boarder
  • Expert Boarder
  • Posts: 291
  • Karma: 16
  • Thank you received: 1
Yes you should have these parts in your thermostat housing. This is an early housing, the later one has the hose connection on the back of the housing and some of the internal parts I think are different.

I've used Berryman carb cleaner in the past but have heard it's not the same anymore, don't know as I haven't bought any in several years. Most of the carbs I do don't require a soaking and I clean them with the spray can type cleaner and a torch tip cleaner (K&L tools makes one of these with a nice small wire. The tip cleaner is used to clean the holes in the jets and passages then I blow through everything with the spray cleaner watching to see if every passage and hole is clear

File Attachment:

File Name: therm.doc
File Size:92 KB
Attachments:

Please Log in or Create an account to join the conversation.

Dick Johnson

1989 16ft Sylvan

'57 Evinrude 18 (finally found a decent one)
'58 Johnson 5.5
'72 Johnson 6.0
'61 Homelite
'64 Johnson 18
'65 Homelite 55
'66 Homelite 55
'68 Bearcat 55 (3)
'70 Bearcat 55 (2)
'71 Bearcat 85 (Sold)

Re:New To Glassics 11 years 8 months ago #76584

Thanks, 4stroke. I'll go ahead and order the therm parts. I got a hold of a fuel pump on craigs list from a Bearcat motor that would probably be used better as an anchor than an outboard motor. I picked it up dirt cheap. Is there a rebuild kit for this fuel pump? Most fuel pump diaphrams have a disc on both sides of the diphram with an actuating rod. If it does need one, this would be a real challenge to make one of these. Once I get the fuel pump on this motor, she's ready to start! I got a dumb question. How much oil does this hold? 66 Homelite 460 A2. Long shaft.

Please Log in or Create an account to join the conversation.

Re:New To Glassics 11 years 8 months ago #76614

  • 4stroke
  • 4stroke's Avatar
  • Offline
  • Expert Boarder
  • Expert Boarder
  • Posts: 291
  • Karma: 16
  • Thank you received: 1
CraigLam wrote:

Is there a rebuild kit for this fuel pump?
I got a dumb question. How much oil does this hold? 66 Homelite 460 A2. Long shaft.


Haven't had a problem with fuel pumps yet so I can't answer that one.

Engine holds 2 1/4 quarts of oil.

Please Log in or Create an account to join the conversation.

Dick Johnson

1989 16ft Sylvan

'57 Evinrude 18 (finally found a decent one)
'58 Johnson 5.5
'72 Johnson 6.0
'61 Homelite
'64 Johnson 18
'65 Homelite 55
'66 Homelite 55
'68 Bearcat 55 (3)
'70 Bearcat 55 (2)
'71 Bearcat 85 (Sold)

Re:New To Glassics 11 years 8 months ago #76619

4Stroke, thanks again for the info. Seems like it would hold more. The whole outboard is bone dry. I'm looking for that info in the manual, but, it's not there. 2 1/4 it is. I picked up more gasket material and made the one for the fuel pump and the oil filter. Before I start this up, I'll probably have a few more questions. Thanks again.

Please Log in or Create an account to join the conversation.

Re:New To Glassics 11 years 8 months ago #76621

  • 4stroke
  • 4stroke's Avatar
  • Offline
  • Expert Boarder
  • Expert Boarder
  • Posts: 291
  • Karma: 16
  • Thank you received: 1
I found it right at the beginning of the manual, it started off with lubrication.

You're welcome!

Please Log in or Create an account to join the conversation.

Dick Johnson

1989 16ft Sylvan

'57 Evinrude 18 (finally found a decent one)
'58 Johnson 5.5
'72 Johnson 6.0
'61 Homelite
'64 Johnson 18
'65 Homelite 55
'66 Homelite 55
'68 Bearcat 55 (3)
'70 Bearcat 55 (2)
'71 Bearcat 85 (Sold)

Re:New To Glassics 11 years 7 months ago #76654

I went to my auto parts store, Haps, and there is a guy there that has a lot of mechanical experience. He was on one of the pit crews for the Long Beach Grand Prix, yesterday. He knows a little about what I'm doing and gave me some recommendations. First, he said it would be better to run a high tension coil with an internal resister than the pre-molded coil with a resister wire. He also recomended a electronic distributor setup, rather than a points and condensor setup. I'm old school, so, I've got experience with the points and condensor setup. Anyone make the conversion? Is it worth it?

Please Log in or Create an account to join the conversation.

Re:New To Glassics 11 years 7 months ago #76720

  • 4stroke
  • 4stroke's Avatar
  • Offline
  • Expert Boarder
  • Expert Boarder
  • Posts: 291
  • Karma: 16
  • Thank you received: 1
I have two engines running the pertronix units. I've run them on points and electronic and personally see no real difference. Both setups run the stock coil. Both have their pro's and con's.

Please Log in or Create an account to join the conversation.

Dick Johnson

1989 16ft Sylvan

'57 Evinrude 18 (finally found a decent one)
'58 Johnson 5.5
'72 Johnson 6.0
'61 Homelite
'64 Johnson 18
'65 Homelite 55
'66 Homelite 55
'68 Bearcat 55 (3)
'70 Bearcat 55 (2)
'71 Bearcat 85 (Sold)

Re:New To Glassics 11 years 7 months ago #76731

I think I'm gonna stick with the points since I'm more familiar with that setup. Hap's actually had a new set of points for my distributor. 10 bucks! This week end, I'm gonna put her to the test. The only thing I need help with, is the stator hookup. I can't make heads of tails of the drawing. I'm not savvy with electrical, anyway. The red wire on the rectifier, goes to the large terminal on the I side of the solenoid. The other two yellow wires on the rectifier, go to the stator. But, there are three screws. ??? I think the they go to the outer pins on the stator, but, not sure what the middle screw is for.

Please Log in or Create an account to join the conversation.

Re:New To Glassics 11 years 7 months ago #76783

  • 4stroke
  • 4stroke's Avatar
  • Offline
  • Expert Boarder
  • Expert Boarder
  • Posts: 291
  • Karma: 16
  • Thank you received: 1
CraigLam wrote:

The only thing I need help with, is the stator hookup. I can't make heads of tails of the drawing. I'm not savvy with electrical, anyway. The red wire on the rectifier, goes to the large terminal on the I side of the solenoid. The other two yellow wires on the rectifier, go to the stator. But, there are three screws. ??? I think the they go to the outer pins on the stator, but, not sure what the middle screw is for.


Maybe this will help, setup w/o hi/lo switch and with hi/lo switch.
If the switch is not used the black wire on the stator hooks to nothing.


Attachments:

Please Log in or Create an account to join the conversation.

Dick Johnson

1989 16ft Sylvan

'57 Evinrude 18 (finally found a decent one)
'58 Johnson 5.5
'72 Johnson 6.0
'61 Homelite
'64 Johnson 18
'65 Homelite 55
'66 Homelite 55
'68 Bearcat 55 (3)
'70 Bearcat 55 (2)
'71 Bearcat 85 (Sold)

Re:New To Glassics 11 years 7 months ago #76790

Your photos are very helpful. Looks like the black wire is in the middle. I don't think this motor had a hi-lo switch on it. Anyway, I went to HF and got some Plasticoat. The stator has some wires that the coating came off. I'm gonna put some on to protect it. Also, I'm ready to assemble the rest of the motor. After It starts, I hope, then I'll set it aside and start on my boat. The carbs look fine. I'm just gonna polish them up. The only problem I might have is when I marked the rotor in reference to the flywheel, I refinished the flywheel and can't find the marks. However, I do remember that the mark on the rotor was pointing towards the balancing drill holes. I guess the only way to find out is to start her up. I'm making my own fuel tank. I have to match the sender to the gauge, so, I'm not sure there is a Homelight sender/gauge set that I can buy.

Please Log in or Create an account to join the conversation.

Re:New To Glassics 11 years 7 months ago #76929

After all these months, she's finally going together. A few minor changes. I made an offset on the water jacket line. I was hitting the starter wire. The stator wires aren't hooked up yet, I'll do that tomorrow. I also bought some split looms and will install them tomorrow as well. I'm looking for a gas tank. If I can't find one at a good price, I'm gonna make my own.


Now I have to assemble my motor hoist to put her back in. Oh Joy!

Please Log in or Create an account to join the conversation.

Re:New To Glassics 11 years 7 months ago #76933

I Use OMC metal fuel tanks.

Please Log in or Create an account to join the conversation.

Re:New To Glassics 11 years 7 months ago #77002

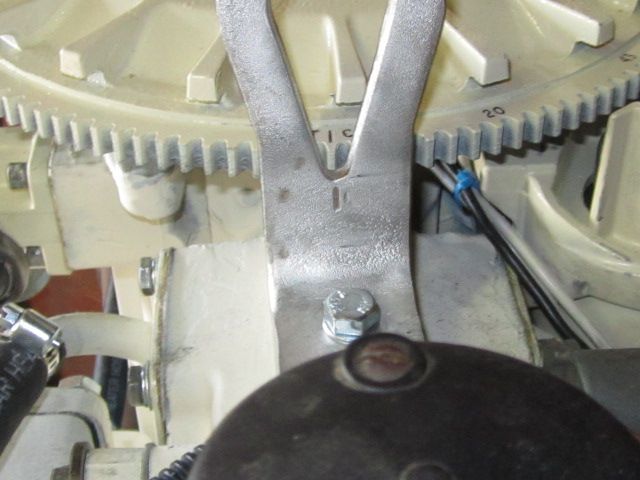
Today, I painted the flywheel and tomorrow when the paint is dry, I'll install it on the motor. Everything is set. The timing marks on the cam gears are lined up. The piston is at tdc and the cam lobes are for no. 1 cyl are opposite each other. I'm gonna use my van battery to jump it and a small gas can for a tank. The gas lines with the bulb pump on it are a little pricey. I just want to see if I can get her to start. I also want to make sure that the flywheel is lined up with the mark on the motor hook. The only thing that may take a little time is the hose adapter. I'm gonna make something that will fit over the water intake.
Someone suggested that I run engine restore with the oil? Not sure about that.

Please Log in or Create an account to join the conversation.

Re:New To Glassics 11 years 7 months ago #77006

  • 4stroke
  • 4stroke's Avatar
  • Offline
  • Expert Boarder
  • Expert Boarder
  • Posts: 291
  • Karma: 16
  • Thank you received: 1
CraigLam wrote:

Someone suggested that I run engine restore with the oil? Not sure about that.


As far as oil, do your own research, this will get you started: www.ttalk.info/Zddp.htm

I use Delo 400 30W

Please Log in or Create an account to join the conversation.

Dick Johnson

1989 16ft Sylvan

'57 Evinrude 18 (finally found a decent one)
'58 Johnson 5.5
'72 Johnson 6.0
'61 Homelite
'64 Johnson 18
'65 Homelite 55
'66 Homelite 55
'68 Bearcat 55 (3)
'70 Bearcat 55 (2)
'71 Bearcat 85 (Sold)

Re:New To Glassics 11 years 7 months ago #77032

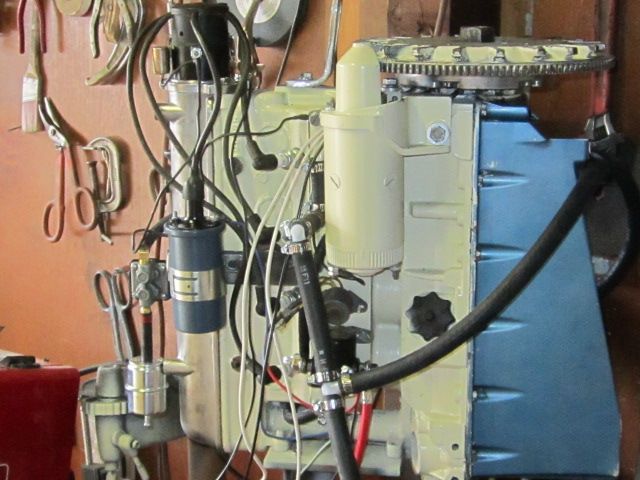
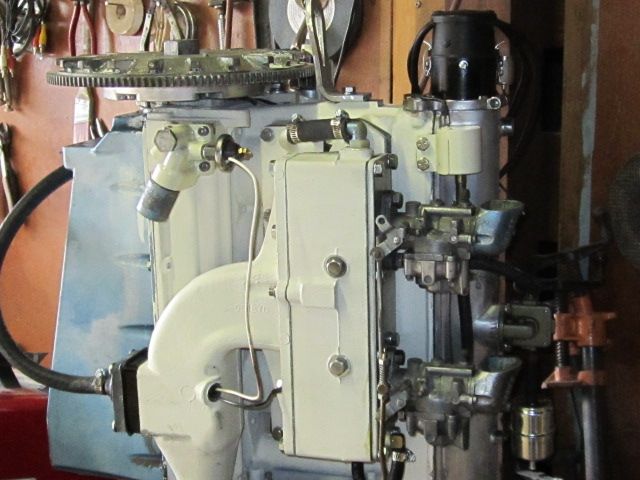
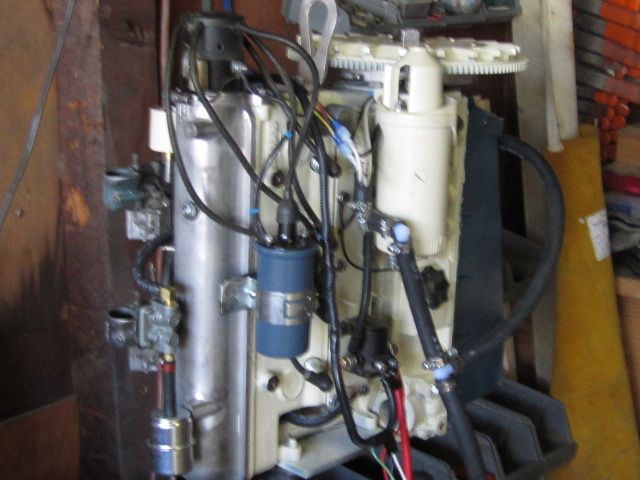
Well, she's ready to go in. I put the flywheel on and lined it up. Distributor rotor points towards #1, and all the marks are where they are supposed to be. I checked for oil in the lower end. There's none. Isn't there supposed to be oil in the lower end where the oil pan is? That's why there's an oil cap there? Anyway, Hap's sells Delo, but, only by the gallon. George suggested Valvoline 30w, so, I'll use that until I can find it by the quart. I have just enough room to put the engine hoist together and lift in. I still have to rig a gas tank.


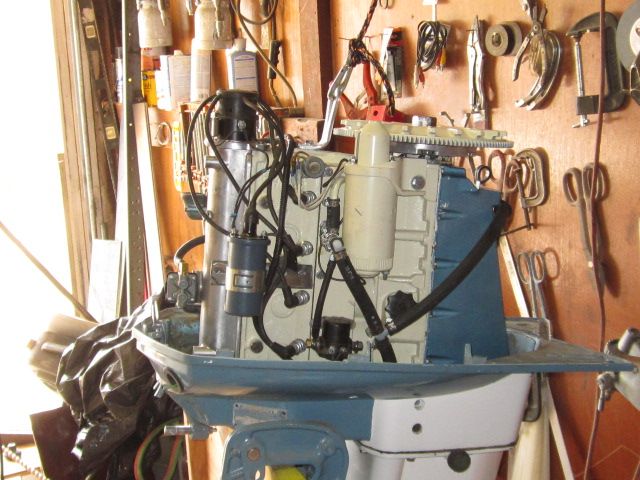
One picture is a little fuzzy, but, you can see I cleaned up the motor a little. I'm gonna crank it over a few times to work the oil around. Then I'll see if it starts.

Please Log in or Create an account to join the conversation.

Re:New To Glassics 11 years 7 months ago #77083

I figured it out. The knob on the lower leg unit is to check the oil, not to fill. The oil cap is where it's filled. I was a little confused. Looks like the engine is going in on Monday. If I get it started, I'll take a video.

Please Log in or Create an account to join the conversation.

Re:New To Glassics 11 years 7 months ago #77110

  • 4stroke
  • 4stroke's Avatar
  • Offline
  • Expert Boarder
  • Expert Boarder
  • Posts: 291
  • Karma: 16
  • Thank you received: 1
CraigLam wrote:

I figured it out. The knob on the lower leg unit is to check the oil, not to fill. The oil cap is where it's filled. I was a little confused. Looks like the engine is going in on Monday. If I get it started, I'll take a video.


I knew you you'd figure it out, now don't forget the pickup tube!

Please Log in or Create an account to join the conversation.

Dick Johnson

1989 16ft Sylvan

'57 Evinrude 18 (finally found a decent one)
'58 Johnson 5.5
'72 Johnson 6.0
'61 Homelite
'64 Johnson 18
'65 Homelite 55
'66 Homelite 55
'68 Bearcat 55 (3)
'70 Bearcat 55 (2)
'71 Bearcat 85 (Sold)

Re:New To Glassics 11 years 7 months ago #77116

  • 4stroke
  • 4stroke's Avatar
  • Offline
  • Expert Boarder
  • Expert Boarder
  • Posts: 291
  • Karma: 16
  • Thank you received: 1

Please Log in or Create an account to join the conversation.

Dick Johnson

1989 16ft Sylvan

'57 Evinrude 18 (finally found a decent one)
'58 Johnson 5.5
'72 Johnson 6.0
'61 Homelite
'64 Johnson 18
'65 Homelite 55
'66 Homelite 55
'68 Bearcat 55 (3)
'70 Bearcat 55 (2)
'71 Bearcat 85 (Sold)

Re:New To Glassics 11 years 7 months ago #77158

  • sabot
  • sabot's Avatar
  • Offline
  • Fresh Boarder
  • Fresh Boarder
  • Posts: 25
  • Karma: 3
  • Thank you received: 0
Dick I talked to Bars leak products today and they said that Rizlone contains 1750 ppm of zinc and to use pt.# 4401 and it should be used at 2 to 3 oz. per quart of oil Thanks ! Sabot

Please Log in or Create an account to join the conversation.

Re:New To Glassics 11 years 7 months ago #77258

After all these months, the outboard is finally together. A lot of little work to do. The motor dropped right in, no problem with the oil p/u and the spline shaft slid right in. I turned the flywheel and the prop shaft turned one way then shifted and it turned the other way. I had to cut the motor stand down 12" to hoist the motor in. The stand was quite tall. The only thing is, I can't see the vent tube. I'm gonna pull the manifold off tomorrow and check to see if everything is OK. I've heard that not venting will cause the motor to leak. ??? Thanks for the heads up on the oil additive.


Please Log in or Create an account to join the conversation.

Re:New To Glassics 11 years 7 months ago #77310

What a nightmare! I talked to the bozo who originally put this engine together. I think it was OC boatworks. Anyway, I couldn't figure out why the oil pan was covering the vent hole in the bottom of the engine pan. I later find out that the engine and the pan aren't from the same year! The muffler compartment doesn't have to be vented. I just have to find a plug for it. I also figured out why they used an electric fuel pump. The fuel connector is on the opposite side of the fuel pump. I had to make a lot of adjustments in re-directing the fuel line. It curves back and the fuel filter is in front of the valve cover. It works pretty good for now. I'm gonna try for tomorrow to start it up. I hope I have this right. Hot lead to (-)side of the coil. Then take a wire from the hot side of the solenoid and touch it to the "s" terminal of the solenoid. I hope that's right.

Please Log in or Create an account to join the conversation.

Re:New To Glassics 11 years 7 months ago #77315

  • 4stroke
  • 4stroke's Avatar
  • Offline
  • Expert Boarder
  • Expert Boarder
  • Posts: 291
  • Karma: 16
  • Thank you received: 1
(-) side of coil goes to the points, (+) side is the "hot" side of the coil.

Please Log in or Create an account to join the conversation.

Dick Johnson

1989 16ft Sylvan

'57 Evinrude 18 (finally found a decent one)
'58 Johnson 5.5
'72 Johnson 6.0
'61 Homelite
'64 Johnson 18
'65 Homelite 55
'66 Homelite 55
'68 Bearcat 55 (3)
'70 Bearcat 55 (2)
'71 Bearcat 85 (Sold)

Re:New To Glassics 11 years 7 months ago #77356

With all the hoopla about how to hot wire the motor, I decided to go to a local marine shop and buy a marine type switch. It has the push in feature for the choke. I rummaged aroung the shop and found the controls and the internal parts to hook everything up. It has the bell and the little red light. I got the motor wired to the bus and a temporary hookup. Tomorrow I need to get some gas. The markings on the switch are a little confusing. B-battery, C-choke, S-starter, and there is an A and two M's. ??? I'm gonna hook up the pos lead to the battery and turn the key on and use a pig sticker to see which terminal is hot. That's the I or ignition. The only thing left is to use the barrel I bought for the water.
I have so much time and money invested in this project, to make a mistake at this point would be devastating.

Please Log in or Create an account to join the conversation.

Re:New To Glassics 11 years 7 months ago #77394

Finally, I got it to crank over. I'm not starting it yet. No gas hook up and no water tank yet. But, she cranks fine. The push-in choke works great, too. Nice travel. It completely closes off the carb. Once I get the water bath set up, then I can start it up. The way gas is right now, I hope I can afford it. Here, it's over 4 bucks. In a few weeks, it will be over five.

Please Log in or Create an account to join the conversation.

Re:New To Glassics 11 years 7 months ago #77702

So, I got everything hooked up and it turns pretty good. I got a heavy duty garbage can and filled it up with water to the rubber leg mounts. The fuel pump is not pumping fuel. I have no primer bulb, which I'm sure is the problem. Since the pump is mounted in a sideways position, it needs to be primed. I ordered one from e-bay and will be here Wed. or Thurs. Also the coil gets pretty hot when I try to start it. I'm gonna draw a schematic of what I have to see if it's correct. I followed the print exactly. Also, I poured a little gas in the carb to see if would kick over. Nothing. I have to check to see if the plugs are lighting up. I'll post again later this afternoon.

Please Log in or Create an account to join the conversation.

Re:New To Glassics 11 years 7 months ago #77709

Well, I got everything. Spark, compression, etc. However, the bendix is not returning. If it starts and the bendix doesn't return, it could chew up the motor. I tried greasing it, but, it didn't work. I'm gonna take it off tomorrow and look at it closer. Any insight as to what's going on?

Please Log in or Create an account to join the conversation.

Time to create page: 0.303 seconds

Donate

Please consider supporting our efforts.

Glassified Ads

Mercury outboard
( / Engines)

noimage
11-03-2024

Classic Mercury Outboard Motors
( / Engines)

Classic Mercury Outboard Motors
10-18-2024

1958 Skagit Sportster
( / Boats)

1958 Skagit Sportster
09-25-2024

FG Login

FiberGoogle

Who's Online

We have 6896 guests and 2 members online