Welcome, Guest
Username: Password: Remember me
  • Page:
  • 1
  • 2

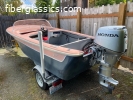
TOPIC: 1960 Starflite V4 75hp back in service.

1960 Starflite V4 75hp back in service. 3 years 4 months ago #143717

  • Pappy
  • Pappy's Avatar Topic Author
  • Offline
  • Junior Boarder
  • Junior Boarder
  • Posts: 149
  • Thank you received: 22
Boat was brought to me to put the engine back into service. Had been sitting for decades. Complete service done on it with new pump.
What you will see is the first water test at the ramp. Video is short and sweet. Turn up your volume. Love these old V engines.

The following user(s) said Thank You: VinTin

Please Log in or Create an account to join the conversation.

1960 Starflite V4 75hp back in service. 3 years 4 months ago #143718

Very nice work !

Please Log in or Create an account to join the conversation.

1960 Starflite V4 75hp back in service. 3 years 4 months ago #143721

That's awesome. I just bought a Glasspar with the same 1960 Evinrude. What mix ratio are you using? And are there any basic parts (rings, seals, carb rebuild kits, etc...) still available for these engines? It's unknown if mine runs but it does turn, looks pretty clean and I'd like to keep it even if it means a total teardown and restoration. just unsure of parts availability. Thanks in advance for any info you may be able to give!
Eric
Attachments:

Please Log in or Create an account to join the conversation.

1960 Starflite V4 75hp back in service. 3 years 4 months ago #143726

  • Pappy
  • Pappy's Avatar Topic Author
  • Offline
  • Junior Boarder
  • Junior Boarder
  • Posts: 149
  • Thank you received: 22
These engines are super simple.
Am using 24:1 in the engine and as you can see by the video there is almost no smoke.
As far as parts go you can either buy from marineengine.com or grab the part numbers there and search on the Bay for what you need. Things like OEM tune up kits are still available including points condensors, etc. Water pump parts are available as are gearcase seals, carb kits, etc.
A simple compression check should indicate the overall condition of the powerhead.
I use OEM in everything with few exceptions. The parts fit and work.

Please Log in or Create an account to join the conversation.

1960 Starflite V4 75hp back in service. 3 years 3 months ago #143810

Good to know.

So here's perhaps a dumb question (but then I am a first time power boat owner, so...)
The Starflite can tilt obviously although I haven't figured out how to do it yet. But, there are two pistons that look like gas lifts...is that what they are, to assist in lifting the weight when tilting the engine up? Do they still make replacements if mine are bad?

Eric

Please Log in or Create an account to join the conversation.

1960 Starflite V4 75hp back in service. 3 years 3 months ago #143812

  • Pappy
  • Pappy's Avatar Topic Author
  • Offline
  • Junior Boarder
  • Junior Boarder
  • Posts: 149
  • Thank you received: 22
I haven't looked for replacements but if you look in Marineengine.com and find a part number you can probably find what you need in the Bay I would think. In the front of the engine you should see a lever that locks the engine down and keeps it from tilting. Flip that to release and see if the pistons still have a charge in them.

Please Log in or Create an account to join the conversation.

1960 Starflite V4 75hp back in service. 3 years 3 weeks ago #144202

Hey Pappy,
So I'm ooing to try to remove the powerhead from the rest of my Starflite. I removed all the visible bolts that seem to hold it to the mid section, removed the fuel line and the electrical socket. Disconnected the shift linkage. Now what's left? Driveshaft seems to be a two part shaft, no? looks like half remains in the lower unit? There is a little diamond shaped door with two screws in the mid section, with another door behind it , and inside looks to be two nuts. is this the coupling for the driveshaft?

Also, before I take it off I want to run a compression test. I've done it on many an auto, but first time working on an outboard. Remove all plugs or one at a time? how many pulses on the starter? And what numbers am I looking for to consider it healthy?

Thanks!

Please Log in or Create an account to join the conversation.

1960 Starflite V4 75hp back in service. 3 years 3 weeks ago #144204

  • ed-mc
  • Offline
  • Platinum Boarder
  • Platinum Boarder
  • Posts: 1388
  • Karma: 232
  • Thank you received: 113

eperot wrote: Hey Pappy,
So I'm going to try to remove the powerhead from the rest of my Starflite. I removed all the visible bolts that seem to hold it to the mid section, removed the fuel line and the electrical socket. Disconnected the shift linkage. Now what's left? Driveshaft seems to be a two part shaft, no? looks like half remains in the lower unit? There is a little diamond shaped door with two screws in the mid section, with another door behind it , and inside looks to be two nuts. is this the coupling for the driveshaft?

Also, before I take it off I want to run a compression test. I've done it on many an auto, but first time working on an outboard. Remove all plugs or one at a time? how many pulses on the starter? And what numbers am I looking for to consider it healthy?

Thanks!


The brass coupler behind the (2) covers is for the shift shaft. Remove the bottom of the (2) bolts and the lower unit will come down (providing all the other bolts are removed, that is). With the lower unit off, take a big ol' long flat-bladed screwdriver, stick it up into the coupler from the bottom. Very gently twist the screwdriver to open-up the coupler just a wee bit.

That will make it a ton easier to get the shift shaft back inside the coupler when you reinstall the L/U. Note that there's a bolt-sized cutout in the top of the shift shaft; before you reinstall the bolt in the brass coupler, you have to make doubly-sure that the cutout lines up with the bolt hole. It it's off, you stand a chance of stripping out the bolt threads when you screw-in the bolt. If the shift shaft is aligned perfectly, the bolt will slide in like Butta.

BTW you don't necessarily have to pull the lower unit to remove only the powerhead, but it sure makes things a lot easier to reassemble if the L/U is still off when you land the powerhead back on the mid-section.

For 2-stroke compression check, pull all of the spark plugs. Crank over the powerhead until the compression gauge needle stops moving. Then move on to the next cylinder. If you want to get really fancy, you can open the throttle all the way and then jumper the starter solenoid. Watch out for sparks around battery and gasoline! Safer to use an automotive remote start switch in that case. But it probably won't make much difference in compression reading, just cranking it over in Neutral with the ign switch.

If you get to 100 psi on an old V-4, you're doin' pretty good! More likely it'll be between 75-90 psi. More important, and especially since it obviously runs (and sounds good), is that each cylinder's compression value is within about 5 psi of each other. Any cylinder that's way higher or way lower than the others has some sort of issue.

Hope that helps, G'luck with the project..........ed

Please Log in or Create an account to join the conversation.

1960 Starflite V4 75hp back in service. 3 years 3 weeks ago #144205

  • ed-mc
  • Offline
  • Platinum Boarder
  • Platinum Boarder
  • Posts: 1388
  • Karma: 232
  • Thank you received: 113
BTW the top of the driveshaft has splines machined into it. The bottom of the crankshaft is broached to accept those splines. So the driveshaft and crankshaft easily separate when pulled apart. There's an O-ring groove at the top of the driveshaft. This O-ring engages the crankshaft and keeps water out of the splined area. Be sure to renew the O-ring, and grease up the driveshaft splines before reinstallation.

Wipe any excess grease off the top of the driveshaft to prevent hydraulic lock........ed
The following user(s) said Thank You: eperot

Please Log in or Create an account to join the conversation.

1960 Starflite V4 75hp back in service. 3 years 3 weeks ago #144206

Wow, Thanks for the great information, Ed! Tons of help there. I really appreciate it.
Eric

Please Log in or Create an account to join the conversation.

1960 Starflite V4 75hp back in service. 3 years 1 week ago #144254

Okay, so...ran a compression test.
#1-75
#2-70
#3-75
#4-75

How's that for general health? Seems low to me but then I've read that these Starflites typically run lower compression and that OMC never even gave specific compression numbers except for the "within 10%"rule, which mine certainly qualifies.

Please Log in or Create an account to join the conversation.

1960 Starflite V4 75hp back in service. 3 years 1 week ago #144256

  • ed-mc
  • Offline
  • Platinum Boarder
  • Platinum Boarder
  • Posts: 1388
  • Karma: 232
  • Thank you received: 113

eperot wrote: Okay, so...ran a compression test.
#1-75
#2-70
#3-75
#4-75

How's that for general health? Seems low to me but then I've read that these Starflites typically run lower compression and that OMC never even gave specific compression numbers except for the "within 10%"rule, which mine certainly qualifies.


Sounds about right. Just keep an eye on the low one. Not that it's terribly low, either but you'd want to spot a trend. You can throw a bottle of Gumout Regane Hi-Miles carbon cleaner in there, it's probably better than Seafoam as a decarbonization tool. Cheap at your local Walmart. Regane has a high level of the carbon-cleaning chemical PEA, same stuff found in Chevron Techroline.

IIRC there's a certain amount you could machine off the cylinder heads to raise compression a bit, for better performance. You'd need to pull a cyl head and do a clearance test with clay, between the piston and top of the head. That way you'd know how much material you could take off the head (minus a safety margin, of course).

But she'll run just fine the way she is, gas-guzzling all the way down the bay! Make sure the carburetor and timing synchronization are set perfectly, and don't cruise at more than 3/4 throttle, and you'll use slightly less fuel. I had an old 75hp V4 on a Glasspar G3 (newer design), and it used something like 9 GPH. Gets a bit expensive nowadays! You're definitely gonna want to have 2 tanks.

Have Fun!...........ed

Please Log in or Create an account to join the conversation.

1960 Starflite V4 75hp back in service. 3 years 1 week ago #144263

  • Pappy
  • Pappy's Avatar Topic Author
  • Offline
  • Junior Boarder
  • Junior Boarder
  • Posts: 149
  • Thank you received: 22
Probably the best way to free your rings is a product called OMC Engine Tuner. Been around for decades and is quite a potent product and does it's job well.
To use, get the engine started and at a high enough idle to stay running while spraying the Tuner down each carburetor throat. The engine should reduce idle to close to a stall but not stall. It will smoke like crazy....keep that in mind if in a neighborhood!!
Use the complete can and once empty shut the engine off immediately. Let sit over night and start and warm the next day. Let it idle keeping in mind that carbon will still be coming off the piston top and rings. We want this to get flushed out with the exhaust not imbed itself into the aluminum piston skirt. Just let it run a bit before a hard in water run.
This is an OMC recommended part of an annual tune-up on their Johnson and Evinrude product line. Check your compression again after the treatment is complete. You may be surprised.

Please Log in or Create an account to join the conversation.

1960 Starflite V4 75hp back in service. 3 years 1 week ago #144267

  • ed-mc
  • Offline
  • Platinum Boarder
  • Platinum Boarder
  • Posts: 1388
  • Karma: 232
  • Thank you received: 113
Engine Tuner is Good Stuff. But it's getting more expensive and harder to find the remaining stock since Bombardier went out of the outboard business. Mercury Power Tune is readily available and also works well.

Carbon-cleaning additive in the fuel is a good preventive maintenance item, and will help to keep the engine's innards carbon-free. Yamaha Ring-Free is another good additive, I mentioned the Regane 'cause it's really cheap (under $5 at Walmart) and does an excellent job.

Cheers........ed

Please Log in or Create an account to join the conversation.

1960 Starflite V4 75hp back in service. 3 years 1 week ago #144268

  • Pappy
  • Pappy's Avatar Topic Author
  • Offline
  • Junior Boarder
  • Junior Boarder
  • Posts: 149
  • Thank you received: 22
Tuner is still readily available through any dealer that still carries OMC parts. Also available through Donovan Marine Parts. Most Marine dealers deal through Donovan.
Agree that Merc product is a good one.

Please Log in or Create an account to join the conversation.

1960 Starflite V4 75hp back in service. 3 years 1 week ago #144283

Hey Pappy...I see it looks like you installed an overboard water indicator on that 75....I suppose they give you a visual indication of your pump actually working? Seems like a really good idea and one that I'd like to use on this Starflite. Can you show or explain how it is hooked up and where you get such parts?
Thanks!

Please Log in or Create an account to join the conversation.

1960 Starflite V4 75hp back in service. 3 years 1 week ago #144286

Hey sorry way late to this. Excellent she's running! I got a package deal on my 62 75hp and 68 80hp when I lived in Maryland. I took the 80 and put it in the 62 housing so looks period specific. That's what's on the Wagemaker now. For the "pee hole" I'm assuming you used the the unused screw on number 2 cylinder and thread a nipple and put a hose on it out of the cover so you can see it pump correct?

Bob

Please Log in or Create an account to join the conversation.

1960 Starflite V4 75hp back in service. 3 years 1 week ago #144289

  • ed-mc
  • Offline
  • Platinum Boarder
  • Platinum Boarder
  • Posts: 1388
  • Karma: 232
  • Thank you received: 113

Waterwings wrote: Hey sorry way late to this. Excellent she's running! I got a package deal on my 62 75hp and 68 80hp when I lived in Maryland. I took the 80 and put it in the 62 housing so looks period specific. That's what's on the Wagemaker now. For the "pee hole" I'm assuming you used the the unused screw on number 2 cylinder and thread a nipple and put a hose on it out of the cover so you can see it pump correct?

Bob


Bob, an 0321885 OMC telltale fitting will work great for your application. Just drill the appropriate-sized hole in the lower cowling and it'll snap in.

I can't recall the location of the threaded plug to remove, but if it's on top of the block you can use a 90-deg threaded adapter such as the one in the attached pic. Should be 1/8" NPT IIRC but be sure to verify 1st.

HTH..........ed
Attachments:

Please Log in or Create an account to join the conversation.

1960 Starflite V4 75hp back in service. 3 years 1 week ago #144295

Cool I was wondering what the part number was for the cowl fitting. Yeah there's a plug hole that has a screw in it off the side of number 2 cylinder if I remember right.

Bob

Please Log in or Create an account to join the conversation.

1960 Starflite V4 75hp back in service. 3 years 1 week ago #144314

So in addition to adding a tell-tale indicator, I noticed that (seemingly around 1961, or the Starflite III) OMC began using an overheat light indicator up at the helm. All those parts seem to still be available on ebay and Marineengine.com but what I don't know is how it was tripped to turn on back at the powerhead during an overheating event. Is it possible to install this feature into a 1960 that doesn't have it? Just seems like another layer of protection that I'd like to add.
I imagine OMC # 0584592 is the sensor end? How/where does it attach to the powerhead?

Please Log in or Create an account to join the conversation.

1960 Starflite V4 75hp back in service. 3 years 1 week ago #144315

  • ed-mc
  • Offline
  • Platinum Boarder
  • Platinum Boarder
  • Posts: 1388
  • Karma: 232
  • Thank you received: 113
There's a hole in the cylinder head water jacket cover. This hole is smaller than the sensor, so you'd have to pull the cover, insert the temp sensor into its sensor well, thread the 2-wire sensor wire thru the hole in the cover, then reinstall the water jacket cover with a new gasket. There's also a 1-wire sensor that grounds thru the block and the "hot" wire goes up to one side of the light/horn/buzzer. The black sensor wire (if present) lug goes under a head bolt or cover screw (ground). If you undo a head bolt, be sure to retorque it. Something like 225 inch-lbs as I recall. The end of the sensor contacts the head and when temp gets too hot, the thermostatic switch closes and lights the warning light. You could even connect it to a warning buzzer or horn, which will get your attention a lot faster than a red light in the dash.

The part that superseded the old V4 2-wire sensor is $150! The 584592 sensor is under $55 at Marineengine.com and the way it's designed, it looks like it would work in the sensor well of the V4 head. If the rubber grommet was smaller than the hole in the water jacket cover, you could add a split washer with a smaller i.d. for the grommet to bear against, to keep it in place.

There are some used ones on eBay as low as $19.00. And new as low as around $46. I pulled up a diagram for a newer V4 and verified that that P/N does go in the cyl heads, so it has to be the overheat horn switch.

One addition that might be more useful is to install a water pressure gauge. You'd just put a tee in the telltale hole, and run a line from that tee to the gauge. This would allow you to monitor water pressure at all times and be able to detect any trends where pressure is going lower. The old V4's don't develop a lot of pressure, so a 0-14psi or something in that range is gonna be plenty.

Just a thought, HTH..........ed
The following user(s) said Thank You: eperot

Please Log in or Create an account to join the conversation.

1960 Starflite V4 75hp back in service. 3 years 1 week ago #144318

Thanks ed-mc
In your opinion, (or outright knowledge) would the 1960 water jacket cover have that hole and sensor well? Or would I need to use a later cover from another 75hp V4? Where should I look on the water jacket to check?
And yes, in addition to the light I would install the OMC warning buzzer also.
-Eric

Please Log in or Create an account to join the conversation.

1960 Starflite V4 75hp back in service. 3 years 5 days ago #144329

  • ed-mc
  • Offline
  • Platinum Boarder
  • Platinum Boarder
  • Posts: 1388
  • Karma: 232
  • Thank you received: 113

eperot wrote: Thanks ed-mc
In your opinion, (or outright knowledge) would the 1960 water jacket cover have that hole and sensor well? Or would I need to use a later cover from another 75hp V4? Where should I look on the water jacket to check?
And yes, in addition to the light I would install the OMC warning buzzer also.
-Eric

See the attached pic. Where the arrow points is where the temp sensor goes. The 1960 cover doesn't have the provision for a sensor, nor does the cylinder head. You'd have to upgrade to newer stuff. The 1960 cover was superseded with a cover that has the "ear" for the sensor.

There are a number of 75HP V4 cylinder heads and covers on ebay that would work. Even a brand-new head, still in original OMC red primer, for around $29 shipped.

I can't post ebay links here because the program won't allow it (STOOPID rule, BTW!). But if you do a search with these keywords, it'll pull up the parts you need:

(307710, 307711) (cylinder head, cover)

See also the attached pics. HTH..........ed
Attachments:

Please Log in or Create an account to join the conversation.

1960 Starflite V4 75hp back in service. 3 years 5 days ago #144330

  • ed-mc
  • Offline
  • Platinum Boarder
  • Platinum Boarder
  • Posts: 1388
  • Karma: 232
  • Thank you received: 113
And just one more thought, an alternative to this sensor mod would be an aftermarket temperature gauge kit such as this one from Sierra Marine:

www.amazon.com/Sierra-International-58862P-Outboard-Degree/dp/B000FPY3VC

It has a sensor with 1/8"-NPT threads, so I'd think it would screw right into the block. The only issue would be if there's enough internal clearance to accept the length of the sensor that protrudes into the water jacket.

You could pull the threaded plug out of the block and check for obstructions, if it's free-and-clear inside, should be good-to-go.

Please Log in or Create an account to join the conversation.

1960 Starflite V4 75hp back in service. 3 years 5 days ago #144342

Ed, you are a treasure. I've met more people like you and pappy and others here who have such amazing knowledge and willingness to help and I thank you for it. I'm certain I'll have many more questions as time goes on (including one later today about a part around my driveshaft on the lower unit that is broken) but it is so nice to have a source of information handy. What a great site. '

I'm also endlessly amused at how practically anything is available for these engines and on the cheap too. I purchased that $22 NOS head and cover too. And as far as the sensor, the $150 two wire was used 1961-1987. the one wire was IIRC 1988-1994. I have to imagine it would work. considering the cost difference, I'll first try the later style.

Please Log in or Create an account to join the conversation.

1960 Starflite V4 75hp back in service. 3 years 5 days ago #144344

So here is the broken part around the driveshaft. I can't see anything like it in the exploded diagrams. Seriously hoping it isn't part of the powerhead block.
Attachments:

Please Log in or Create an account to join the conversation.

1960 Starflite V4 75hp back in service. 3 years 5 days ago #144347

  • ed-mc
  • Offline
  • Platinum Boarder
  • Platinum Boarder
  • Posts: 1388
  • Karma: 232
  • Thank you received: 113

eperot wrote: So here is the broken part around the driveshaft. I can't see anything like it in the exploded diagrams. Seriously hoping it isn't part of the powerhead block.

Attachments:

Please Log in or Create an account to join the conversation.

1960 Starflite V4 75hp back in service. 3 years 4 days ago #144349

No, Ed, that's not it. it's larger than the actual hole that the driveshaft passes down through in the mid section. with a flashlight, if I look up the mid section I can see the snap ring which is the last thing at the bottom of the piece you posted in the pic above. So it looks fine. I've included another pic....I also can't see any shards of the missing bits anywhere in the lower unit. I'm stumped.


On another note, I'm trying to remove the powerhead still and it doesn't want to budge. I have all the visible bolts holding it to the mid out and it won't move. Then looking up to see if that piece you posted could be the culprit, I noticed a large allen head bolt way up near the top of the exhaust tube. The 2nd pic shows the bright bolt pretty much dead center uo the tube. Is that what needs removal to release the block?
Attachments:

Please Log in or Create an account to join the conversation.

1960 Starflite V4 75hp back in service. 3 years 4 days ago #144350

  • ed-mc
  • Offline
  • Platinum Boarder
  • Platinum Boarder
  • Posts: 1388
  • Karma: 232
  • Thank you received: 113
OK, I know what it is now; it's the long shaft extension tube that fits between the top of the water pump, and the L/S extension housing. P/N is 307240 and there are a bunch of 'em on Ebay, even new ones with the rubber grommet. Note on the drawing it's #91, also note the #90 Grommet and the #92 O-ring.

On the powerhead, there are no bolts accessible from below that mount the powerhead to the mid-section. There are (2) hidden nuts at the lower rear of the powerhead, under the exhaust manifold cover, between the cylinder banks.

Take a look at the "exhaust tube" parts breakdown and you can see how many holes are in the base gasket. For each of those holes, there's either a bolt sticking up into the powerhead, or a stud screwed-into the powerhead, sticking down, and held on by a nut. There are studs at the front and the rear, so be sure you've gotten them all.

www.marineengine.com/parts/johnson-evinrude-parts.php?year=1960&hp=75&model=V4SL-12&manufacturer=Johnson§ion=Exhaust+Tube+Group

Most times, it's a lot easier to pull the back half of cover over the mid-section, to gain better access to all the nuts/bolts and linkages hiding down there. If you have a fresh-water motor, all that stuff should come right out. Anything that doesn't move readily and freely, don't reef on it or you'll break off the stainless hardware in aluminum. Not an easy fix.

Just use heat and then penetrating oil to release any stuck parts. A propane or MAPP torch will usually get everything but the worst Salty Dog apart.

See the attached pic of the base gasket, make sure you have all the bolts unbolted and the studs de-nutted.

HTH........ed
Attachments:
The following user(s) said Thank You: eperot

Please Log in or Create an account to join the conversation.

1960 Starflite V4 75hp back in service. 3 years 4 days ago #144351

LOL, I literally was just coming up to the office to the computer to say i figured it out. Marineengine.com, under 1960, stopped listing items after like part #89, and I thought it might be one of those items still shown in the exploded diagram. So I switched to 1963 figuring it was pretty much the same and they had it listed. Bingo. I just wonder how it broke, and where the heck the rest of the pieces went. But mystery solved!

Thanks again for all the help. This is going to be a lot of fun to rebuild this engine. I'm really looking forward to it. My main experience is with air cooled VW's and some BMW engine work, so this should be cake. And as you said, I can confirm this boat and engine were always fresh water. Everything is coming apart like a dream.

That said....it's destined one day to be in salt water. When putting this back together, any recommendations for keeping corrosion at bay with reassembly? Mainly, are anti-seize compounds a good idea for nuts and bolts?

Please Log in or Create an account to join the conversation.

1960 Starflite V4 75hp back in service. 3 years 4 days ago #144353

  • Pappy
  • Pappy's Avatar Topic Author
  • Offline
  • Junior Boarder
  • Junior Boarder
  • Posts: 149
  • Thank you received: 22
OMC recommends or recommended the use of Gasket sealing compound on bolt threads. It works and I still use a lot of that but for any bolt that is below static waterline I use teflon paste on the threads. Almost all of the outboard dealerships from Miami down through the keys use this and it works!!

Please Log in or Create an account to join the conversation.

1960 Starflite V4 75hp back in service. 3 years 4 days ago #144354

  • ed-mc
  • Offline
  • Platinum Boarder
  • Platinum Boarder
  • Posts: 1388
  • Karma: 232
  • Thank you received: 113

Pappy wrote: OMC recommends or recommended the use of Gasket sealing compound on bolt threads. It works and I still use a lot of that but for any bolt that is below static waterline I use teflon paste on the threads. Almost all of the outboard dealerships from Miami down through the keys use this and it works!!


I'd imagine the Teflon paste is a lot less messy than the OMC gasket compound or Permatex No. 3 Aviation-Type non-hardening sealer, which I use a lot of. Years ago I was maintaining a bunch of old 35 and 40HP Big Twins for a guy who used them to push his big work barges. Just for a lark I did a test, one side of the lower unit bolts had Sta-Lube blue marine grease on them, other side Permatex No. 3. These were Salty Dogs which never got flushed, and were run mercilessly. Next time I worked on that particular motor, both sides came apart equally well.

Any kind of salt barrier is better than nothing. Of course the mfr's are too cheap to apply 10 cents worth of stuff on the bolts. They'd lose too much money on a Million units and then everybody could get their motors apart and work on 'em! Who needs that? :whistle:

I always used something, 'cause I figured the next guy who worked on the motor might be me! And of course when you would find a motor all stuck because no one bothered to take care of it, you'd have to cuss out the previous mechanic. Talk about paying it forward!!

Trying to get stuck head bolts out of a Salty Dog Big Twin or V4 is the Pits! Almost as bad as trying to get the exhaust manifold bolts out of a Salty Mercury without busting every one. You have to say a Blessing if the previous mech lubed/sealed 'em up good. Otherwise, break out the Heat Wrench!

Cheers......ed

Please Log in or Create an account to join the conversation.

1960 Starflite V4 75hp back in service. 2 years 11 months ago #144433

This is slightly off topic, but then not really...I have the opportunity to score a vintage Airguide tachometer on the cheap. It even comes complete with the transmitter unit. Airguide had 2 models then, the 653 and 654 (maybe others for Mercury) but 653 was for any 2 or 4 cyl. outboard with magneto ignition, and 654 was for Evinrude/Johnson 4 cyl. engines, with battery ignition. This one is a 654. With the '60 Starflite, I'm a little confused. Obviously it has a battery, but then it also has a magneto, right? Would the 654 work with this engine? I wonder how different the two transmitters can be. They both have two terminals for the gauge, and both have two terminals to the engine except presumably one hooks up to the magneto and the other to a coil? I don't want to buy this if it won't work for me.
Thanks in advance for your thoughts and expertise!

Please Log in or Create an account to join the conversation.

1960 Starflite V4 75hp back in service. 2 years 11 months ago #144444

  • ed-mc
  • Offline
  • Platinum Boarder
  • Platinum Boarder
  • Posts: 1388
  • Karma: 232
  • Thank you received: 113
The old V4's have two different styles of ignition, (1) is the magneto (self-powered), with a distributor cap that points directly downwards; (2) battery-powered ignition (i.e. the ign runs off of 12V just like a car ignition), and the distributor cap mounts on the top of that distributor, with the plug wires sticking out the sides.

You can't run a magneto-driven tach transmitter on a 12V ignition system, and you can't use a 12V-ign tach transmitter with a magneto. They wouldn't be getting the correct signal, and in the case of the 12V ign system, you'd run the risk of burning up a magneto transmitter.

I'm assuming your '60 75hp has a magneto, most of the early ones with manual shift did. IIRC they used the 12V ign system mainly when the motor was equipped with an electric shift lower unit, and would also have had a charging system to run the 12V ignition.

One cool trick on the models with a 12V ign system, you can just hook up a car tach, set to V8. The 2-stroke V4 has the same number of ignition pulses as a 4-stroke V8. My good boating buddy ran an old 90hp V4 with a car tach, worked great. He also used a Mallory hi-performance car-coil along with the matching ballast resistor (bypassing the special ballast wire on those motors), and it was the best mod he could have done. That 90hp started instantly and ran like a Swiss watch!

Anyway, I'd bet yours has a mag, so you're gonna be stuck with a tach setup meant for that.

HTH...........ed
Attachments:

Please Log in or Create an account to join the conversation.

1960 Starflite V4 75hp back in service. 2 years 11 months ago #144579

Well, I couldn't pass up how perfect the tach was so I bought it and I'll just have to be on the lookout for the magneto style transmitter.

So I've been thinking about the engine and the possibility of a power tilt unit. To my understanding OMC didn't start producing tilt mechanisms until 1963 and then the design changed in the 1970's. Just curious if any of these units would be compatible with the Starflite II. Don't really need trim but power tilt would be nice, especially if this Seafair is one day destined for a Marina. Sure would be easy to get that lower unit out of the water to keep barnacles and other sea life off of it.

Please Log in or Create an account to join the conversation.

1960 Starflite V4 75hp back in service. 2 years 11 months ago #144580

  • ed-mc
  • Offline
  • Platinum Boarder
  • Platinum Boarder
  • Posts: 1388
  • Karma: 232
  • Thank you received: 113
Well, the standard shocks on your '60 model are the same P/N as the standard shocks on a '66 100hp which was available with power tilt. The "tilt only" hydraulic cylinder bolts in place of the standard shock. So I'd assume that you should be able to retrofit the hydraulic tilt cylinder to your center bracket. Best scenario would be to find a parts engine with all the bits that you need. You also might be able to piece it together from eBay parts, but it's gonna be expensive.

I looked at a 1968 85hp V4 and it also has the same non-power shock. I found this setup on eBay that's supposed to fit the 85hp and it looks pretty much like what I remember for the older ones:

https:// www. ebay .com /itm/114489022634 Copy the link and paste it in your address bar, then take out the spaces. Can't post a link directly here, since this site parses eBay links.

I couldn't guarantee the way the trim motor mounts to the older V4's is the same as this 85hp unit. But it doesn't look terribly complicated and quite frankly, doesn't even have to be mounted on the motor. It could be mounted on the transom and new pipes made up. But I'd expect you could make up a suitable bracket if the motor assembly doesn't bolt right up.

And this listing says it's "parts or not working" so no guarantee the tilt motor or other parts are any good. You can still get a replacement for the tilt motor but the other parts are pretty much unobtanium unless you run across something in the classifieds or eBay. Far as I know this would be the newest type of assy you could retrofit. None of the single or double-ram PT&T setups are going to work with the old-fashioned transom bracket.

A buddy of mine back in the 80's had a 90hp V4 powerhead bolted to a '66 Johnson 100hp Selectric body with power tilt. The tilt was quite handy, especially since his bulbous V4 was a lot harder to get tilted-up than my Perfectly Balanced 100hp Merc Inline Six! ;)

Anyway, there's a few options for ya. Time to start scouring the classifieds, eBay, and swap meets for parts!!

HTH..........ed
The following user(s) said Thank You: eperot

Please Log in or Create an account to join the conversation.

1960 Starflite V4 75hp back in service. 2 years 11 months ago #144582

Thanks Ed, that's what I was looking for, mainly confirmation that I wouldn't have to replace my whole transom mounting/tilt bracket.

The assembly you show on ebay looks very simple, really. The motor and pump are in the same housing, the dingle power piston and the rest looks like regular old brake line parts. I could get stainless lines and fittings and make some new ones up easily with my SAE flare tools. As you noted, I could even relocate the pump to the inside of my splashwell for better protection from salt water and spray. The only question i have is seen in a difference between that unit and the one shown here and in this video:


The one on ebay appears to have a flex hose going to a small bracket that presumably held a reservoir for the hydro fluid...and the one in the pic here has no such line that I can see....looks like two lines compared to three on the ebay unit. Thoughts?

Also, what type of fluid would these use? Brake fluid?

I've searched high and low for part numbers to make parts searching a bit easier but there doesn't appear to be any such accessory parts on Marineengine.com...

As ever, thanks!
Attachments:

Please Log in or Create an account to join the conversation.

1960 Starflite V4 75hp back in service. 2 years 11 months ago #144584

  • ed-mc
  • Offline
  • Platinum Boarder
  • Platinum Boarder
  • Posts: 1388
  • Karma: 232
  • Thank you received: 113
Yeah, I was wondering about that extra hose myself. Not sure, maybe one of the OMC experts can weigh-in on that. The tilt unit in that video ran like a banshee.

BTW, did you get an email from the seller on eBay? Apparently he got excited that his listing was getting so many views, and sent out a reduced price offer. $256.50. So who knows, he might be open to an even less offer if you're interested. Couldn't hurt to try. I can't see any reason why that early 85hp tilt wouldn't be able to be retrofitted to your V4.

Regarding the working fluid, there is a special "power trim and steering fluid" that Mercury and others sell, I've used the Merc stuff before. An old model like this would probably be happy with straight 30W oil or a multi-vis such as 10W-30, in a pinch.

Or use an automotive power steering fluid, which has additives that hydraulic systems would like. This system is pretty small in volume; I doubt that it would even take an 8oz bottle to fill it up.

For that matter, an 8oz tube of Supertech Marine Power Trim & Tilt fluid is only $3.88 at Walmart:

www.walmart.com/ip/Super-Tech-Marine-Power-Trim-and-Tilt-Fluid-8-oz-tube/16927999

Super Tech Marine Power Trim and Tilt Fluid is specially formulated to deliver optimal pump and seal life. It is made with anti-foam and extreme pressure additives that work together to provide stability and shear resistance. This trim hydraulic fluid also inhibits rust. It is suitable for all power-steering systems.

Please Log in or Create an account to join the conversation.

1960 Starflite V4 75hp back in service. 2 years 10 months ago #144596

Thanks for the info, Ed. I actually tossed him an offer and got the tilt. As time permits l’ll look into it and see what it needs.

Funny thing is, if you look at the pic of the YouTube one above, you can see how there is a raised casting on the transom bracket for the pump to bolt to. My 1960 has the same casting complete with tapped holes for the bolts. Odd, says l. Hmmmm.

Please Log in or Create an account to join the conversation.

1960 Starflite V4 75hp back in service. 2 years 10 months ago #144620

Well, here it is in the flesh. Pretty decent shape too. Plus I got a NOS OMC power tilt switch plate to go with it. Nice!
Attachments:

Please Log in or Create an account to join the conversation.

  • Page:
  • 1
  • 2
Time to create page: 0.531 seconds

Donate

Please consider supporting our efforts.

FG Login

Glassified Ads

FiberGoogle

Who's Online

We have 7185 guests and one member online