Welcome, Guest
Username: Password: Remember me
  • Page:
  • 1

TOPIC: Fill/vent plug seats

Fill/vent plug seats 11 years 4 months ago #79943

  • Normspeed
  • Normspeed's Avatar Topic Author
  • Offline
  • Gold Boarder
  • Gold Boarder
  • Posts: 528
  • Karma: 22
  • Thank you received: 1
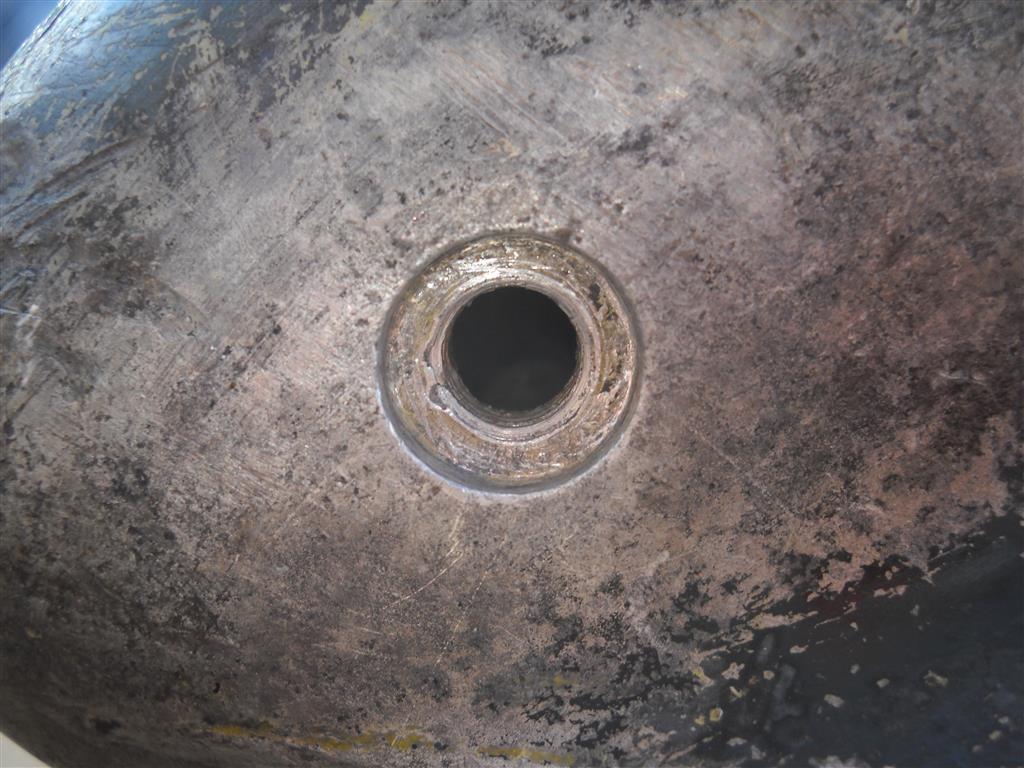
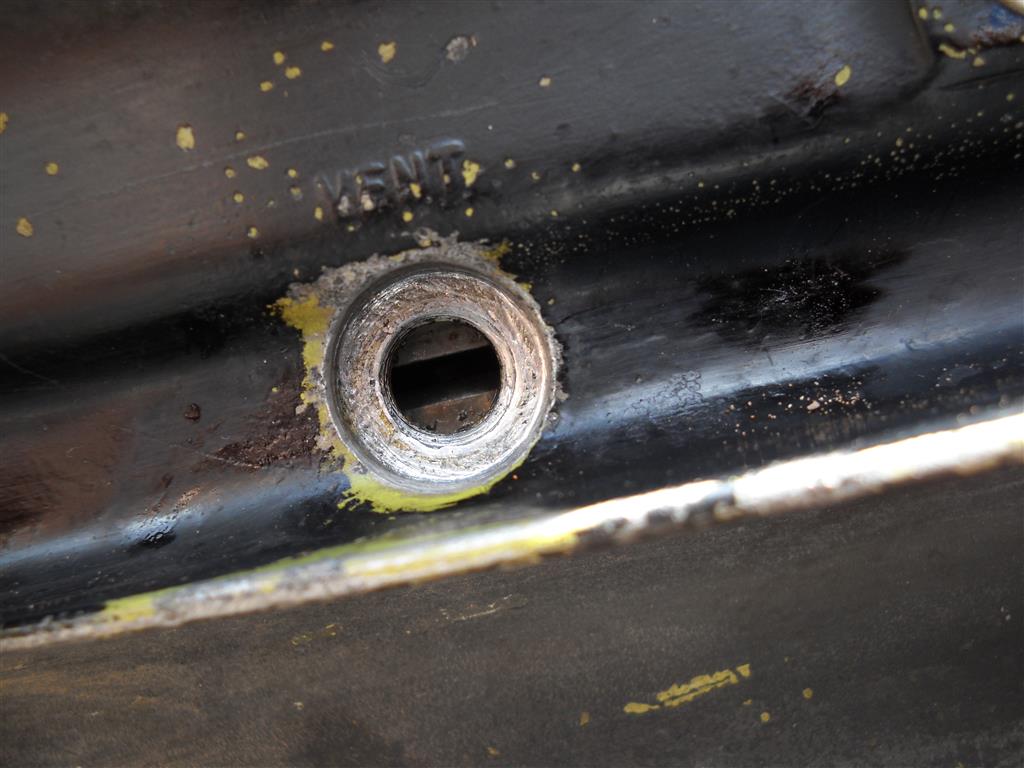
I'm still getting some water in my lower unit. Ran the pressure/vacuum tests again and as Tim suggested to me, I think the leak is at the fill or drain plug. I already have new plugs and washers ordered. Here's my problem. Both old plugs had nylon washers and also someone had put black fiber washers below those. The fiber washers appeared to be glued in very securely. Took about an hour with some adhesive remover and a small screwdriver to gently remove them. Underneath I found the sealing surfaces in the L.U. to be pretty bad. Looks like someone used a pocket knife to dig out old washers and scratched up the surfaces. Fill hole has a small chip near the threaded area as well. So, any suggestions on what type of sealer would work best on those surfaces and maybe on the threads? I'm thinking Permatex #2 but if you know of something better I'd like to try it. I know on a well cared for L.U. this shouldn't be needed, but this is an old motor with signs that someone did a fair amount of rough work on it in the past. Just trying to save my gearcase from water leaks. Edit: do those look like helicoils or did these motors come with thread inserts in the alloy case?
Attachments:

Please Log in or Create an account to join the conversation.

Re:Fill/vent plug seats 11 years 4 months ago #80025

  • Robby321
  • Robby321's Avatar
  • Offline
  • Contributing Member
  • Contributing Member
  • Posts: 902
  • Karma: 42
  • Thank you received: 10
I'd use Blue RTV sealent. Let it cure with the fiber gasket in, fill oil, and slam the plug screw in.

You could try a Dremel, with a flap wheel (using the end) to smooth out the surface too, but how to keep the grit out the LU would take some thinking. Only other way is strip the guts, get a proper counter bore cutter, and re surface. Back together new seals, and good to go..(winter project there)

Please Log in or Create an account to join the conversation.

Re:Fill/vent plug seats 11 years 4 months ago #80034

  • Robby321
  • Robby321's Avatar
  • Offline
  • Contributing Member
  • Contributing Member
  • Posts: 902
  • Karma: 42
  • Thank you received: 10
Wait a sec, as maybe try this.

Caliper the OD the seal diameter. Get a twist drill same diameter. Now cut it flat with a abrasive wheel cut off machine.

Take a abrasive "stone"..(ike the kind you would use hand sharpening old metal cutting tool bits, lathe.

Round off the edges so it won't "dig in". Now take the sharp cutting surface, and slightly "dull" the edge. Electric or air drill, and try to get a smooth surface. PLUG THE HOLE WITH HEAVY GREASE FIRST!

Reason for "dulling" in the soft material will grab and dig in. Its the way I did soft stuff, (Alum/Brass), as 21 years a Machinist.

Hope this helps you, as any others too.

Please Log in or Create an account to join the conversation.

Re:Fill/vent plug seats 11 years 4 months ago #80038

  • Normspeed
  • Normspeed's Avatar Topic Author
  • Offline
  • Gold Boarder
  • Gold Boarder
  • Posts: 528
  • Karma: 22
  • Thank you received: 1
I was thinking along those same lines but don't have the precision machinery available to make up a cutting tool. How about this? take a hardwood dowel the same diameter as a seal washer, cut to about 12" length. Glue a disk of wet or dry sandpaper on the end with contact cement. put it in the recess and spin it between your hands, sort of like you would spin a valve seat grinder tool in the old days.

To keep the grit out, I might be able to cut or grind the head off an old fill plug or cut a short section of a bolt with the same threads, slot the end for a screwdriver, and thread it into the hole flush, with grease on it, to plug the hole while I sand. Then clean out the grit with some spray cleaner like Lectra Motive, and unscrew the plug when done. Think that might work? The alloy is fairly soft. Then finish up with the RTV if needed.

Please Log in or Create an account to join the conversation.

Re:Fill/vent plug seats 11 years 4 months ago #80048

  • Robby321
  • Robby321's Avatar
  • Offline
  • Contributing Member
  • Contributing Member
  • Posts: 902
  • Karma: 42
  • Thank you received: 10
Yep on all! Your idea would work fine..(just grease the hole). I see a "why not try event" Share the results and glad to "do the think tank"...wet 55 years, messing with boats is WAY more fun than. Hmm, I could say more, but whoever has fun in life?..care less what ya do..(just get thinking and doing it!)

I was thinking along those same lines but don't have the precision machinery available to make up a cutting tool. How about this? take a hardwood dowel the same diameter as a seal washer, cut to about 12" length. Glue a disk of wet or dry sandpaper on the end with contact cement. put it in the recess and spin it between your hands, sort of like you would spin a valve seat grinder tool in the old days.

To keep the grit out, I might be able to cut or grind the head off an old fill plug or cut a short section of a bolt with the same threads, slot the end for a screwdriver, and thread it into the hole flush, with grease on it, to plug the hole while I sand. Then clean out the grit with some spray cleaner like Lectra Motive, and unscrew the plug when done. Think that might work? The alloy is fairly soft. Then finish up with the RTV if needed.

Please Log in or Create an account to join the conversation.

Re:Fill/vent plug seats 11 years 4 months ago #80060

  • Normspeed
  • Normspeed's Avatar Topic Author
  • Offline
  • Gold Boarder
  • Gold Boarder
  • Posts: 528
  • Karma: 22
  • Thank you received: 1
I appreciate the brainstorming. This old Merc keeps running better and better as I get it fine tuned.

Please Log in or Create an account to join the conversation.

Re:Fill/vent plug seats 11 years 3 months ago #81437

  • Normspeed
  • Normspeed's Avatar Topic Author
  • Offline
  • Gold Boarder
  • Gold Boarder
  • Posts: 528
  • Karma: 22
  • Thank you received: 1
update...The dowel with sandpaper worked OK to clean up those seats. I did pressure and vacuum tests afterwards and found another seal leak under the impeller. I replaced the seals, gaskets and o-rings there, and at the moment no leaks show up when testing. But, that's with the fresh seals and a bunch of grease on the shaft, and testing with a hand pump. I hope it holds up under actual running. Weather here has been pretty violent with lots of thunderstorms since it's now monsoon season in NM, so I haven't taken her up to the lake for a trial run.

Please Log in or Create an account to join the conversation.

  • Page:
  • 1
Time to create page: 0.176 seconds

Donate

Please consider supporting our efforts.

Glassified Ads

1967 23 ft powercat flybridge
( / Boats)

noimage
11-17-2024

Mercury outboard
( / Engines)

noimage
11-03-2024

Classic Mercury Outboard Motors
( / Engines)

Classic Mercury Outboard Motors
10-18-2024

FG Login

FiberGoogle

Who's Online

We have 6217 guests and no members online