Paint it Black
by Brian Lawson
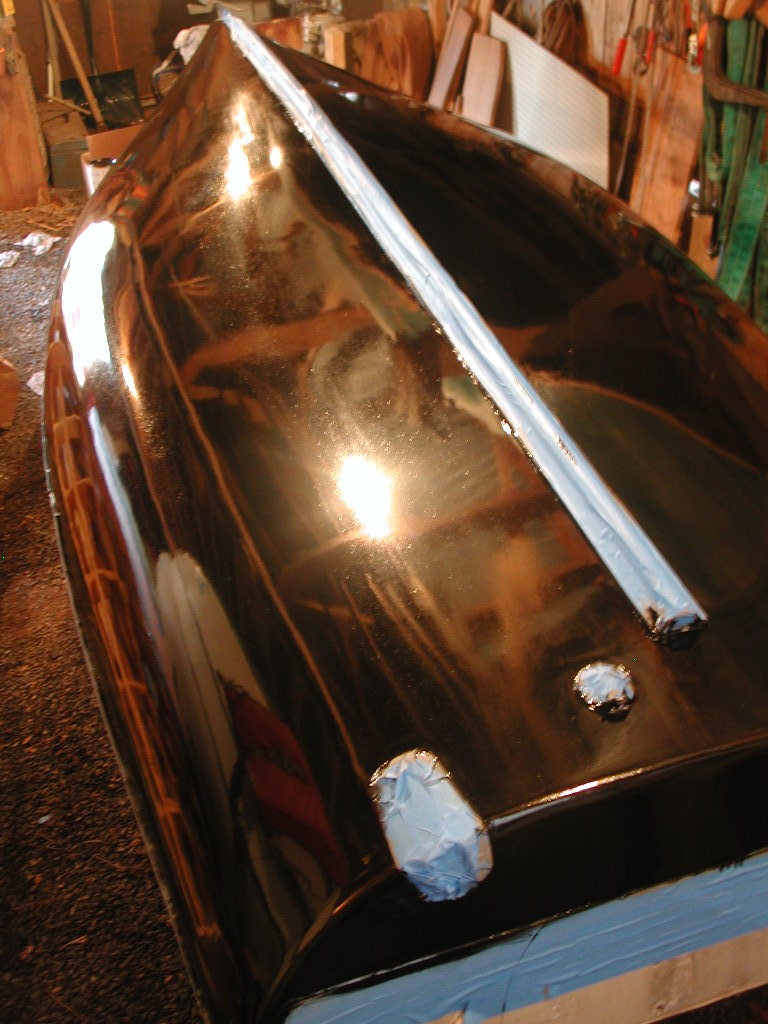
“I see a red door and I want to paint it black.” I’m dating myself here. Paint It, Black was a Rolling Stones hit of 1966. I remember it well, along with Ruby Tuesday and a line from that song that is my motto “Lose your dreams and you will lose your mind.” “Paint it black” strikes fear in the hearts of anyone who has ever tried to get a good finish with this color. But wait! Black is not a color. By definition, the absence of color is, well, black. Are we confused? Color or not, painting a boat black can be an absolute nightmare. But a good black paint job (or any other dark color) is a beautiful thing on a boat. After restoring many boats and applying a rainbow of colors (including the not a color – black) I have developed a technique that I think will work for anyone willing to give it a try; wood or fiberglass. So I will describe, probably in more detail than need be, how to get a really nice finish using the high gloss paints available to us. In particular, I will focus on the Interlux Brightsides line of paints as I have developed a love affair (shows you how needy I am) with this line of paint.
First we need to discuss the spray versus brush controversy. I don’t spray. My shop is not set up for it. To spray the one and two part paints on the market today really requires extraordinary safety measures. Isocyanate aerosols are not something you want to be breathing in. The manufacturer recommends using the roll and tip method. If you’re lucky enough to have two skilled people, one working the roller, and the other the tipping brush, then give it a try. For me, after years of experimenting, I have developed a process using high quality foam brushes, Interlux 333 brushing liquid, and the Interlux Brightsides line of paints that yields results about as close to spraying that I think is possible. And you can do it all by yourself. It will take 3 to 5 coats to get the finish you want. So, let’s begin.
Preparation
It’s no secret that preparation for a truly good paint job is essential. And, it’s no exaggeration that 95% of the time that goes into a paint job should be spent on surface preparation. You’re only going to spend a few hours with brush in hand. You should be planning many hours longer than the actual painting time preparing the surface. Paint does not fill in cracks, holes, etc. It actually accentuates them.
For wood, all the old paint should come off. I use a chemical stripper for this job. It’s nasty stuff, and should be used in a well ventilated space. I don’t like sanding off old paint or using heat guns. Old paint can contain some really nasty heavy metals. I prefer to work the surface wet which keeps this from going airborne. It takes me typically 3 applications of stripper to get to bare wood. I recommend a scraping tool that you pull towards you, not push away from you. It is much easier to control the blade and causes less gouging of the wood. I like a long handled tool with a knob over the blade for one hand. I also like a 4 blade tool that allows you to quickly rotate the blade when dull. And, when you’ve used all four blades, don’t throw the blade away. It can be easily sharpened on a stone and reused. Once the old paint is off and the wood is dry give it a good sanding to remove any residue.
The next job is to start filling the nicks, dings, and gouges with filler. There are several options here. Pettit 7191 epoxy mender is an easy to spread 1 part filler. It dries quickly and sands easily. As much as this may be heresy for wood boat owners, you can also use fiberglass fillers with excellent results. For example, if you have a long or deep gouge, try a first layer repair using long strand fiberglass filler (often called kitty hair). This two part filler is mixed with a cream hardener paste and then pressed into the repair area using a putty knife or preferably a plastic blade. Screed the area and go a little high with the material. When dry sand the repair area well with 80 grit paper. Then overcoat the repair area with either Pettit 7191 or again you can use a lightweight 2 part fiberglass filler to fair the repair. Again, when dry, sand the repair fair with the surrounding wood. Check your existing filler in screw holes, bolt holes, etc. and if lose, remove it and replace it with new filler. Sand the entire area to be painted with 120 grit paper when done with the repairs. I use an 8 hole 5” Dewalt sander that I connect to a 40 foot flexible swimming pool hose. This long hose runs out of the shop to my shop vacuum. When running the noise of the vacuum is outdoors, but more importantly, any dust that makes it past the filter system is also outdoors.
For fiberglass boats the preparation can be daunting. If your gelcoat is in good condition (no cracks, crazing, etc.) but just really faded, use the sander described above and using either 50 or 80 grit paper sand the gelcoat to completely dull it. Be careful on molded parts with sharp angles or round edges that the sander doesn’t cause flat spots. You may want to hand sand these areas. If your gelcoat is cracked or crazed you need to sand through the crack to eliminate it. If you don’t I guarantee it will show through the paint job. You can chase a few cracks by grinding them out using either an angle grinder (which makes a heck of a mess) or using your sander on an angle. If your gelcoat is heavily checked as often occurs on old boats, consider sanding the gelcoat off the entire surface. It’s only about 0.035 thousands of an inch thick Get down close to the finish layer of cloth that lies under the gelcoat. If you need to paint a molded in anti-skid surface, don’t sand this as it will destroy the mold. Instead, try taking a heavy wire brush to these areas and really work the wires into the anti-skid areas to dull the gelcoat.
Fiberglass repairs are done next. Again, gouges, dings, dents, etc. can be base repaired with the long strand filler, and then the finish filler as noted above. Check your surface carefully and fill and fair as necessary. Consider skim coating the surface if need be using light weight two part filler. This will fair the surface and eliminate flat spots. I buy a 12” painters edging tool with a metal blade and use this to screed the material on the surface. You don’t want to be too heavy with this material. The long screed and sharp blade helps keep the amount applied light. When dry, sand smooth with 80 grit.
So wood or glass, if you think you’re done with surface preparation, the next thing to do is take a walk around the boat and truly convince yourself it is ready for paint. If you are convinced, then we’re ready to paint. Remember, any imperfection you can see now will be accentuated when painted.
Cleaning
The surface to be painted must be clean as a whistle. Vacuum the surface to be painted, then tack rag it, and finally, wash the surface with Interlux 333 brushing liquid and a lint free cloth. You will go through this exercise every time you prepare to apply a coat of primer or finish coat.
The Brush
The brush I recommend is made by the Wooster Brush Company of Wooster, OH. It is a high quality disposable foam brush. You can get them at Lowe’s for about $2.25 each. I buy them by the dozen, use them once and throw them away. It will stand up to one and two part paints. The cheap ones on the wooden handles disintegrate.
Priming
The primer used for Interlux Brightsides is Interlux Pre-Kote (white or gray). The primer is rather special for fiberglass boats, but adheres equally well to wood. The primer actually dissolves the fiberglass layer and then provides a chemically compatible surface for the finish paint to bind to. It’s sort of like two sided sticky tape. Here is where the tricks I’ve learned begin. Just before beginning to paint, apply a little Interlux 333 brushing liquid to a clean lint free cloth and moisten the area you will paint. I moisten about 4’ of space at a time. Now start painting. The Interlux 333 brushing liquid mixes with the paint as it is applied and helps it flow and level out. Here is another good place to stop and walk around and look at what you just painted. Are you pleased or displeased with what you see? If displeased with the surface preparation, fix it now, it will only get worse, not better. When the primer is dry, sand it with 220 grit and go through the cleaning process above, and then second coat it, again, using the Interlux 333 ahead of where you’re painting. If you think a third primer coat is needed, repeat sanding, cleaning, etc.
Finish Coat
When ready to apply the first coat of finish, sand the primer with 220 grit and go through the cleaning process. Really focus on getting every bit of residue off the surface. Next, open your Interlux Brightsides finish paint and stir well. Don’t shake the can. Find a piece of clean scrap wood, cover it with plastic wrap. Take one of the foam brushes dip it in the paint and paint the plastic wrap to condition the brush and get it wetted. When the brush is conditioned, apply 333 liquid to the surface to be painted. Keep it good and moist, but not runny. Apply the paint working it in well with the brushing liquid and finishing with long strokes. Keep the amount on the brush light until you get a feel for it. Too much paint and it will run. Then wet the area ahead of you and repeat, blending in each new area to the last. Do NOT paint over prior areas with the exception of blending each area. Just let it be. The 333 liquid with the paint will level out beautifully. When dry, sand with 320 grit. Clean fastidiously again and repeat the application again, conditioning the brush, applying the 333 liquid, etc. Repeat until you like the coverage. I suspect this will be 2 coats minimum, and up to perhaps 5 coats.
Applying the paint may take some getting use to. Don’t stress about it. Worst case you can sand it off and start over.
The finish you will end up with will be as close to a sprayed appearance I think possible. If you can get a great paint job in black, you’re ready to handle any color of the rainbow. Good luck!


