Welcome, Guest
Username: Password: Remember me

TOPIC: 1963 Glastron V143 JetFlite Restoration

1963 Glastron V143 JetFlite Restoration 11 years 11 months ago #69836

  • Kern
  • Offline
  • Junior Boarder
  • Junior Boarder
  • Posts: 105
  • Karma: 17
  • Thank you received: 1
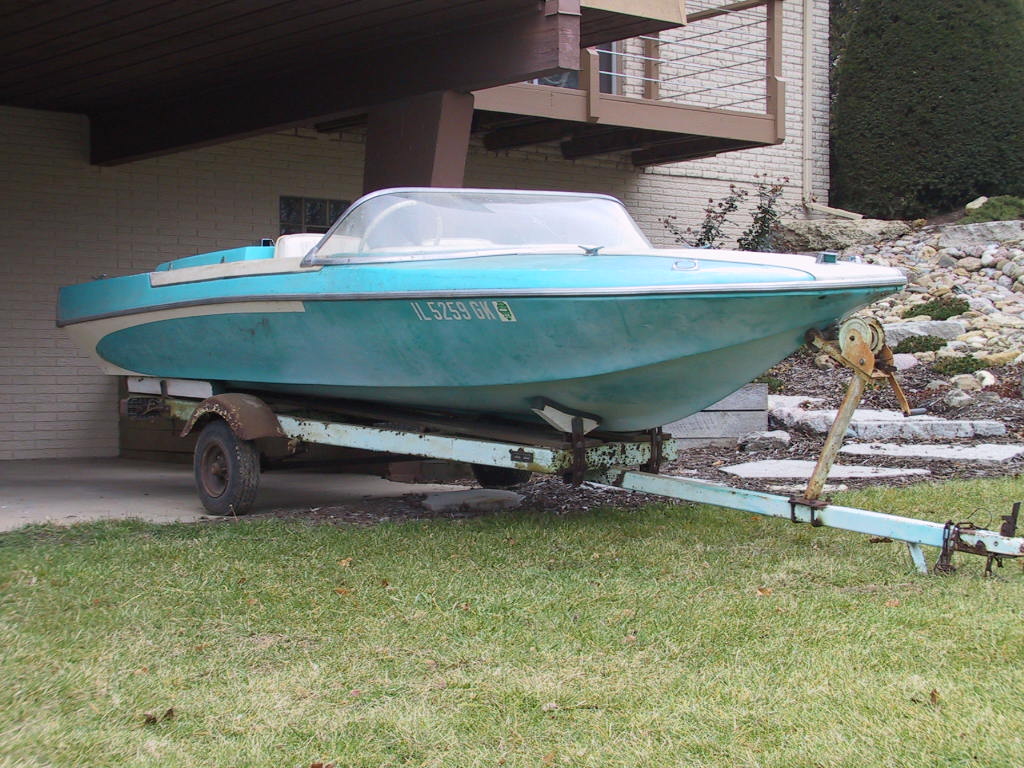
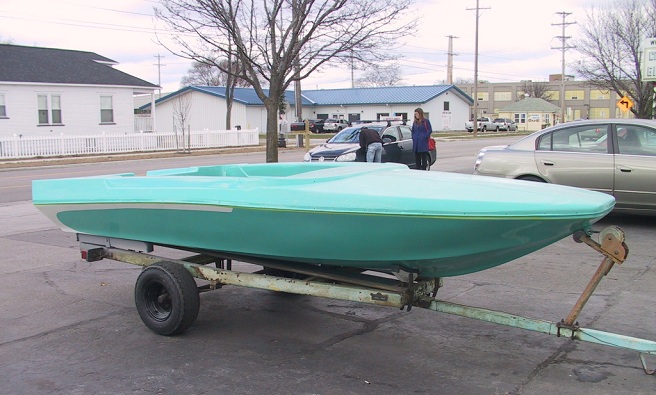
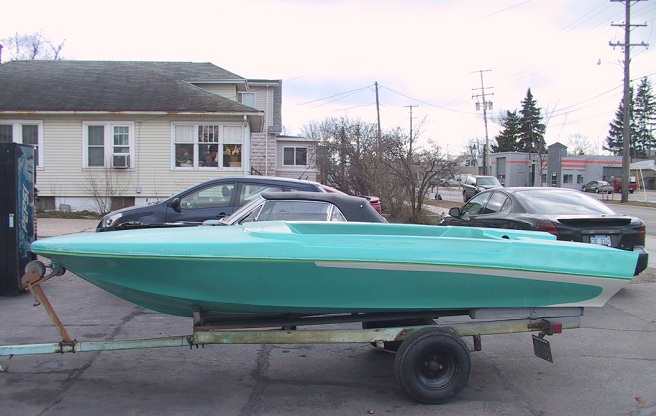
I am in the process of restoring/updating a 1963 Glastron V143 JetFlite. It has the tonneau covers that cover the rear portion of the cockpit and make the boat into a two seat sports runabout. The covers can be removed when needing more room for other passengers. If anyone wants to see what the boat looked like when new and factory fresh, there are pictures on the Classic Glastron web site ( www.classicglastron.com ). Click on the Values, Rarity, and Collectibility page and scroll down to 1963.

The basic hull shape was sold from 1961 to 1963. The 1963 was the only year that had the optional tonneau covers and was the only year with the aqua/white color combination. I believe that the tonneau cover idea was inspired by the 1962 Ford Thunderbird Sports Roadster, which had a cover over the rear seat to make it into a two seater.

This boat was not a “find” as I have owned it from new. I was looking for a boat of this size back in the early sixties. I was single and worked at Ford Engineering in Dearborn, MI at the time. One day I went to the bank at lunch and saw this boat on a trailer in front of a marine store. I was absolutely grabbed by the style. I looked at it more closely after visiting the bank, thought about it all afternoon, and went back to buy it after work that day.

As purchased, this boat had several differences from the catalog illustration. This boat was also different from pictures that I have received from other owners. This may be an indication that this is a later production unit and there were design or vendor changes during the production year. The changes noted on this boat relative to the catalog illustration were:

1. The bow light was located close to the bow rather than
back by the windshield, probably to minimize glare from
the white trim on the foredeck during nighttime operation.
2. The cleats look to be a different design, although the
factory picture of the cleats is not real clear.
3. The stern light appears to be a different design.
4. The scoops at the front outer corners of the tonneau
covers appear to be a different design.
5. The factory picture shows white welting along the rear
edges of the tonneau covers. This boat had no welting on
those edges.

Through the early years of ownership, I used it a lot. Then we moved to Illinois and I started a new business. Time and water access restricted usage and I had not had it out since 1995. I figured it was time to sell but did not get any significant responses, so I decided to get it restored to enjoy some more, and, perhaps, recapture some of my youth!

Pictures prior to starting and during the early phase are included. The restoration will not be a perfect factory restoration as some materials are no longer available and, having owned and used the boat for so long, I have some improvements/updates that were desired. However, the basic shape will not be altered and the original color is being matched closely. The trailer is also being restored, will be set up specifically for this hull only, and will be color matched to the boat. If it runs OK, I will use the original 65 HP Mercury that I bought shortly after purchasing the boat.


Will I be spending more than the boat is worth - probably. However, as far as I can tell, there were not many of these produced and there are probably very few left. I feel that it is worth it as a part of the Glastron legacy. Hopefully, in the future some new caretaker will also feel the same about it.

Please Log in or Create an account to join the conversation.

Re: 1963 Glastron V143 JetFlite Restoration 11 years 11 months ago #69839

Very nice, good luck!

Please Log in or Create an account to join the conversation.

Re:1963 Glastron V143 JetFlite Restoration 11 years 11 months ago #69936

  • Kern
  • Offline
  • Junior Boarder
  • Junior Boarder
  • Posts: 105
  • Karma: 17
  • Thank you received: 1
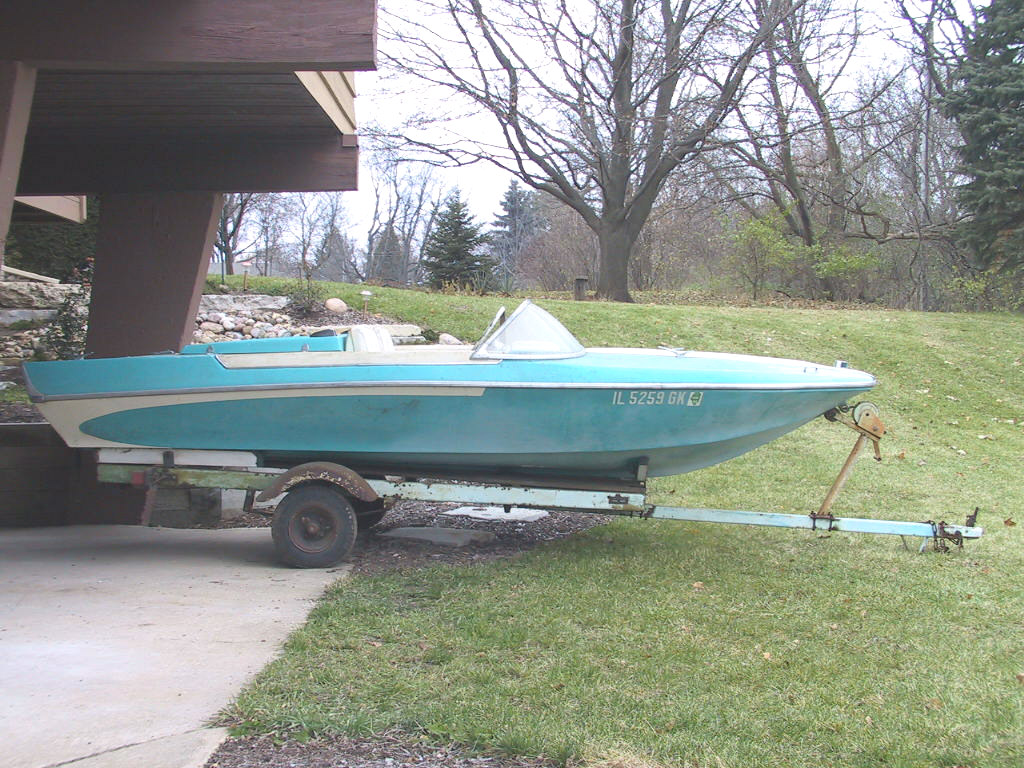
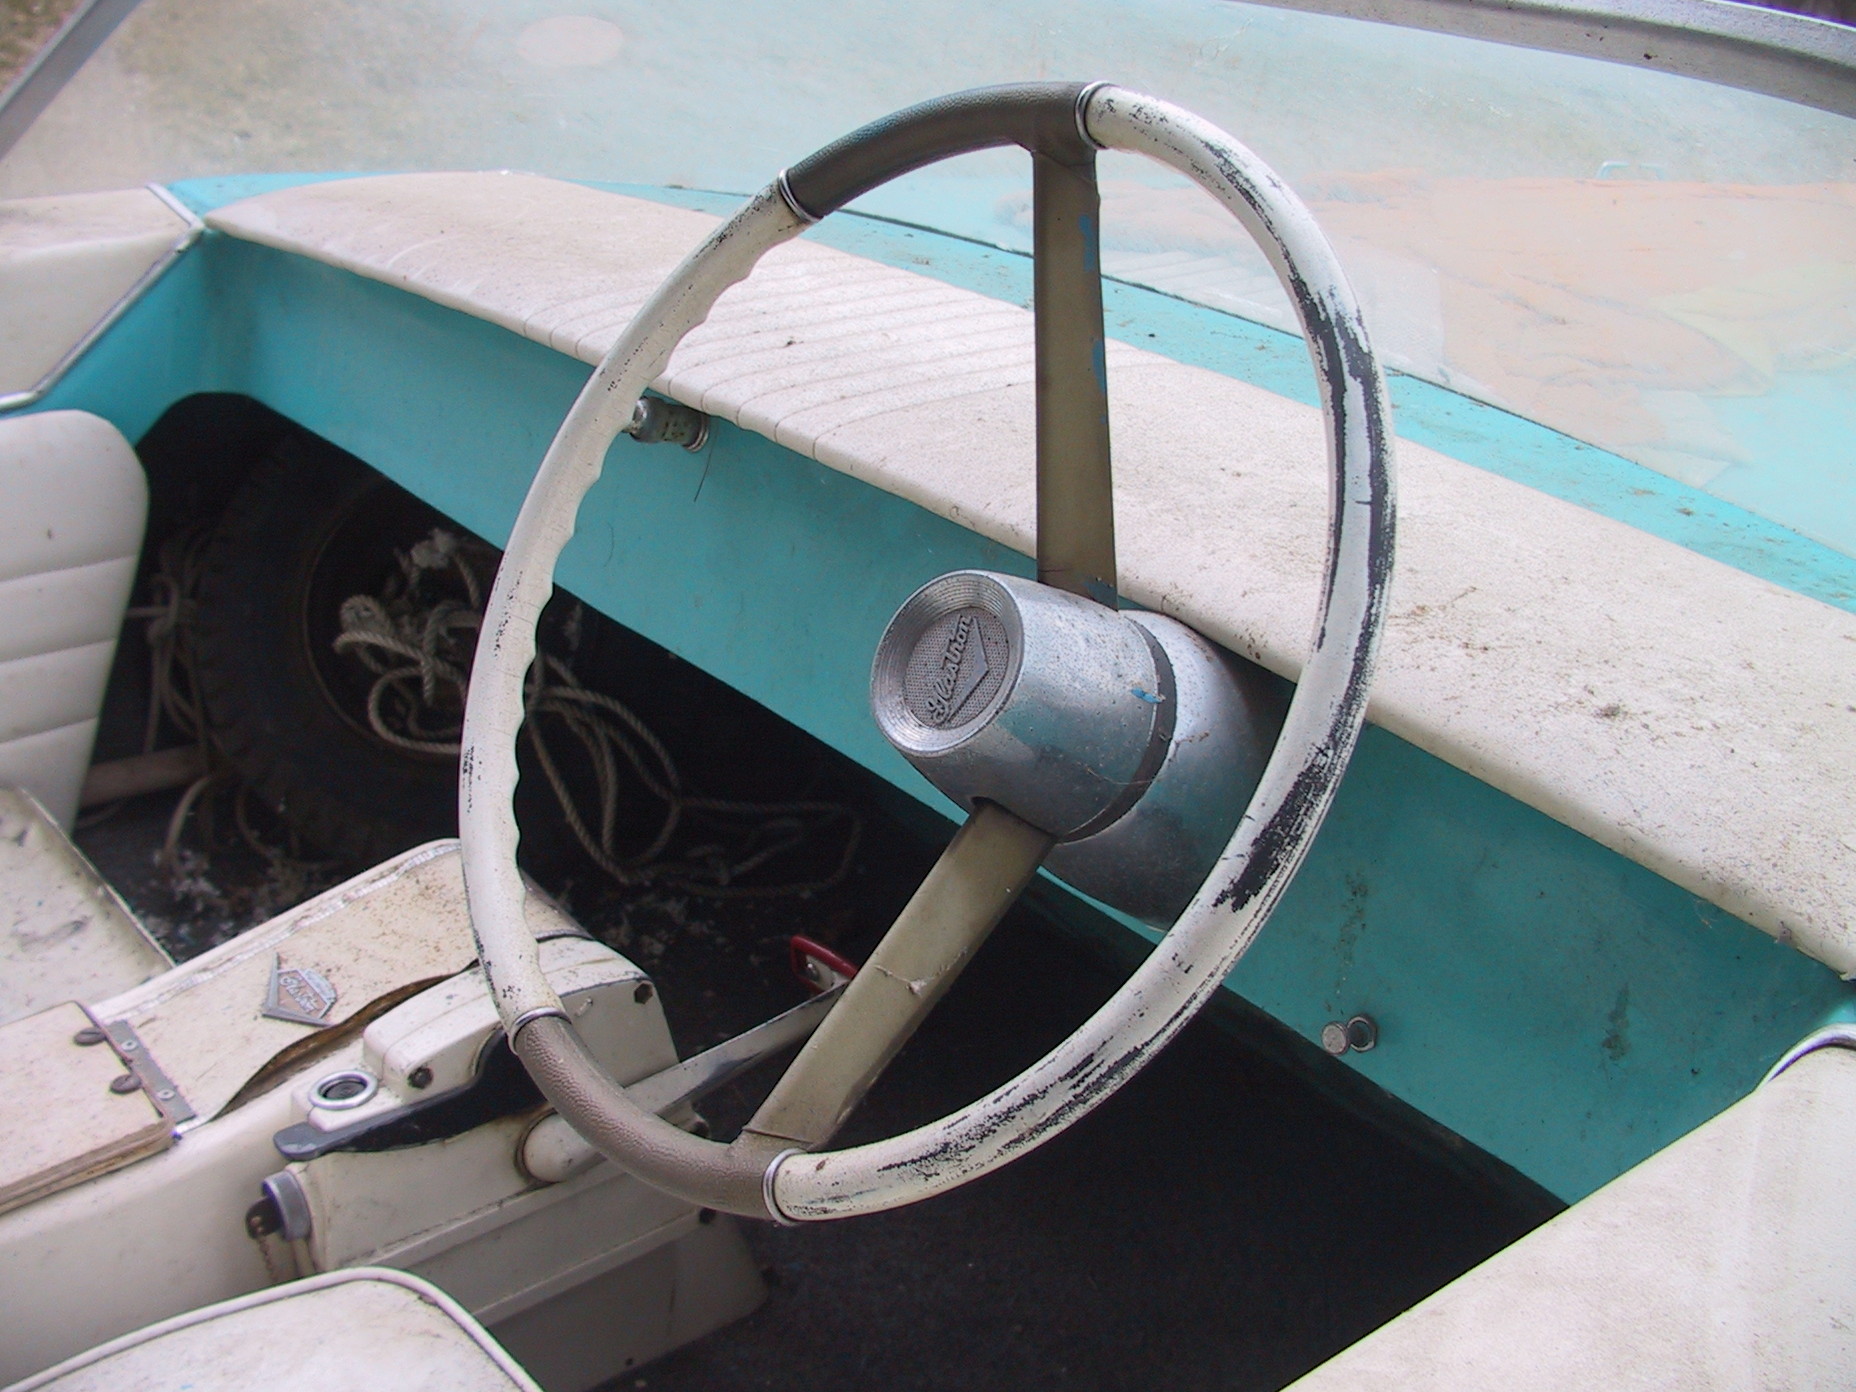
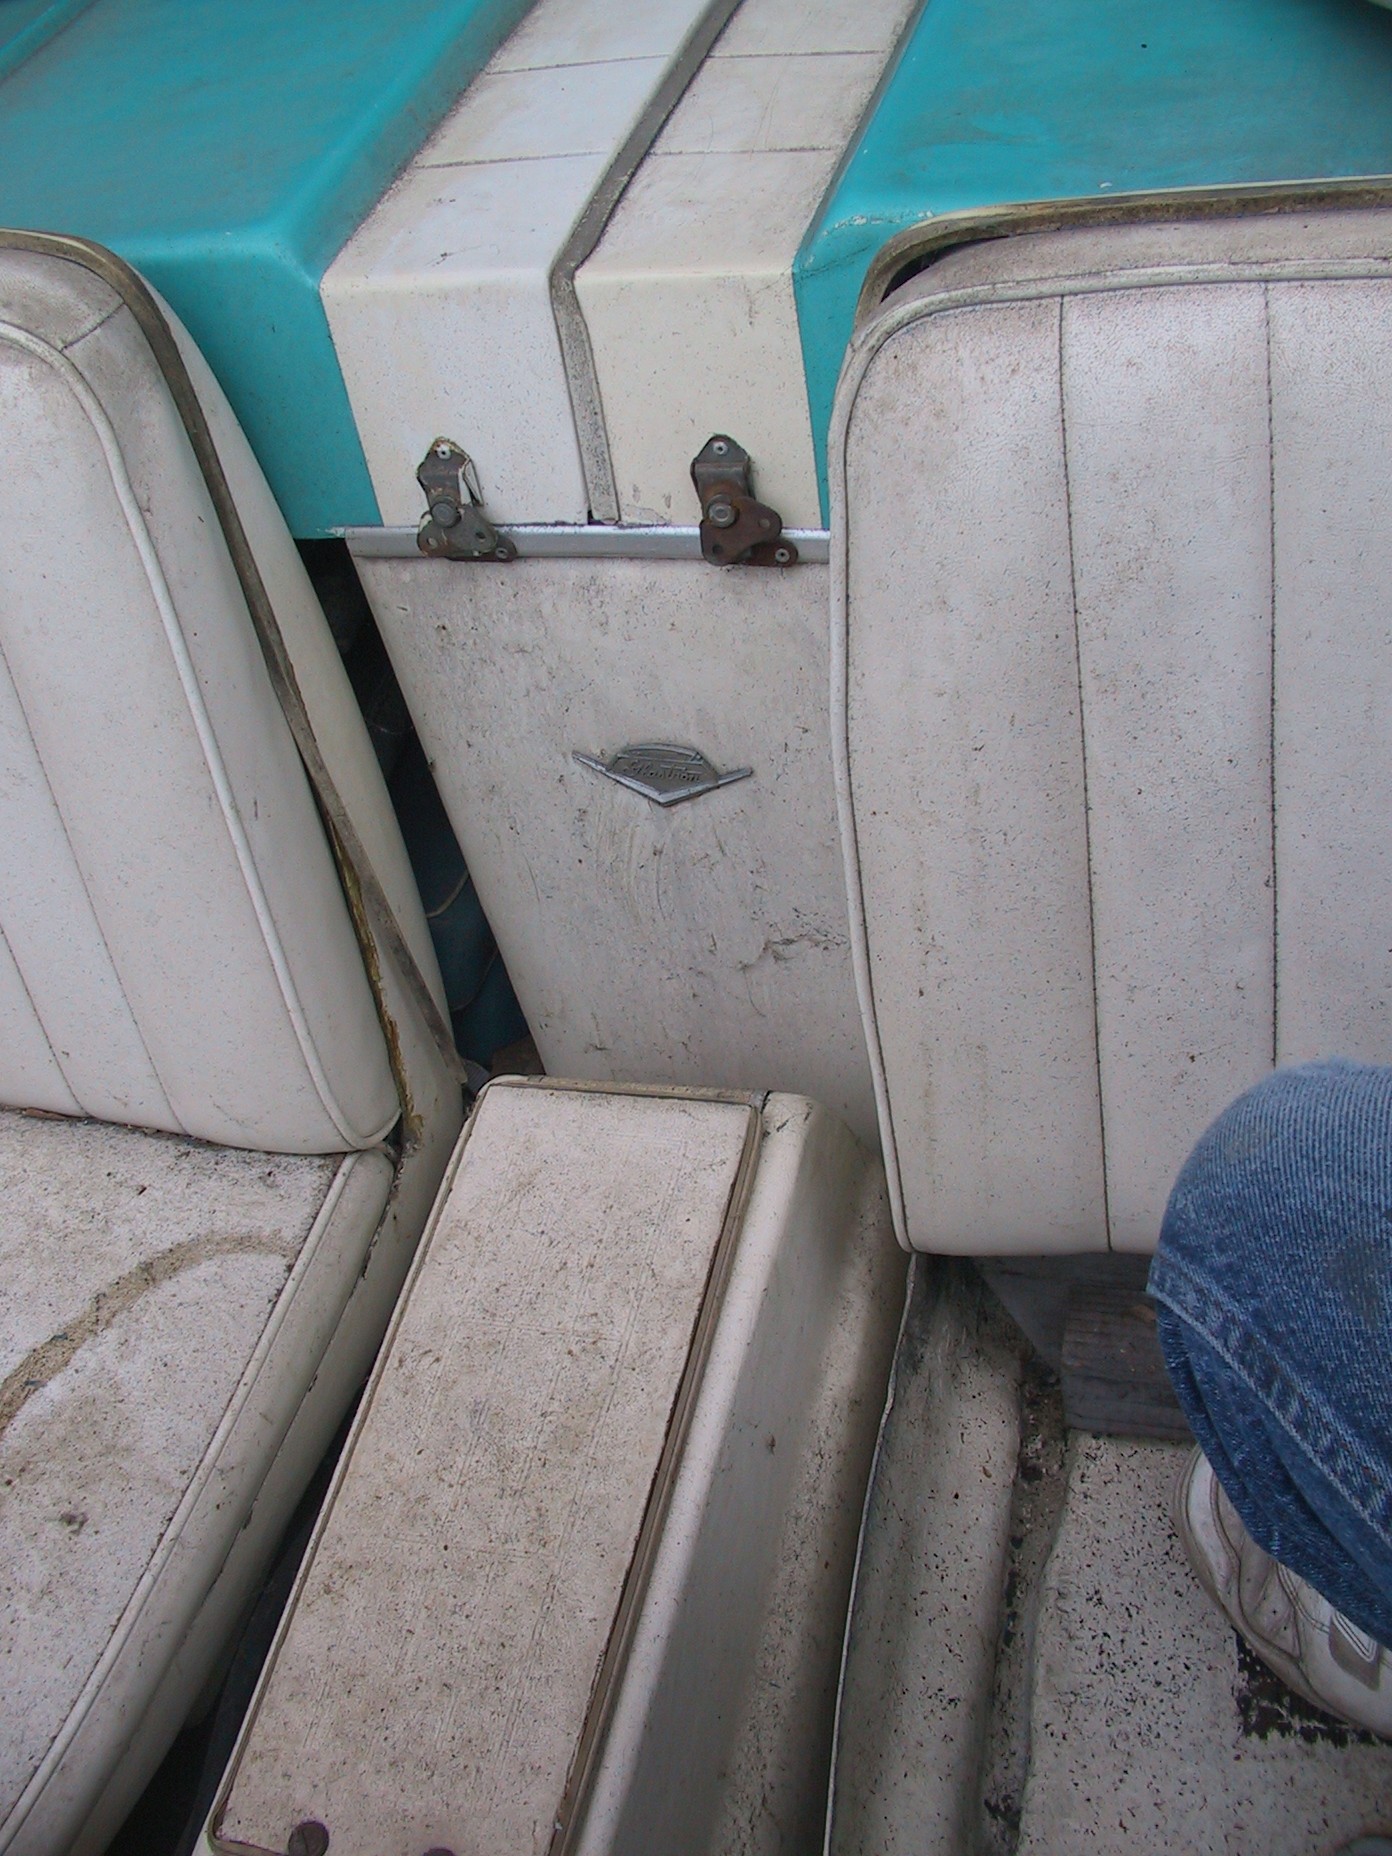
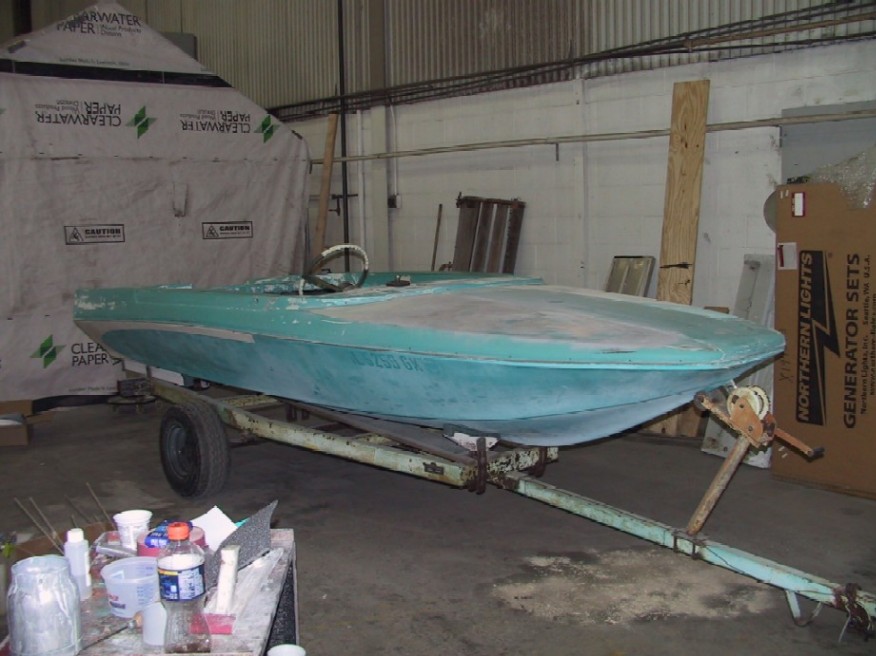
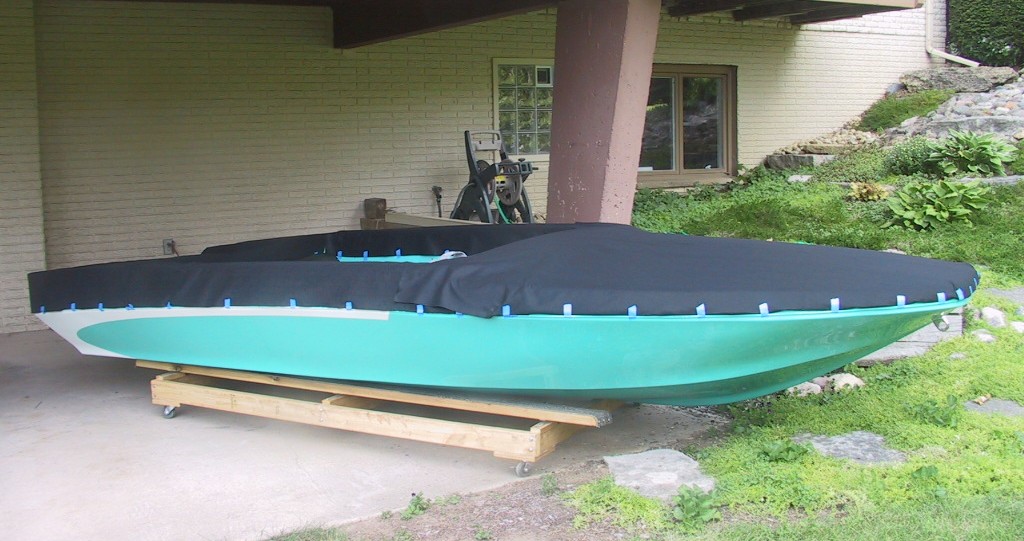
A couple more pics of the boat prior to being taken for restoration.
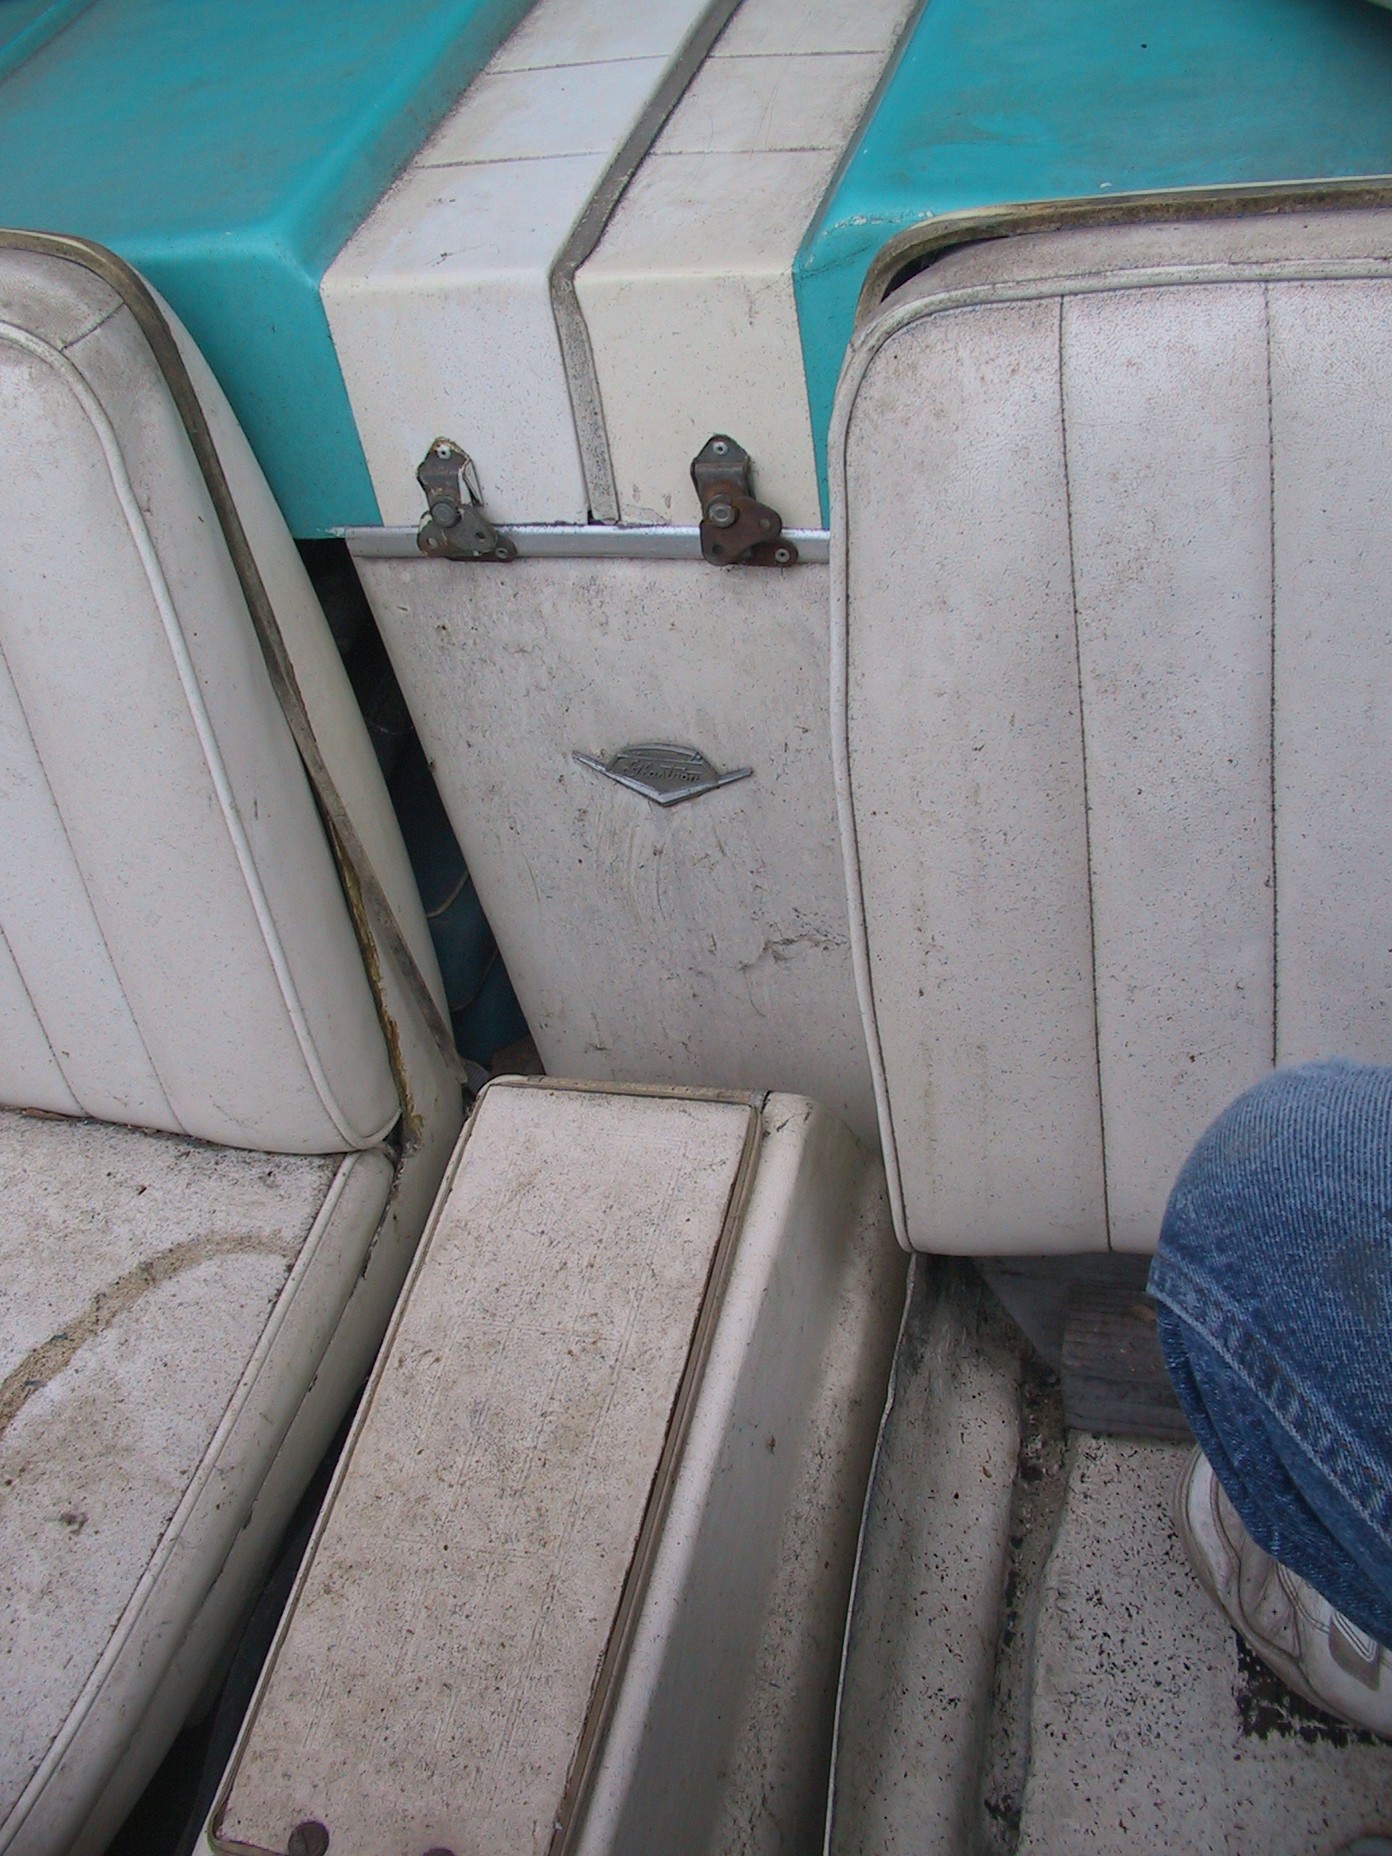
A detail of the center console, front tonneau cover support, and seat construction.

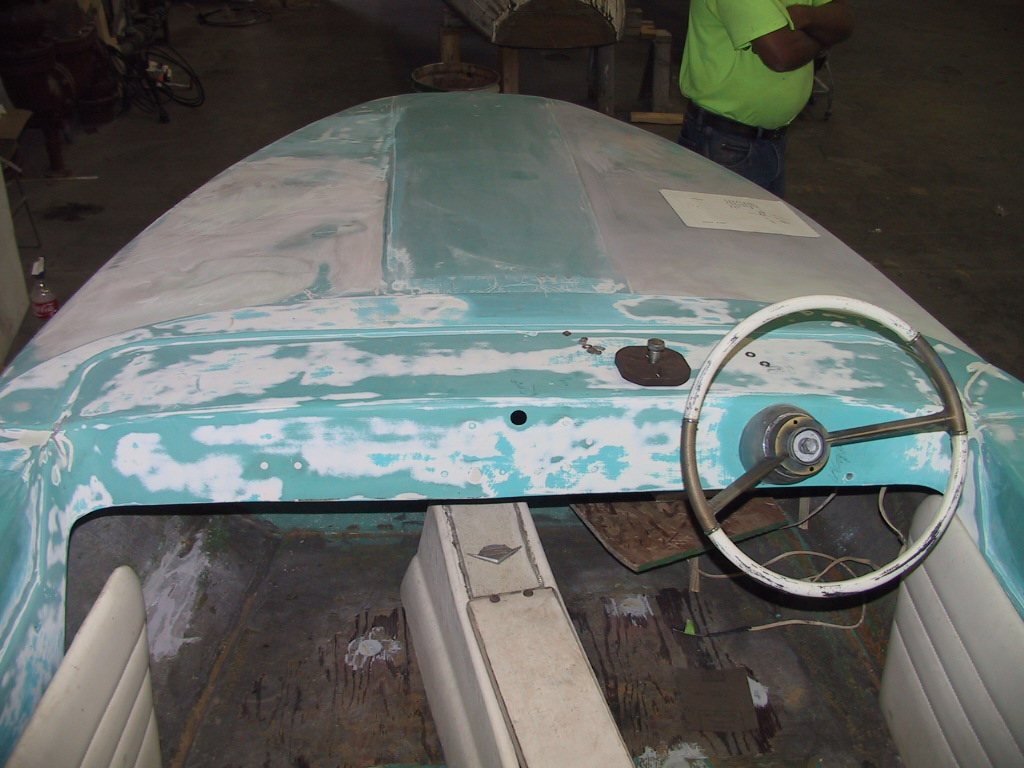
The factory instrument panel and helm. The upholstery material and pattern are not factory as they were redone in the mid eighties.
Attachments:

Please Log in or Create an account to join the conversation.

Re:1963 Glastron V143 JetFlite Restoration 11 years 10 months ago #70736

  • Kern
  • Offline
  • Junior Boarder
  • Junior Boarder
  • Posts: 105
  • Karma: 17
  • Thank you received: 1
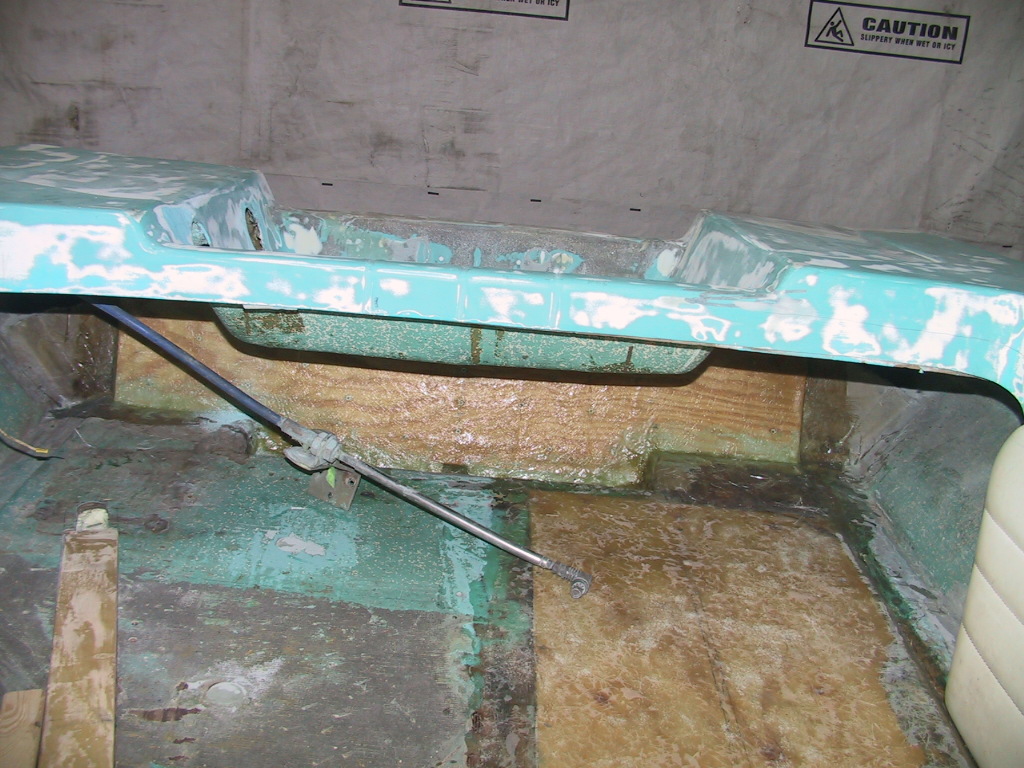
The shop chosen for the restoration is Starboard Marine Restoration in Muskegon, MI. They have started to renew the hull. The transom had rot in the center so the center section was replaced and an internal cross board was added to tie the new center to the outer transom boards. A section of the floor on the port rear corner was replaced because it was weak. The stringers were inspected and were sound. Expanding foam was injected into the cavities between the hull bottom and floor for flotation and to stiffen the hull.

The decks are being filled and sanded to repair minor cracks and to smooth the low spots in the original surfaces.

The new transom center section is shown.

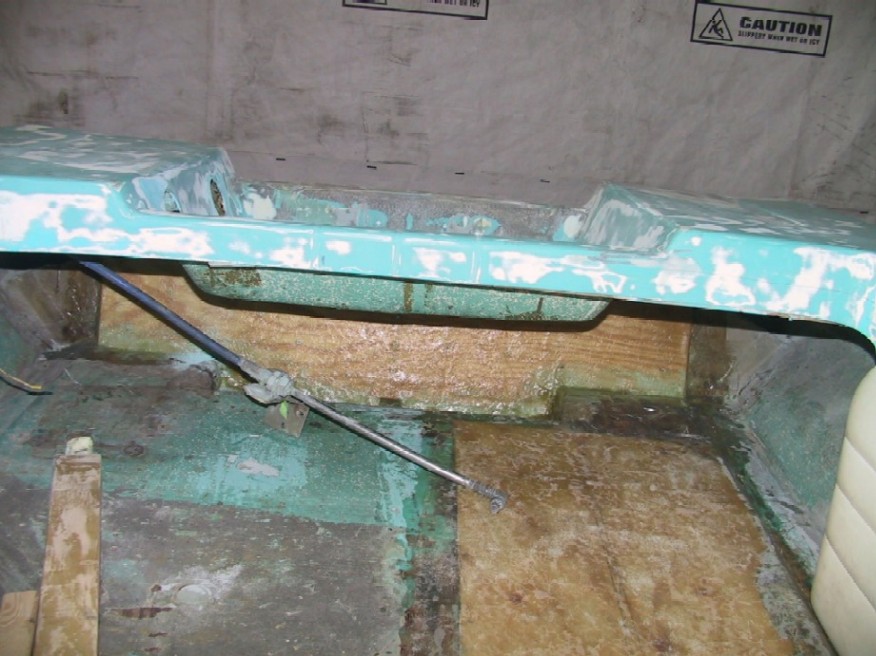
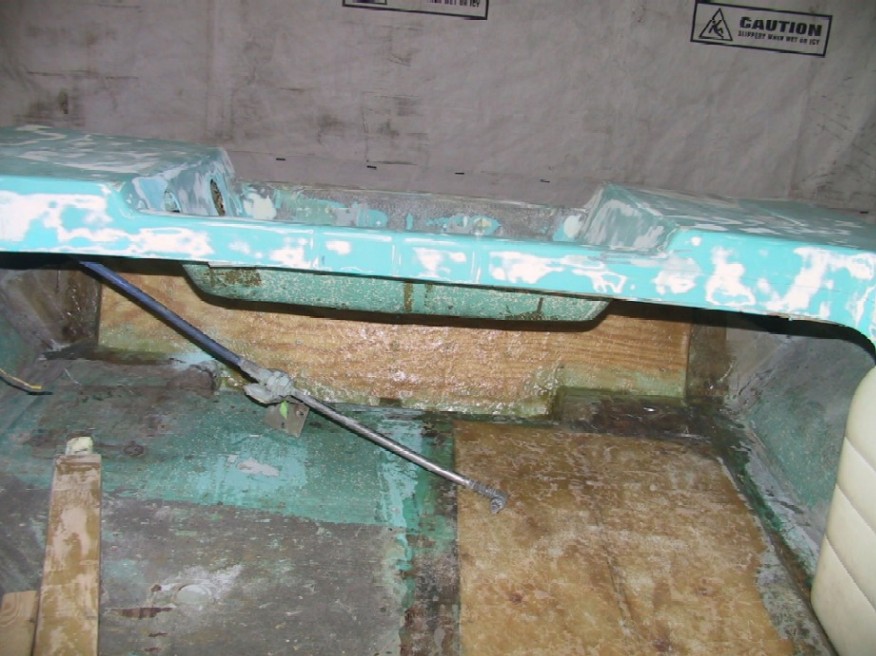
The transom load board is shown below the motor well. The new floor section is shown on the right in the photo. The angled strip of new wood on the left in the photo is a cover for a channel that was cut into the floor so the motor control cables could be routed under the floor and out of sight.

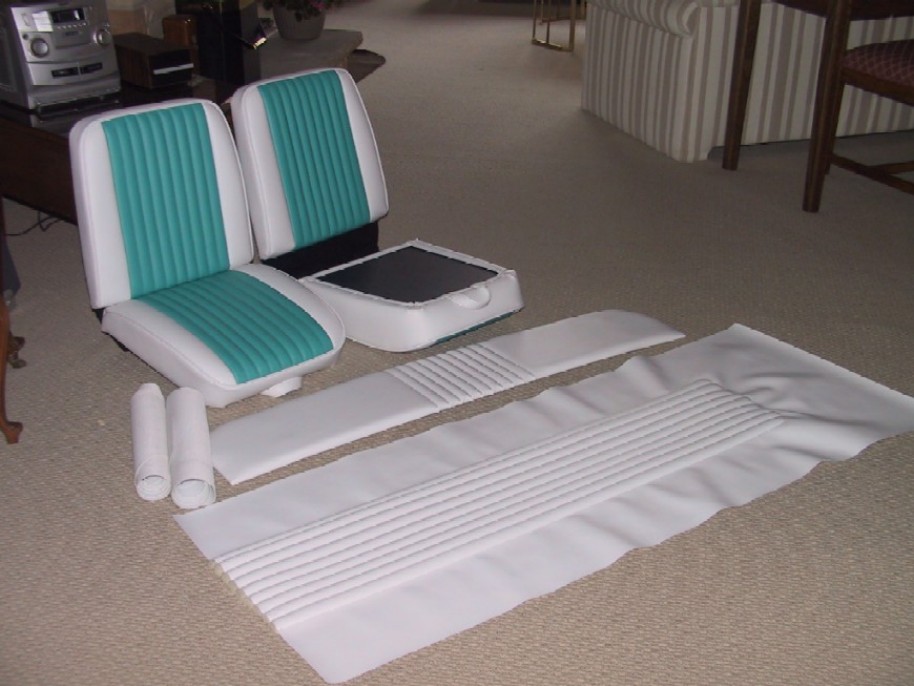
Some of the retrimmed interior parts. The aqua color was chosen as the closest match to the original hull gel coat color. The trim design is not original as those items are not available. A design was chosen that looked interesting and would add some spark to the interior. The hull color will be matched to the aqua upholstery color and will be quite close to original.

The upholstery shop selected for the work is not a marine upholstery specialist. Schober's Trim in Sandwich, IL is a shop that specializes in hot rod and custom car interiors. At first they were not interested in doing a boat. However, after explaining that this was a collector boat and was rather rare, they agreed to accept the project.

Please Log in or Create an account to join the conversation.

Re:1963 Glastron V143 JetFlite Restoration 11 years 10 months ago #70739

  • Neil
  • Neil's Avatar
  • Offline
  • Platinum Boarder
  • Platinum Boarder
  • Posts: 1997
  • Karma: 65
  • Thank you received: 1
Looking good.

Please Log in or Create an account to join the conversation.

Neil and Mary Ousnamer

Re:1963 Glastron V143 JetFlite Restoration 11 years 10 months ago #70753

  • MarkS
  • MarkS's Avatar
  • Offline
  • Moderator
  • Moderator
  • Posts: 5348
  • Karma: 118
  • Thank you received: 5
That is going to be one beautiful JetFlite when you're done Kern, please keep us posted on your progress.

Please Log in or Create an account to join the conversation.

Mark

Re:1963 Glastron V143 JetFlite Restoration 11 years 10 months ago #70779

  • 63 Sabre
  • 63 Sabre's Avatar
  • Offline
  • Contributing Member
  • Contributing Member
  • Posts: 4676
  • Karma: 147
  • Thank you received: 167
I can see why the original boat caught your eye, she's a beauty to be sure. I'll be following the progress.
Cal

Please Log in or Create an account to join the conversation.

Re:1963 Glastron V143 JetFlite Restoration 11 years 10 months ago #70789

  • Kern
  • Offline
  • Junior Boarder
  • Junior Boarder
  • Posts: 105
  • Karma: 17
  • Thank you received: 1
Thank you all for your kind words. I definitely plan to keep the progress reports coming. Unfortunately, I am about 250 miles from the restoration shop so I cannot get there as often as I would like and I am going to have to depend on the shop owner for update photos.

Perhaps he is thankful that I cannot camp on his doorstep.

Please Log in or Create an account to join the conversation.

Re:1963 Glastron V143 JetFlite Restoration 11 years 10 months ago #70803

Beautiful lines and the interior is going to look GREAT!

Bob

Please Log in or Create an account to join the conversation.

Re:1963 Glastron V143 JetFlite Restoration 11 years 10 months ago #70858

  • Shelby18
  • Shelby18's Avatar
  • Offline
  • Contributing Member
  • Contributing Member
  • Posts: 436
  • Karma: 18
  • Thank you received: 0
Kern wrote:

Unfortunately, I am about 250 miles from the restoration shop so I cannot get there as often as I would like and I am going to have to depend on the shop owner for update photos.

Perhaps he is thankful that I cannot camp on his doorstep.


Mine must love me I'm 2,300 miles away currently.:lol:

Please Log in or Create an account to join the conversation.

Great to be on board.
Rick

Re:1963 Glastron V143 JetFlite Restoration 11 years 9 months ago #72312

  • Kern
  • Offline
  • Junior Boarder
  • Junior Boarder
  • Posts: 105
  • Karma: 17
  • Thank you received: 1
The project has run into a couple of small bumps in the road but has been continuing to move forward. The original restoration shop lost its lease and did not have enough business to find a new location. The owner moved the business back to his home shop and does not have room for this project.

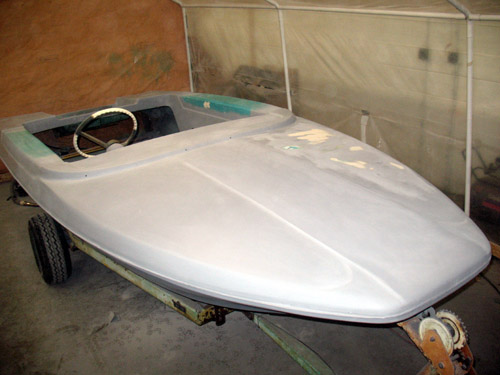
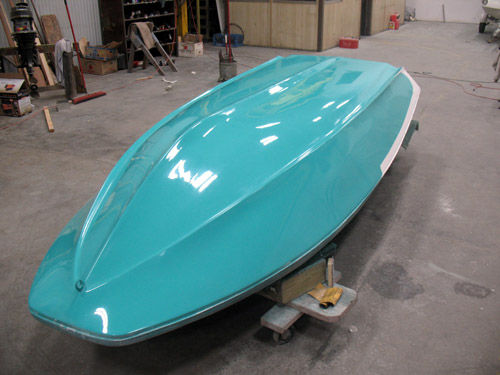
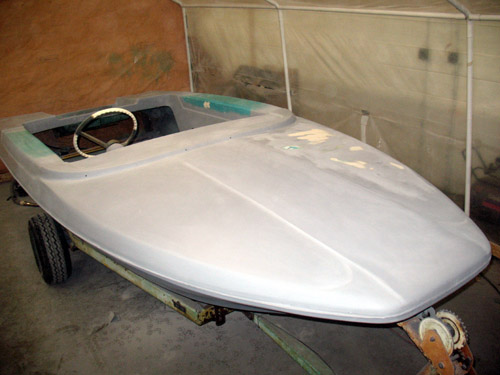
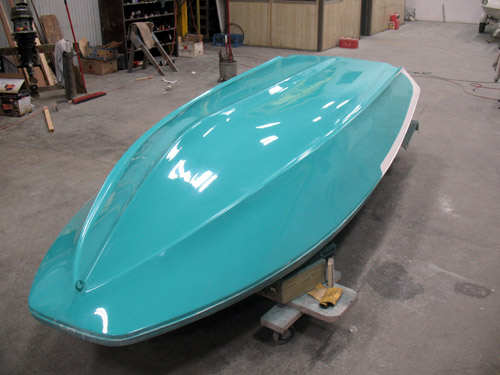
Prior to their move out, they did complete the paint, clear coat, and polishing of the hull below the rub rail. They also painted the top deck.

The faired and partially primed top deck. A considerable amount of filling and sanding was required to flatten the waves that were in the original fiberglass.


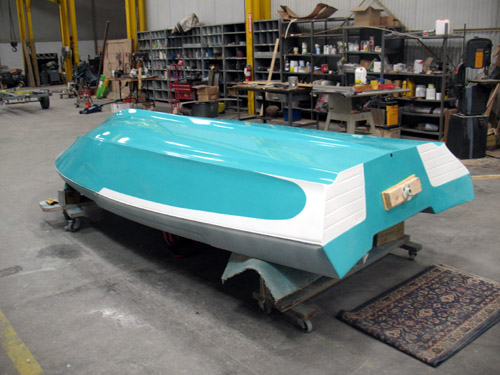
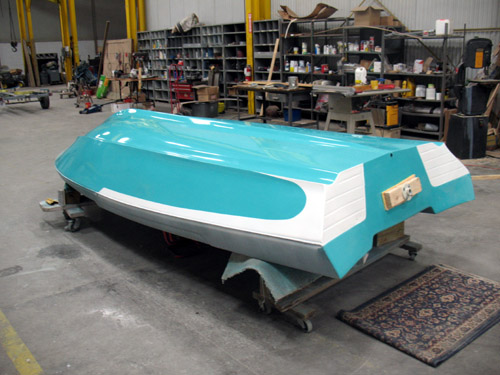
The bottom & sides after paint, clear coat, & polishing. The bottom was quite flat and did not require extensive fairing.

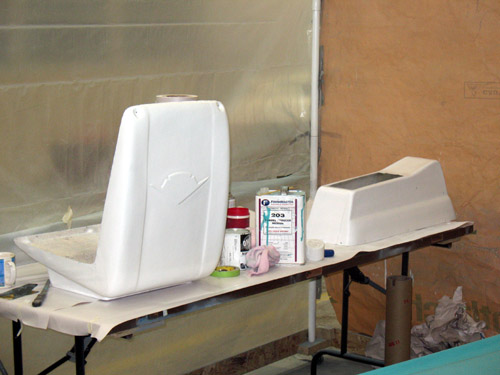
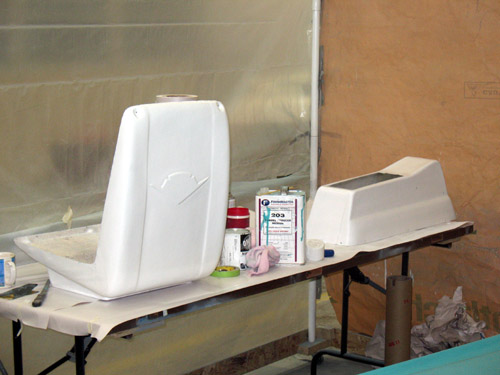
One seat shell and the center console being prepared for painting.

The hull was then moved to City Auto Body in Grand Haven, MI. City is not a boat specialist but they do various project car restorations. They will be modifying and painting the trailer and finish painting the hull. The project will then be brought home to Illinois for completion of the interior and assembly.

The painted hull as brought to City Auto Body. The Glastron signature side scallop was not copied correctly and will have to be redone.


Meanwhile, the motor was taken to Van's Sport Center in Grand Rapids, Mi, a long standing Mercury dealer. They did a complete check, tuneup, and refresh on the motor and pronounced it fit for service.

Please Log in or Create an account to join the conversation.

Re:1963 Glastron V143 JetFlite Restoration 11 years 5 months ago #75262

  • Kern
  • Offline
  • Junior Boarder
  • Junior Boarder
  • Posts: 105
  • Karma: 17
  • Thank you received: 1
After starting the restoration, a decision was made that during my ownership the boat would never be carried on another trailer and the trailer would never carry another boat. Therefore, some modifications were planned for the trailer to alter the looks and performance while towing. These modifications included:
A. Moving the axle rearward six inches to minimize sway when towing.
B. Changing the wheel/tire package to a ten inch wheel with a wider tire.
C. Replacing the fenders.
D. Modifying the front winch post and welding it to the tongue.
E. Replacing the keel rollers and the front stop roller.
F. Revising the front bunk brackets.
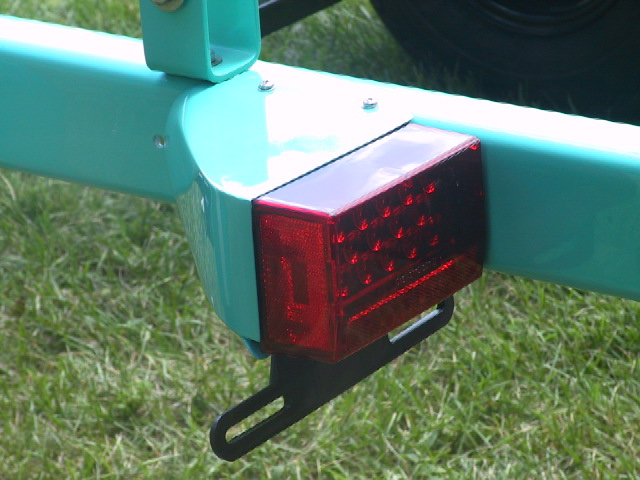
G. Replacing the tail lamps with LED units for maximum visibility.
H. Making fairings for the tail lamps to better integrate them into the trailer rails and to hide the brackets and wiring.
I. Paint the trailer to match the boat hull color, with some white accents.

During the visit to City Auto Body, Brandt and I discussed the modifications to be made to the trailer, he had several questions, some suggestions, and we clarified the intent of some of my drawings. I also gave him some additional drawings and pictures. He will start working on the trailer first so it can be finished prior to placing the hull back on the trailer for final painting.

In early December of 2012, the first batch of rechromed parts was picked up at Superior Polishing and a second batch was dropped off. The finish of the first batch was beautiful and virtually flawless.

The early months of 2013 were slow going as the modifications to the trailer were not clear to City Auto Body. There were several false starts on the winch post because of not understanding the desired result that I wanted. The fenders also had some delays because I purchased fenders that were not suitable. Altogether, I purchased three sets of fenders before getting the set that looked right.

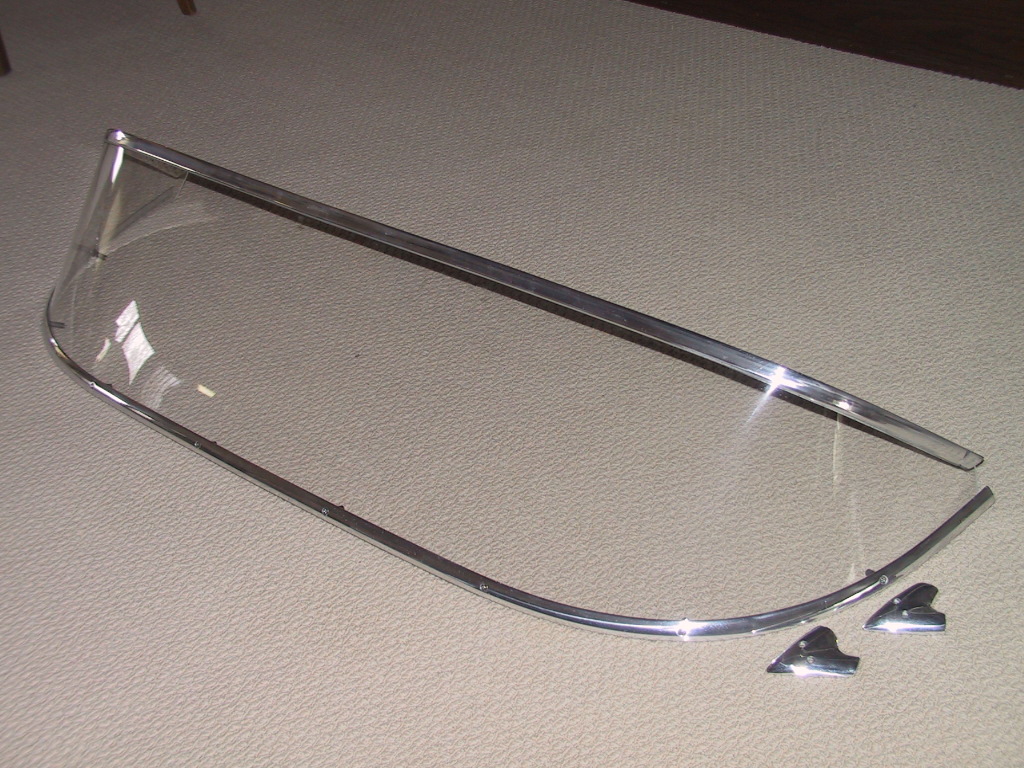
The windshield and frame were picked up in late January and taken to EDS Plastics in South Lyons, MI to have a new duplicate made. I also asked Ed to polish the frame while he had it.

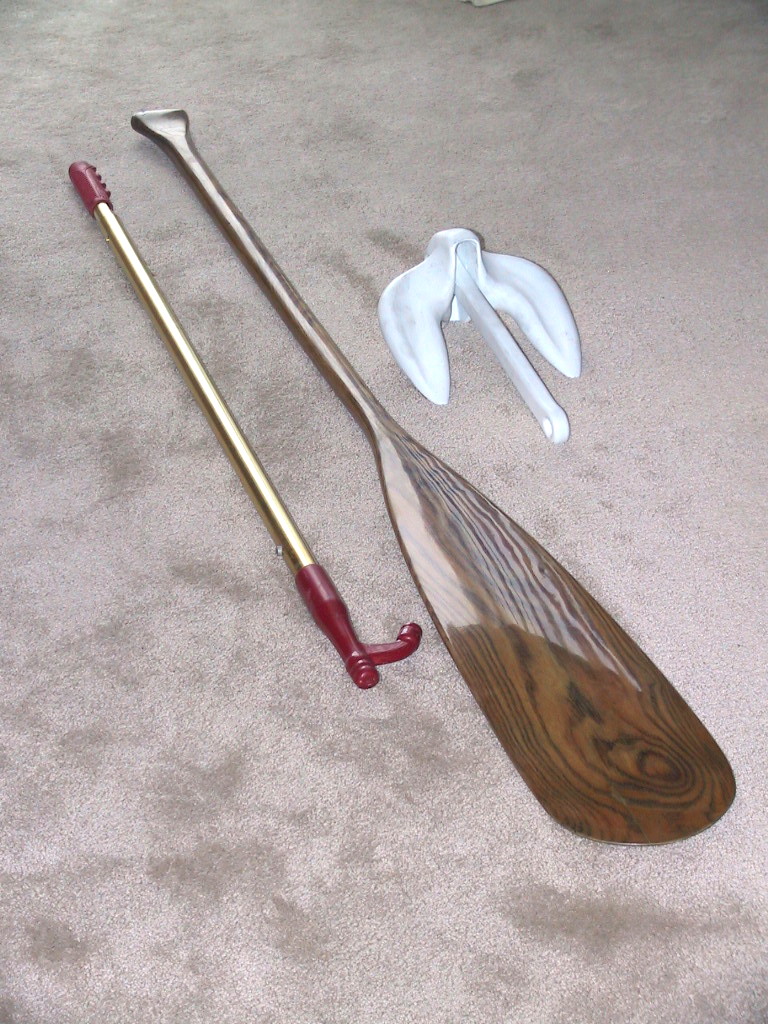
While the big bits are being completed, there are some smaller projects that can be continued. The paddle was refinished, the boat hook was cleaned and polished, the anchor was lightened, cleaned, and coated with PlastiDip, and various methods were tried to make gaskets for the deck hardware.

The paddle was sanded smooth, some cracks were filled with Elmer’s glue and it was coated in several coats of clear polyurethane with sanding between some of the coats. After final sanding with 220, it was polished with rubbing compound and automotive paint polishes. The final result is smooth and shiny, just like fine furniture. The experience from this process will be used in the finishing of the new wood surfaces for the instrument panel and console.

Attachments:

Please Log in or Create an account to join the conversation.

Re:1963 Glastron V143 JetFlite Restoration 11 years 5 months ago #75279

Excellent, can't wait to see the finished product!

Bob

Please Log in or Create an account to join the conversation.

Re:1963 Glastron V143 JetFlite Restoration 11 years 5 months ago #75294

  • MarkS
  • MarkS's Avatar
  • Offline
  • Moderator
  • Moderator
  • Posts: 5348
  • Karma: 118
  • Thank you received: 5
Your JetFlite is going to be a real "jaw-dropper" when you get her done Kern, thanks for sharing the progress reports with us.

Please Log in or Create an account to join the conversation.

Mark

Re:1963 Glastron V143 JetFlite Restoration 11 years 5 months ago #75429

  • Kern
  • Offline
  • Junior Boarder
  • Junior Boarder
  • Posts: 105
  • Karma: 17
  • Thank you received: 1
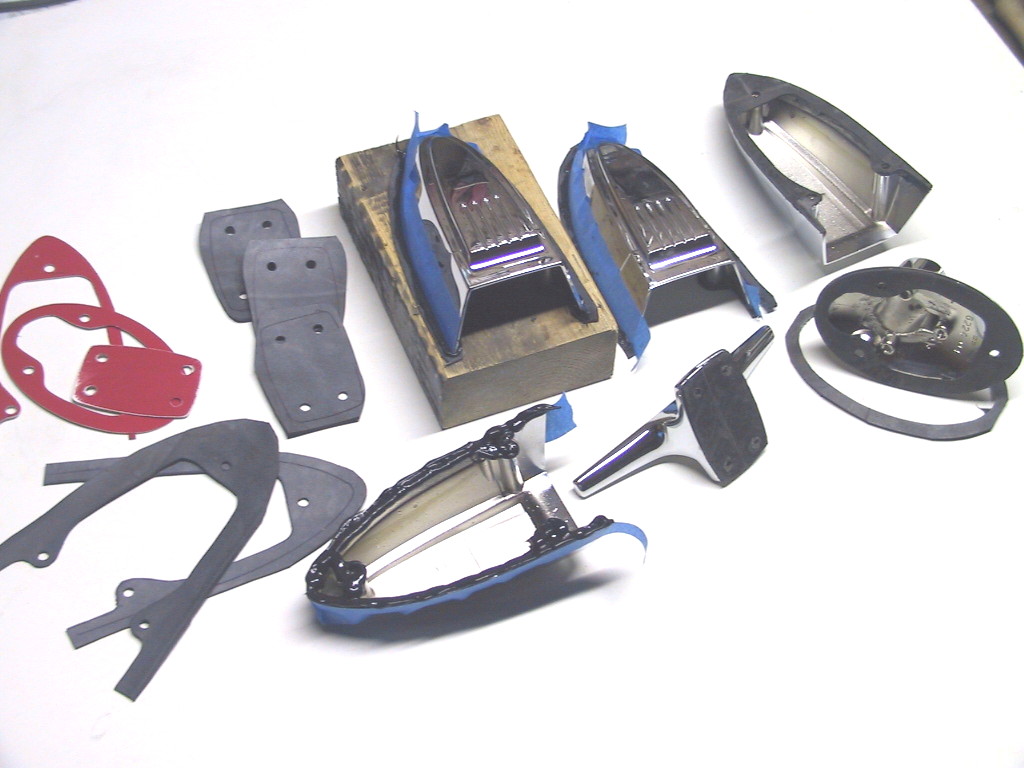
A decision was made to make gaskets for all the deck hardware to minimize damage to the newly painted surfaces and to provide a positive seal to prevent water and dirt from getting under the hardware. An old inner tube was obtained to make the gaskets. Various attempts were made to cut the gaskets to shape prior to attaching them to the hardware. This was especially difficult on the vents as the side walls were very thin and getting precise alignment and a good bond was almost impossible without a custom molded gasket that had a channel for the edges to sit into. Also, while trying to cut the rubber, it would be moving and stretching so precise cuts were difficult.

The above photo shows the final process that was developed to make the gaskets. The red items at upper left are cardboard patterns used to lay out the shapes and define hole locations. Then the gaskets were cut with the center areas being to the final shape desired and the outer edges being close but not on the precise edge. Some overhang was left in the centers to provide for a silicone fillet. Mounting screw holes were punched in the parts, as shown next to the red patterns.

Then a bead of silicone was laid around the perimeter of the part where the gasket was to be bonded, as shown on the upside down vent in the lower center. The gasket was then mated to the part and the assembly was screwed down to a block of wood that had been drilled for this purpose. This holds everything in alignment and keeps the part and the gasket flat and tight.

After the silicone has cured, the assembly was removed from the block and the excess around the outside was trimmed with a sharp knife, using the shape of the part to guide the knife.
This allows the gasket to be trimmed right at the edge of the part for a neat, precise look. The trimming has started on the right side of the vent shown in the upper second from right position. The upper right vent shows the trimmed gasket bonded to the vent.

The lower right two items show the final trimmed versions of their gaskets. The cleat is quite easy, the stern light base slightly harder. The narrow oval around the stern light base is the trimmed edge that was removed from that part.

Silicone has several advantages for this process. It is relatively inexpensive, long lived, and a bead can be laid on the inside to provide larger amounts of surface area for adhesion. Another plus is that if the result is not satisfactory, it is easy to remove the gasket, strip off the silicone, and start over.
Attachments:

Please Log in or Create an account to join the conversation.

Re:1963 Glastron V143 JetFlite Restoration 11 years 3 months ago #77963

  • Kern
  • Offline
  • Junior Boarder
  • Junior Boarder
  • Posts: 105
  • Karma: 17
  • Thank you received: 1
The new windshield was completed by EDS Plastics in South Lyon, MI and was picked up. The new part was made using a tool created from the original windshield. The new part matches the old perfectly and looks very nice, all shiny and clear with no scratches. They also polished the frame.


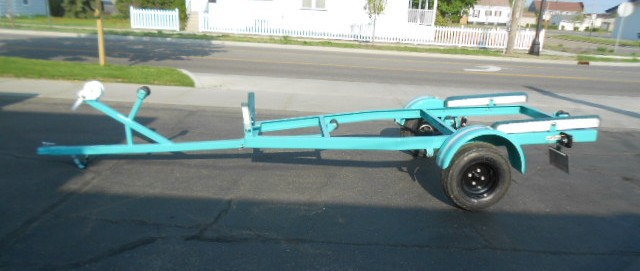
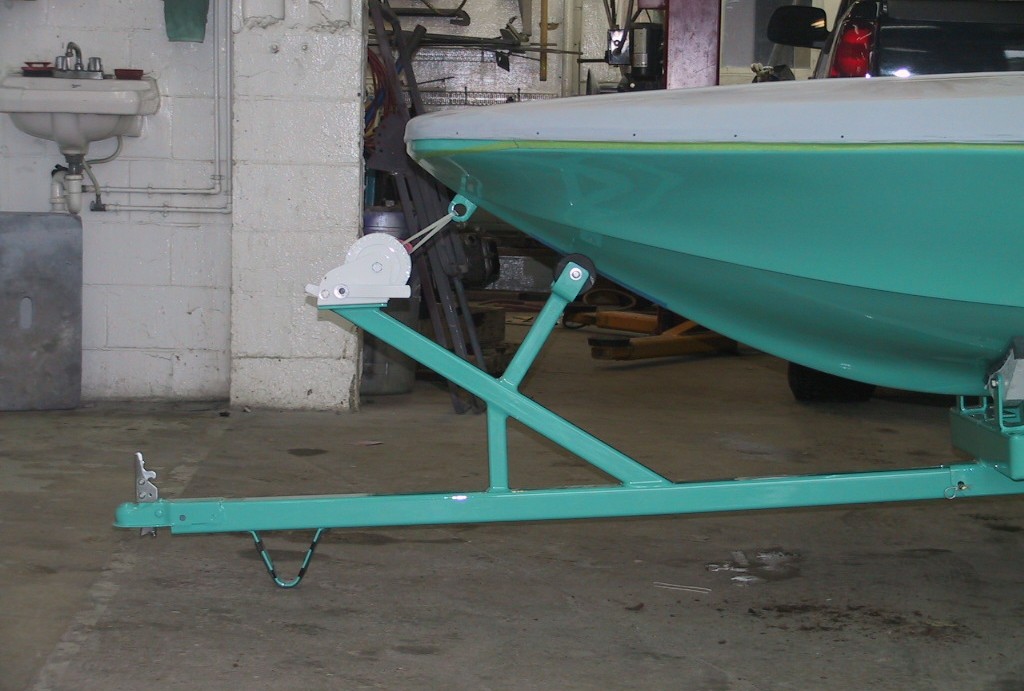
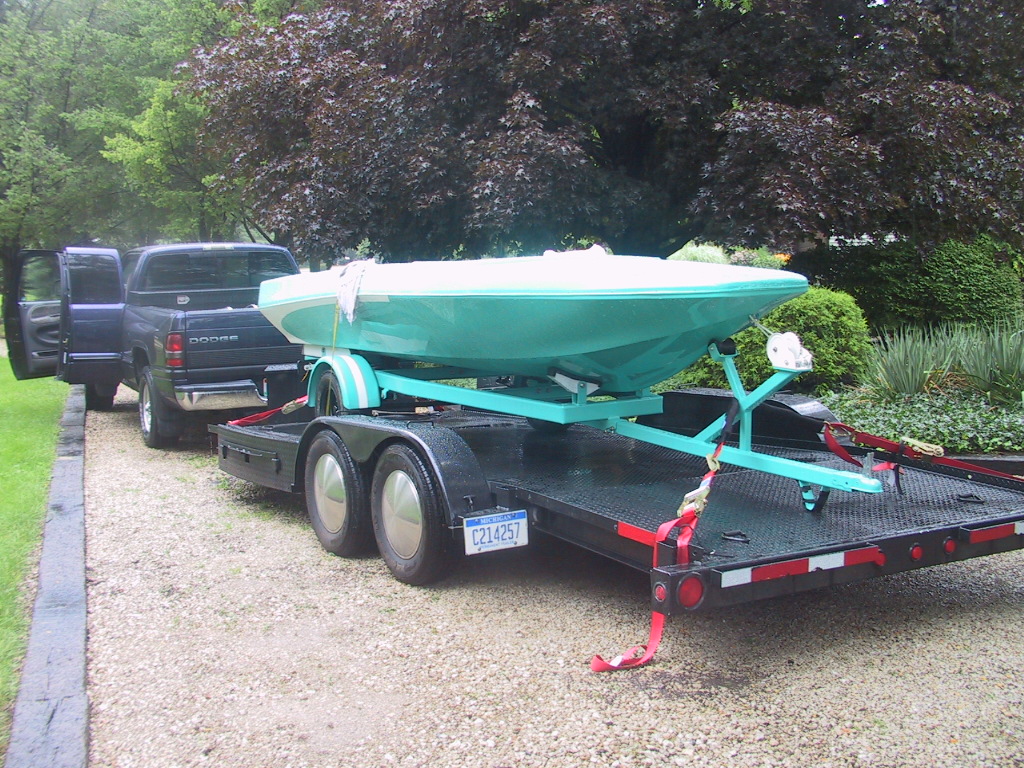
Restoring and revising the trailer ended u[ being much more time consuming and costly than planned. The major structural change involved the redesign and fabrication of the winch post. I wanted the angle to match the bow angle of the boat and I wanted it welded to the tongue. The winch height and distance from the bow were also factors that were considered in the design.

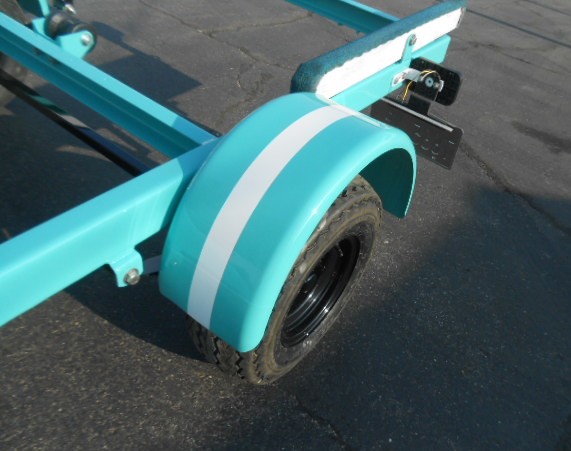
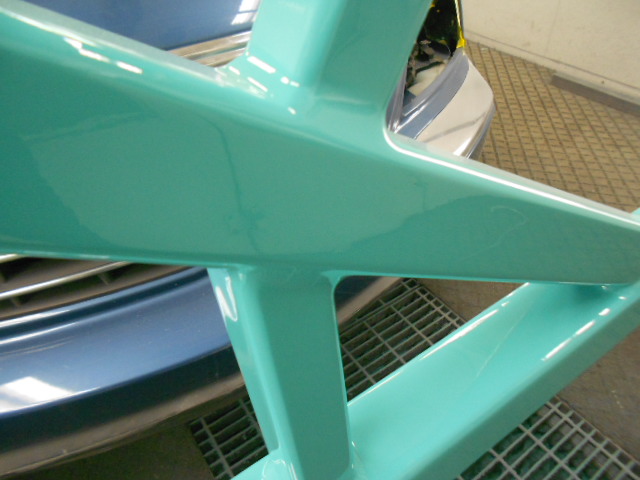
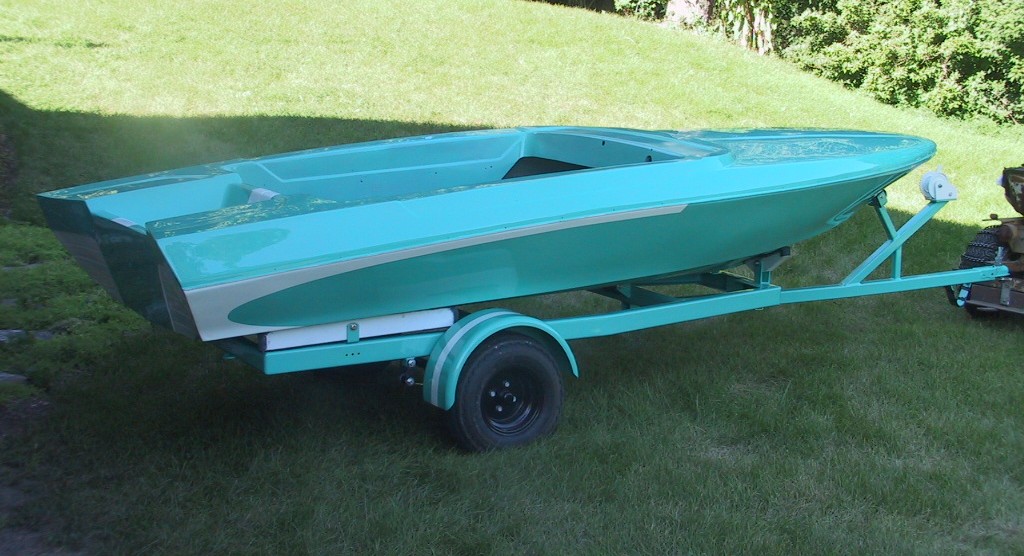
After the fabrication was finished the trailer was sand blasted, primed, all pitting was filled and the color and clear coats applied. The resulting finish is equal to many show cars. The pictures show some detail of the result. There are still some details that need to be completed once the trailer gets home. Those will be shown on future postings.

The mostly complete trailer.

The new fenders to cover the larger wheel/tire combination.

Detail of the weld and finish of the new winch post.

Compare this winch post with the original at the top of this posting. Since this boat/trailer combo will always remain together as long as I own it, the winch post does not have to remain adjustable for another boat.

The color on the trailer and hull looks different, due to the lighting. The same paint was used on both.

Note the care that the shop took to protect the bottom of the tongue support and prevent the paint from getting scratched. A permanent protector will be created later.

Please Log in or Create an account to join the conversation.

Re:1963 Glastron V143 JetFlite Restoration 11 years 3 months ago #78344

  • Kern
  • Offline
  • Junior Boarder
  • Junior Boarder
  • Posts: 105
  • Karma: 17
  • Thank you received: 1
City Auto Body has performed, and has in process, various car restoration projects. As this project moved along several factors influenced the change from a nice restoration to an all out - make it as nice as we can - restoration. These factors included the rarity of the boat, the unique design, a long history of ownership, and some fortunate life changes that provided the means to move the project to a higher level.

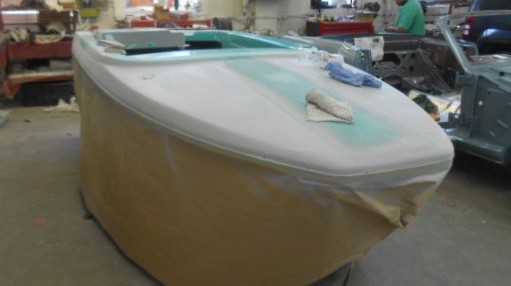
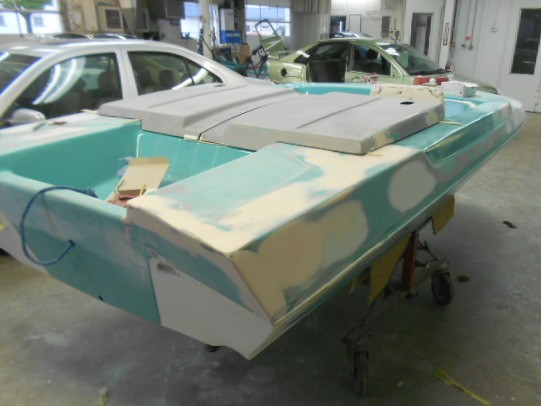
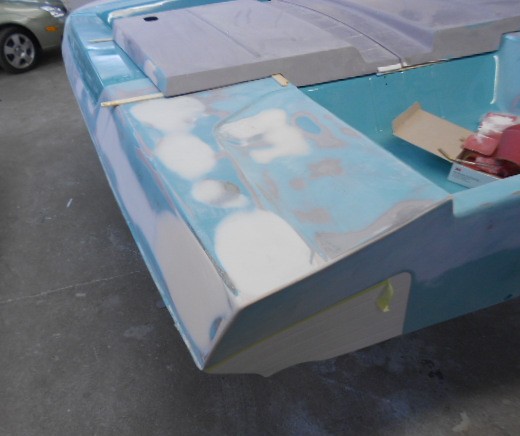
When the hull was delivered to City Auto Body, it had some filling and fairing and had been painted. When the above decision was made, additional work was performed on the upper deck section. All holes except the fuel/cable hole were filled and made smooth. New holes will be drilled when all component locations are finalized.

The foredeck after additional filling and fairing. The final surface will have none of the waviness that was in the original surface.

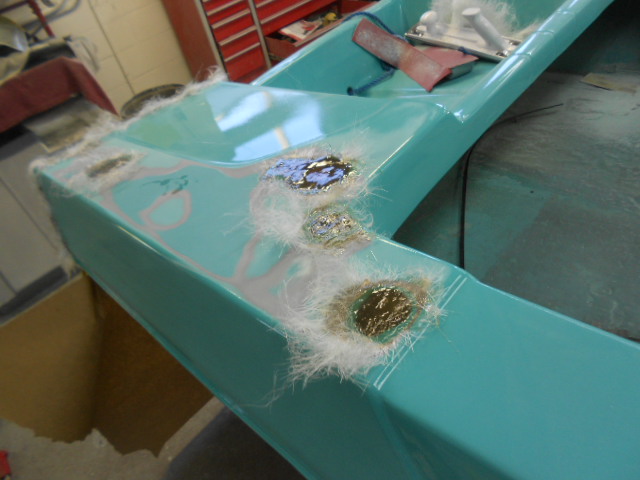
The starboard rear deck showing the areas that had original holes, were ground out, and filled with fiberglas roving and resin.

The rear starboard final filled and faired surface.

The final rear port surface.

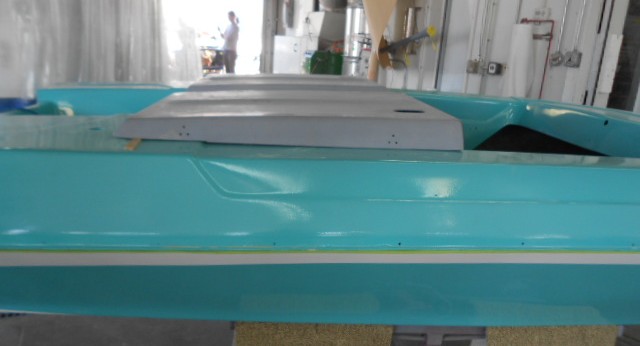
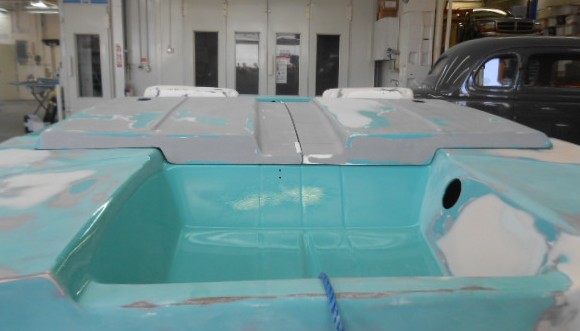
The original fit of the tonneau covers to the decking was close but not very precise, probably because the covers and decks were made in separate areas of the factory and the covers were close so they could be matched to any deck.

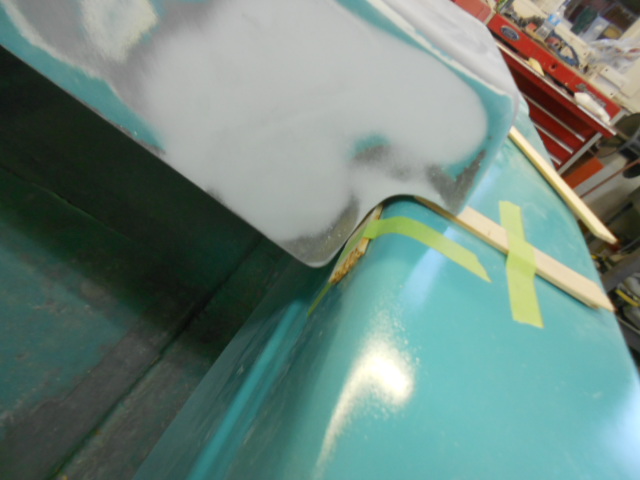
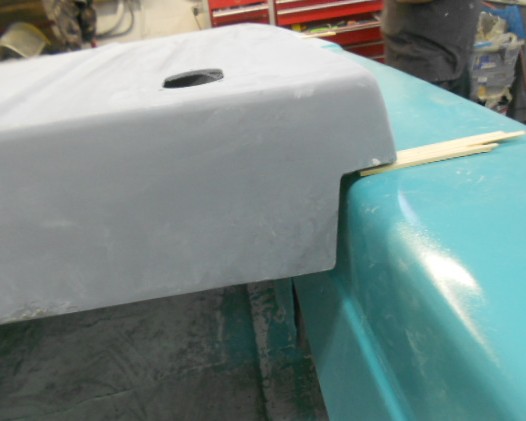
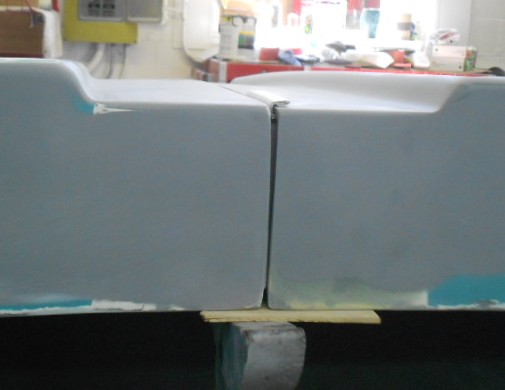
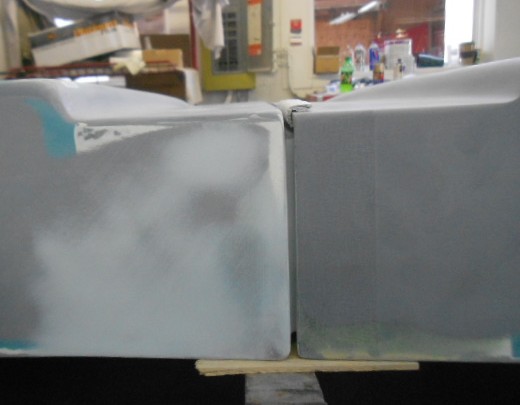
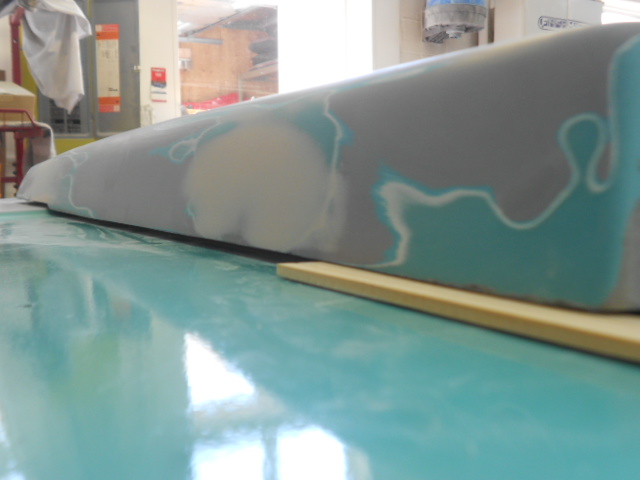
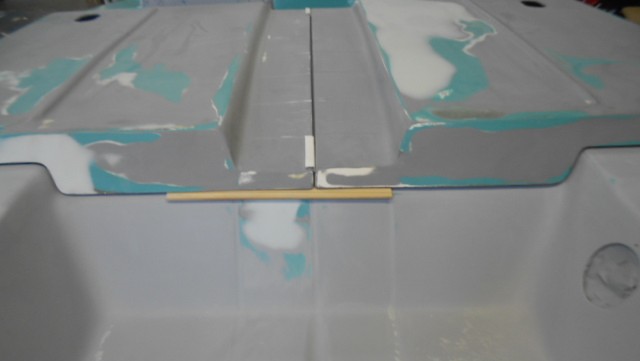
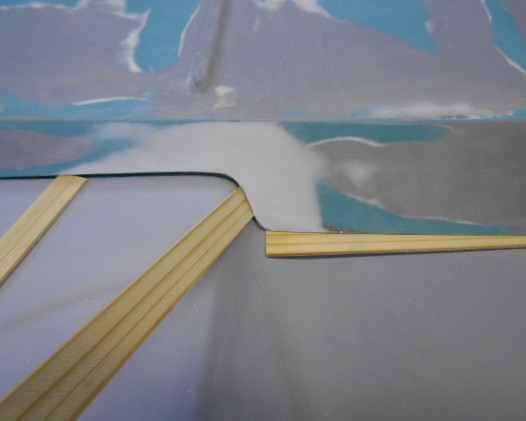
The desired fit quality was more like the fits of the panels on a car, so a 1/8 inch gap between the covers and the deck was chosen and the cover edges were modified to maintain a consistent gap. Before and after photos are shown below.

The factory fit of the front corner of the port cover.

The final fit of the same corner.

The gap between the covers at the front. This gap is filled by the welting shown on the front top of the covers, which extends down the front and is attached to the edge of the port cover.

The revised gap, which will give a more consistent line between the welting and the starboard cover.

The side of the starboard cover early in the process. The original bottom edge was straight and the gaps were even more uneven than shown.

The final gap. The support shims are 1/8 inch. Note the step near the rear of the cover that matches the change in height of the side deck in that area.

The original rear fits. There were some places where the covers rubbed on the deck and caused wear and scratching of the gel coat.

The final fit. The factory image of this boat shows the white welting all across the rear of the covers. This boat was not delivered with that welting and I prefer the look without it as there is no line that breaks the color from the covers to the rear side decks and motor well.

A closeup of the port side fit at the transition from the side deck to the front surface of the motor well. Some fiberglass build up was required to get the desired shape.

Please Log in or Create an account to join the conversation.

Re:1963 Glastron V143 JetFlite Restoration 11 years 3 months ago #78351

  • Shelby18
  • Shelby18's Avatar
  • Offline
  • Contributing Member
  • Contributing Member
  • Posts: 436
  • Karma: 18
  • Thank you received: 0
Looks excellent. That attention to detail will certainly pay off in the final product. Congratulations on being able to take it to the next level.

Please Log in or Create an account to join the conversation.

Great to be on board.
Rick

Re:1963 Glastron V143 JetFlite Restoration 11 years 2 months ago #78820

  • Kern
  • Offline
  • Junior Boarder
  • Junior Boarder
  • Posts: 105
  • Karma: 17
  • Thank you received: 1
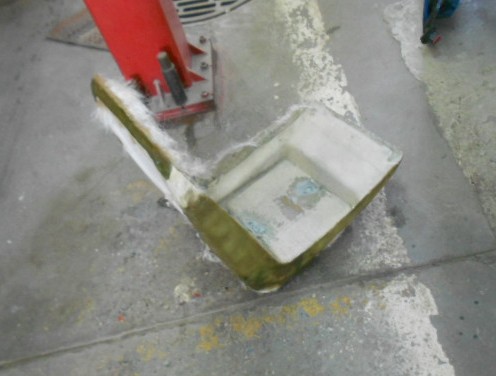
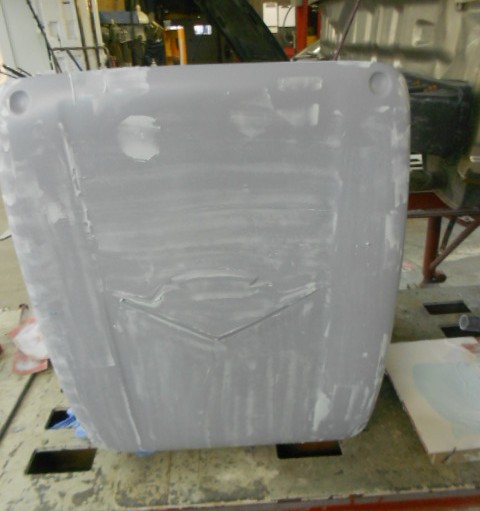
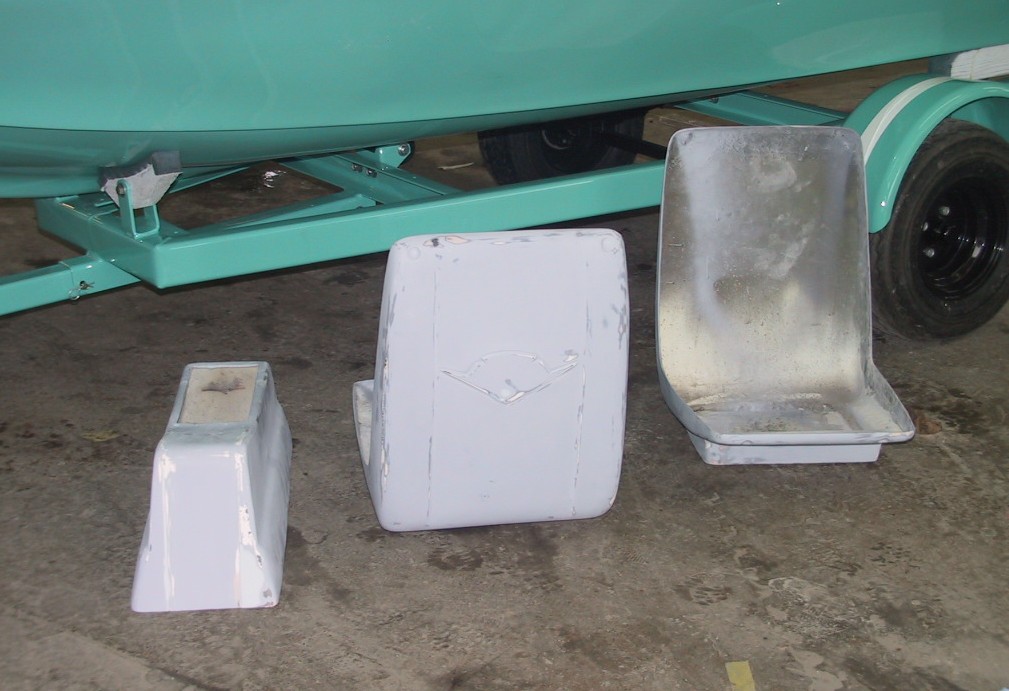
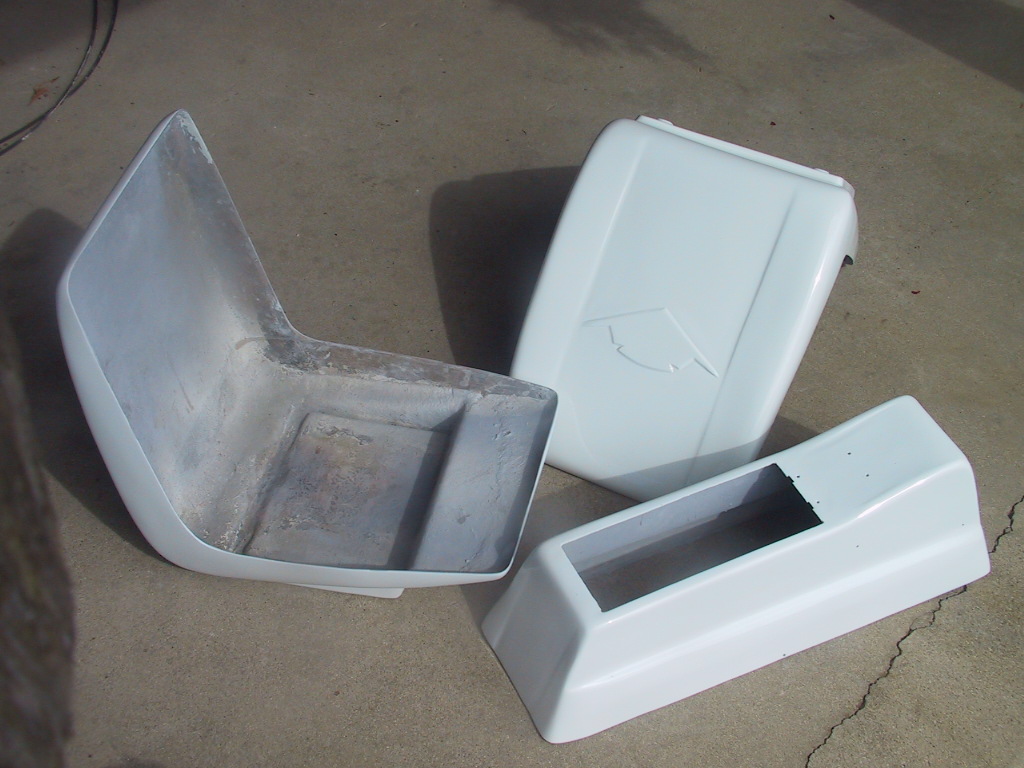
The seat shells and console are fiberglass moldings that had a pebble grain type texture on the outer surfaces. Each of these pieces needed some work to repair stress cracks and chips from usage.

The texture would have been very difficult and time consuming to try to duplicate so it was decided to make all the outer surfaces smooth and then paint them white as original. The smooth surface would match the other white painted surfaces on the hull and would be easier to keep clean.

One of the seat shells showing the fiberglass added for repair.

A seat shell back surface after filling and sanding smooth.

The three parts after initial prime and final sanding, ready for final prime and paint.

Please Log in or Create an account to join the conversation.

Re:1963 Glastron V143 JetFlite Restoration 11 years 1 week ago #82812

  • Kern
  • Offline
  • Junior Boarder
  • Junior Boarder
  • Posts: 105
  • Karma: 17
  • Thank you received: 1
The trailer, hull and parts, and motor finally came home on August 22. Brandt and Laura from City Auto Body brought it from their shop to my house. Brandt offered the delivery as I had found a car over here that he wanted to buy and haul back to his shop. He loaded the trailer and boat with the seats inside, onto his car trailer and put the rest of the items in his truck.


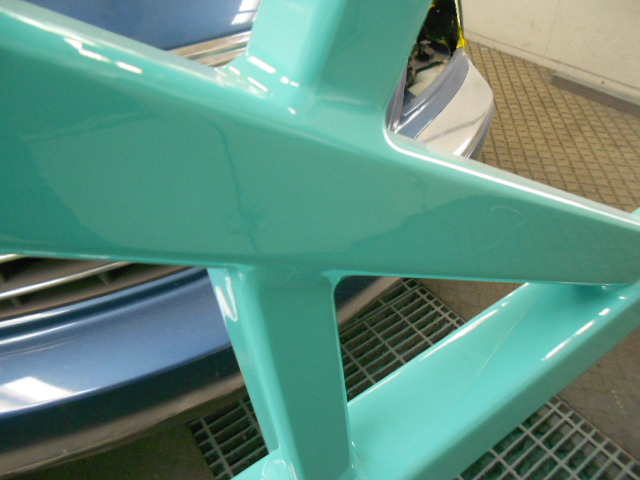
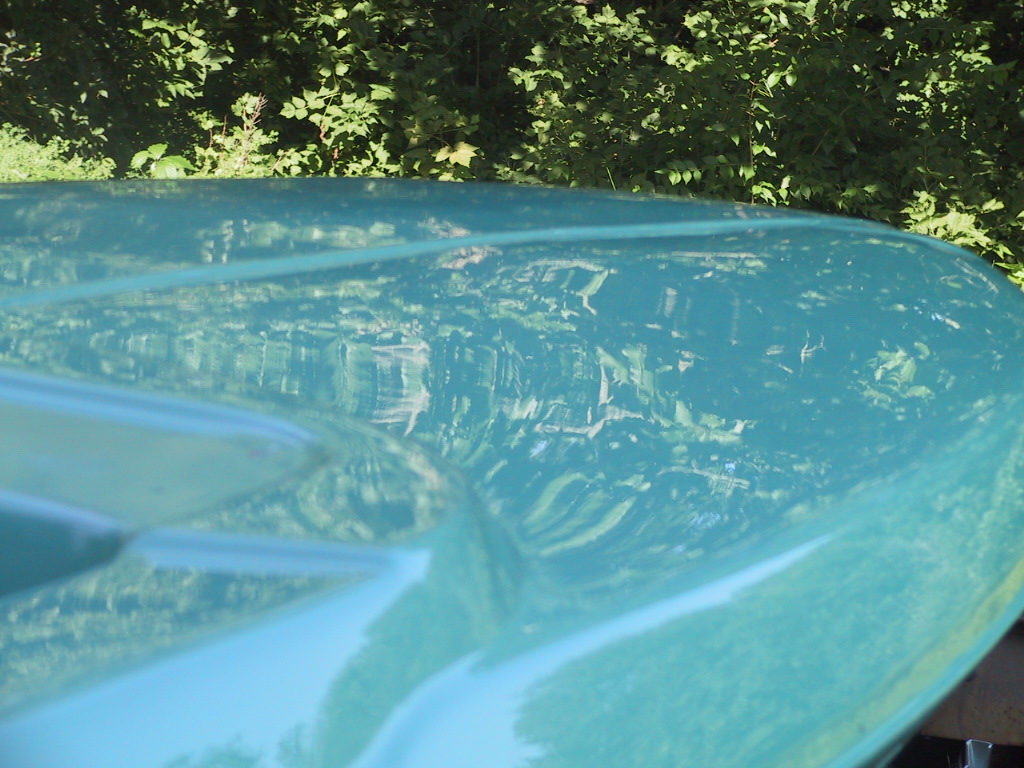
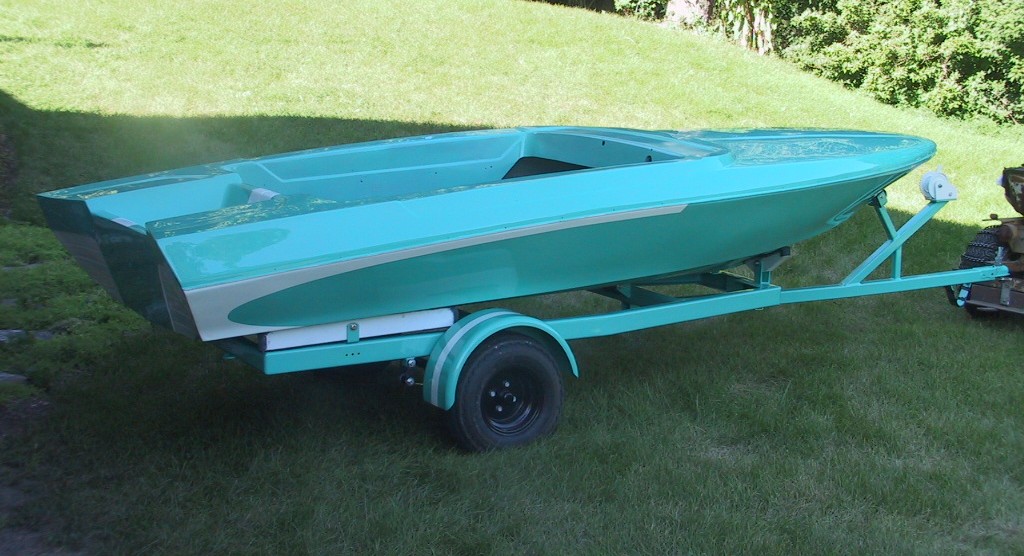
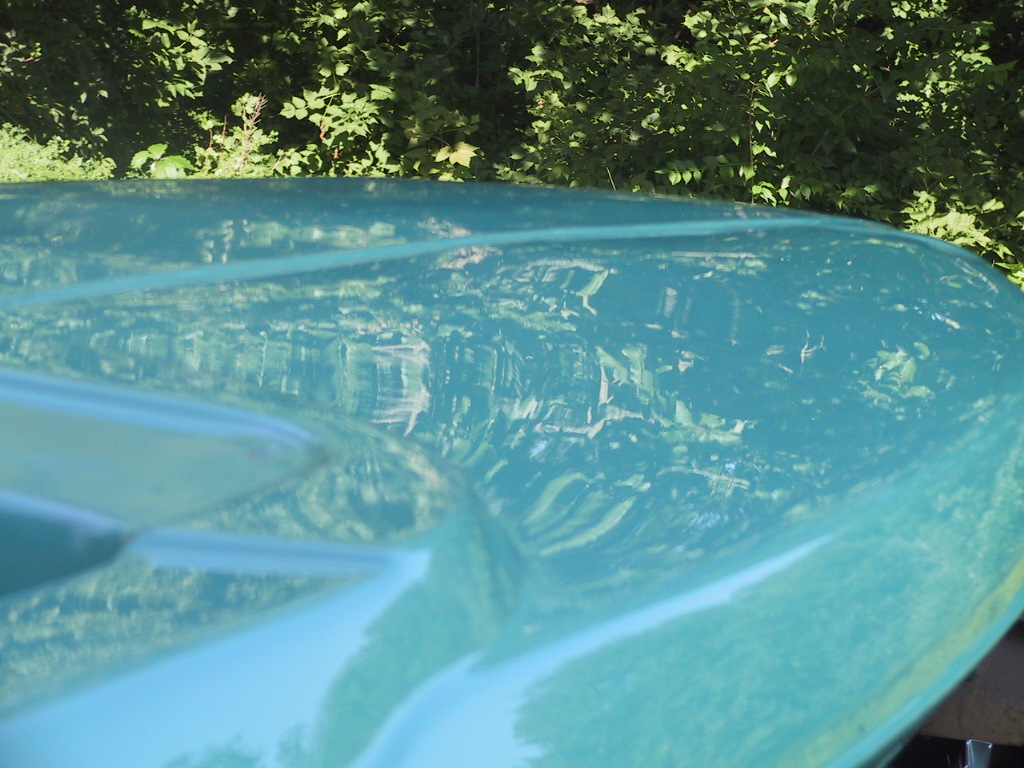
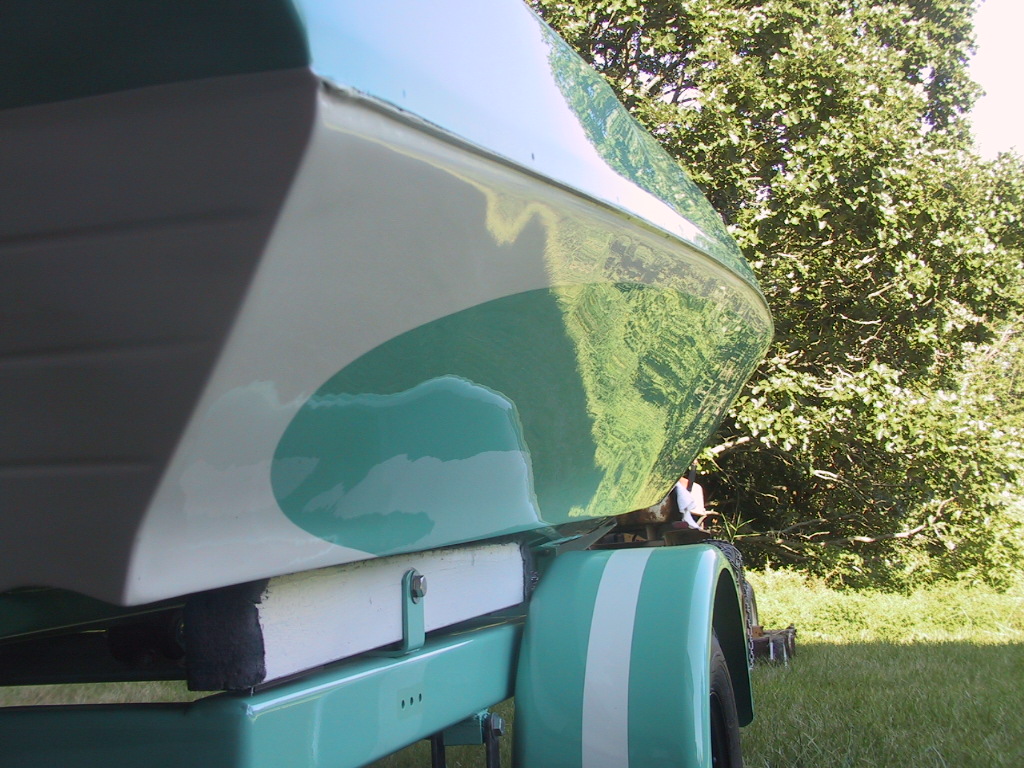
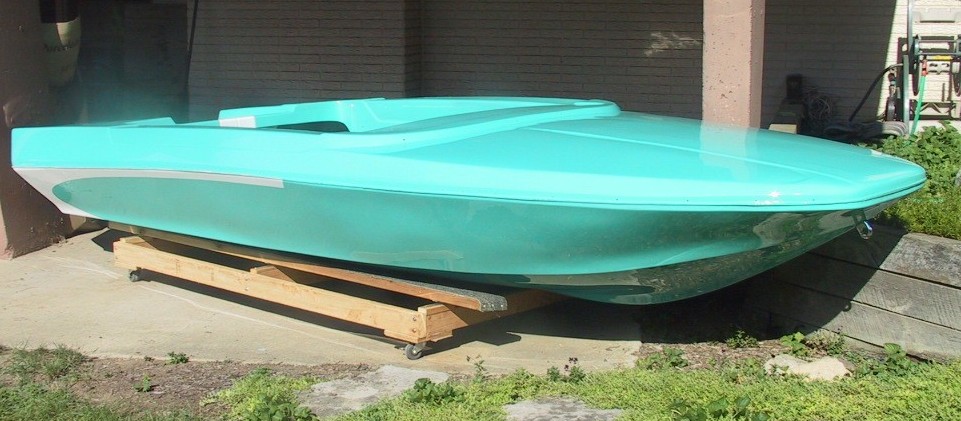
The paint was finished to a very high level, equivalent to many show cars I have seen. The paint process used was the same as most new cars with a color coat/clear coat combination. Attached pictures show the reflections of the surface. City Auto Body also corrected the shape of the Glastron scallop on the sides of the boat.

As mentioned above, the seats and center console were smoothed and painted to the high gloss finish that was used on the white trim of the hull. They better match the rest of the boat and will be much easier to keep clean.

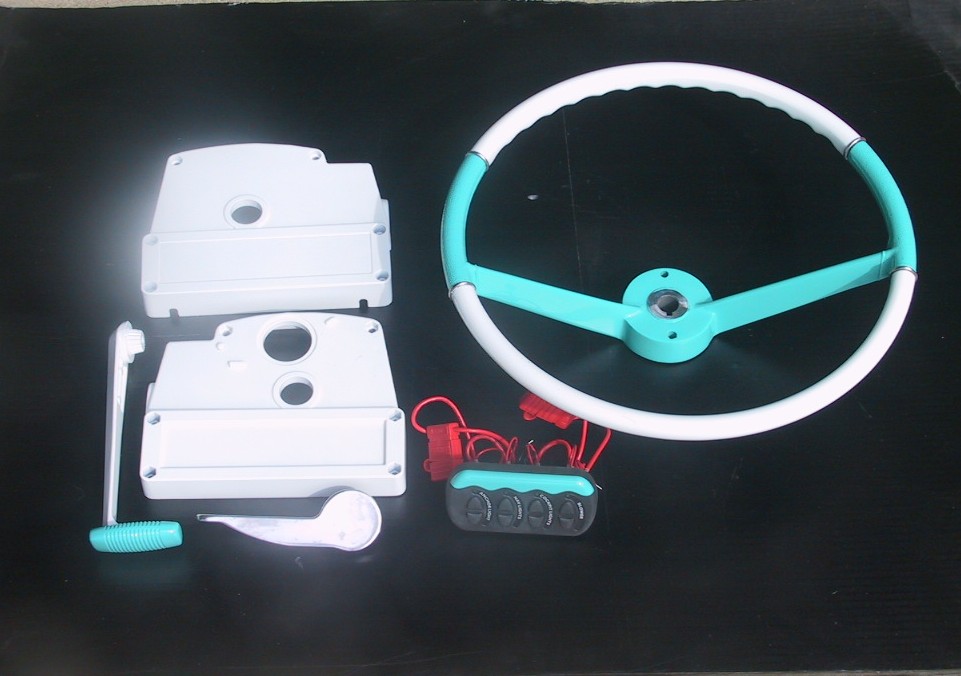
City Auto Body also painted some of the other items that will be installed. The steering wheel originally had a gold color on the spokes and grip areas. This now matches the hull color. The grip handle for the motor control and the trim for the auxiliary switch panel were also painted hull color. The motor controller was painted to match the console. The fast idle lever was originally black. It was aluminum so I polished it to match some of the other brightwork.

Please Log in or Create an account to join the conversation.

Re:1963 Glastron V143 JetFlite Restoration 11 years 1 week ago #82822

  • Shelby18
  • Shelby18's Avatar
  • Offline
  • Contributing Member
  • Contributing Member
  • Posts: 436
  • Karma: 18
  • Thank you received: 0
Really really beautiful job. That paint job is over the top!

Please Log in or Create an account to join the conversation.

Great to be on board.
Rick

Re:1963 Glastron V143 JetFlite Restoration 11 years 1 week ago #82828

Kern,

WOW! Just plain, WOW!

yours, satx

Please Log in or Create an account to join the conversation.

Resistance to tyrants is obedience to Almighty God.
Thomas Jefferson, 1803

Re:1963 Glastron V143 JetFlite Restoration 11 years 1 week ago #82873

Outstanding!!!!!!!!!!!!!!!!!!!!!

Bob

Please Log in or Create an account to join the conversation.

Re:1963 Glastron V143 JetFlite Restoration 11 years 5 days ago #83112

  • Kern
  • Offline
  • Junior Boarder
  • Junior Boarder
  • Posts: 105
  • Karma: 17
  • Thank you received: 1
The week since the boat was delivered has been a week of surprises!! As I was transferring the hull from the trailer to the working cradle, the bow was raised and water started coming out of holes in the floor near the stern. The original plan was to bring the boat from Michigan to Illinois in dry conditions. However, Brandt was caught in a rain storm and the interior of the hull was exposed to the downpour. Evidently water flowed into the open channel that was cut into the floor for the control cables and penetrated the under floor cavities.


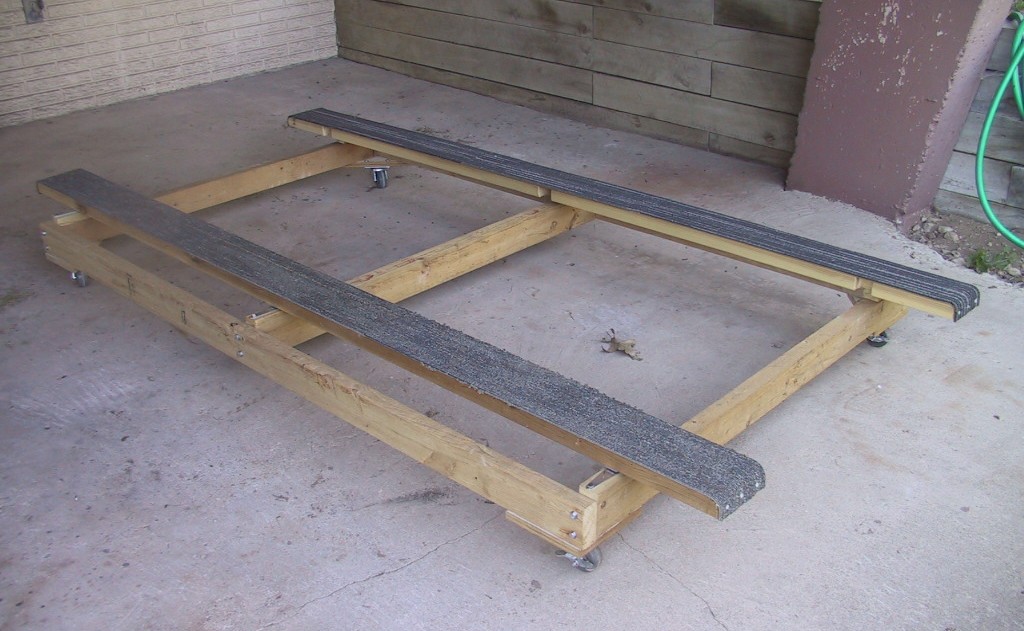
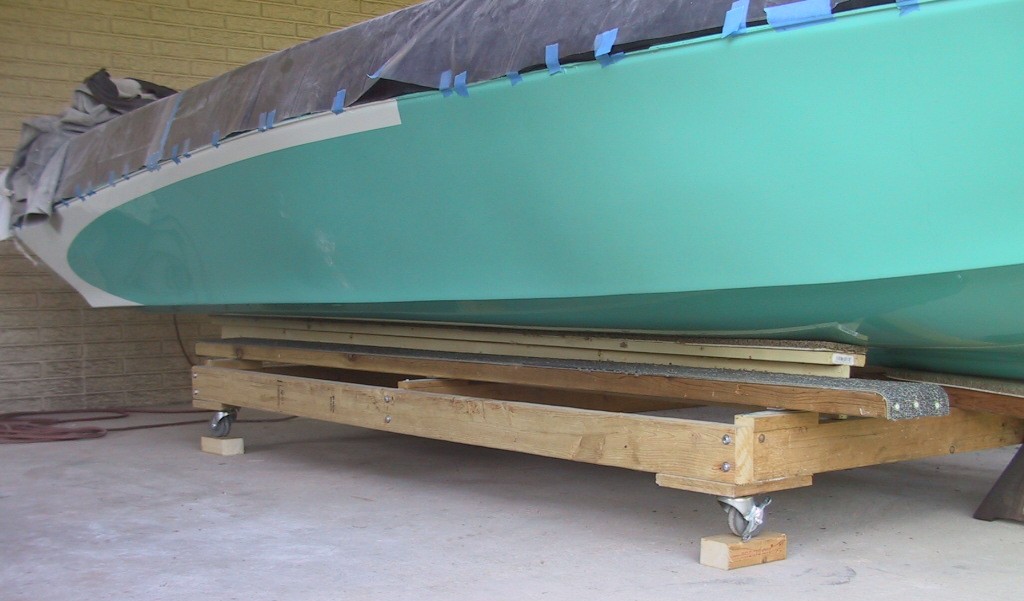
The working cradle was built to support the hull closer to the floor to make access easier for working on the hull.

I could think of no easy way to dry the cavities between the floor and hull bottom so decided to cut the floor open. I was not happy that I would have much additional work to dry the cavities and replace the floor. However, upon opening the cavities, I became very glad that the water entered the spaces and forced the decision to open the floor.

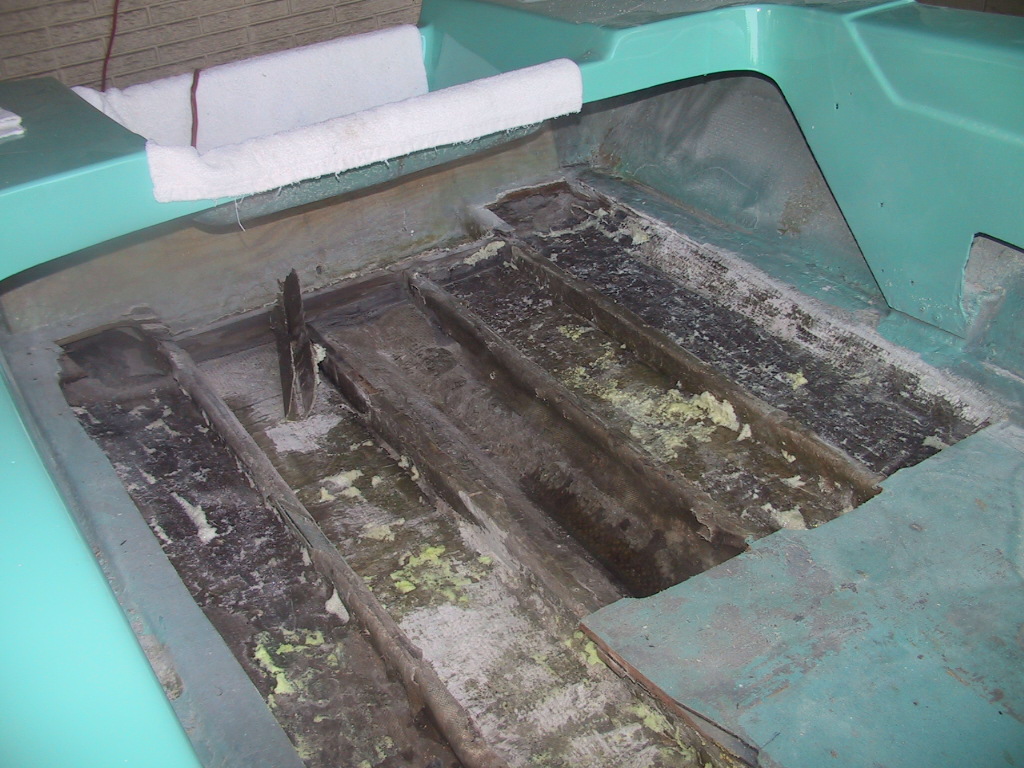
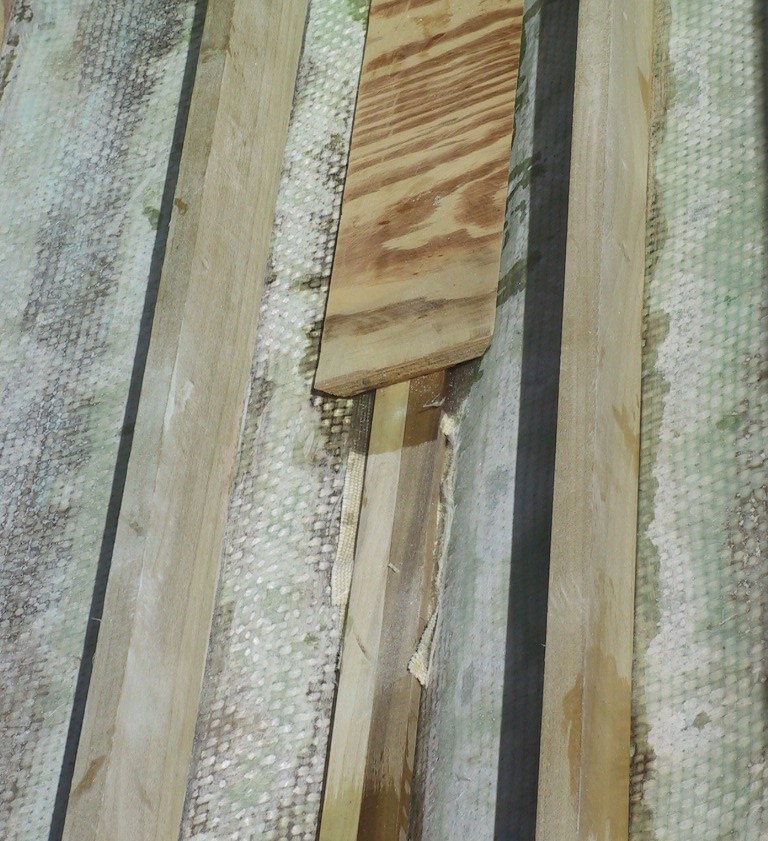
When Starboard Marine was working on the hull, they determined that the stringers were not rotted and chose to only look at a short section that was exposed when cutting the cable channel. Opening the floor showed that the stringers were, indeed relatively sound but they were no longer bonded to the bottom and the fiberglass mesh that was designed to hold them tightly in place was not bonded to the stringer wood, evidently due to shrinkage of the stringers.

The under floor structure. The loose part lying near the rear of the inboard starboard stringer is a piece of the fiberglass cloth that was over that stringer. It was not bonded to the stringer and was easily cut away.

The floor was adequately bonded to the hull around the edges but not to the stringers. I noted in usage prior to parking the boat for an extended period, that when hitting waves the whole assembly seemed to shake and did not feel solid. This was evidently due to the bottom, stringers, and floor not being attached, which allowed vertical movements of the three components separate from one another.

One other surprise that can be noted in the pictures is that this hull does not have an internal keel. The hull molding defines the outer keel shape. Evidently this is strong enough as the boat has been parked and towed all these years on the trailer, which has three keel rollers plus the bunks, and there is no distortion of the keel line.

When walking around inside the boat, I occasionally stand on the bottom and it seems to support my weight without distorting. Even though it appears quite strong I will be replacing the stringers one at a time with a support beam under the hull to keep it flat while bonding the stringers to the bottom.

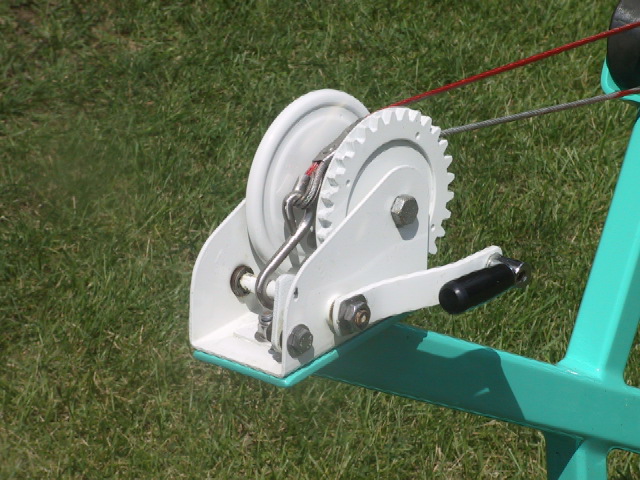
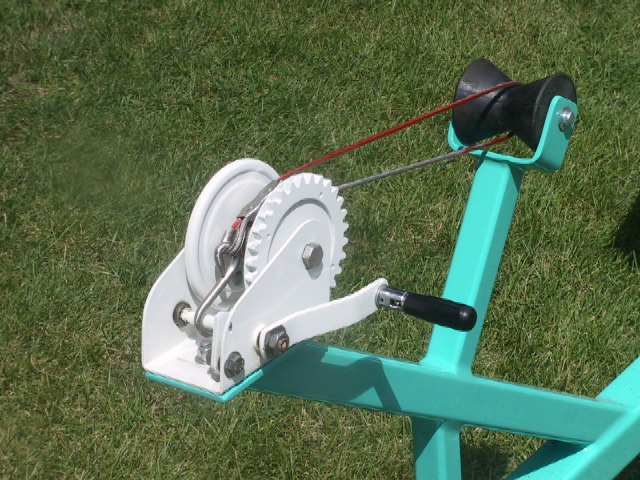
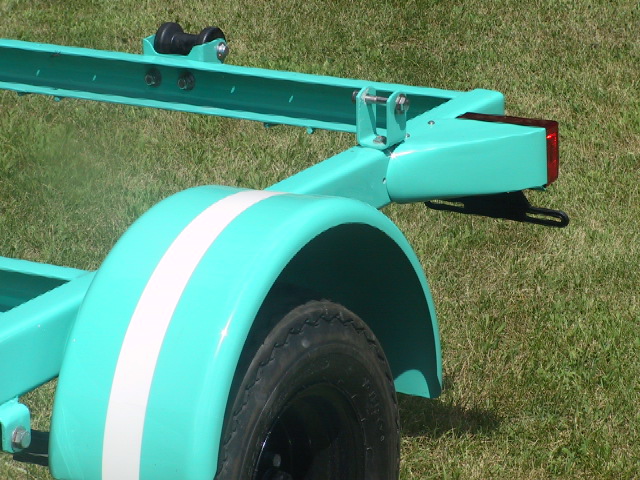
In between working in the cramped hull and getting dusty, I worked on the trailer to finish the winch and install the taillamps.

The winch with the shorter crank arm and the new handle in the folded position.

The handle in the operating position.


The L.H. taillamp fairing.

Please Log in or Create an account to join the conversation.

Re:1963 Glastron V143 JetFlite Restoration 11 years 15 hours ago #83369

  • Kern
  • Offline
  • Junior Boarder
  • Junior Boarder
  • Posts: 105
  • Karma: 17
  • Thank you received: 1
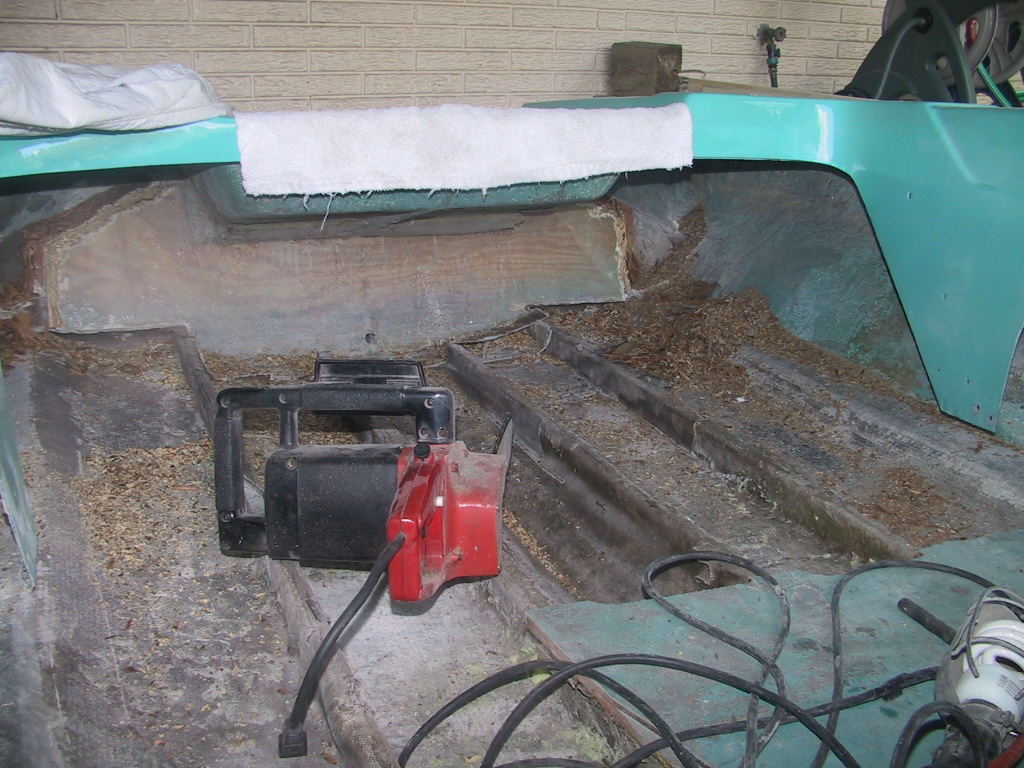
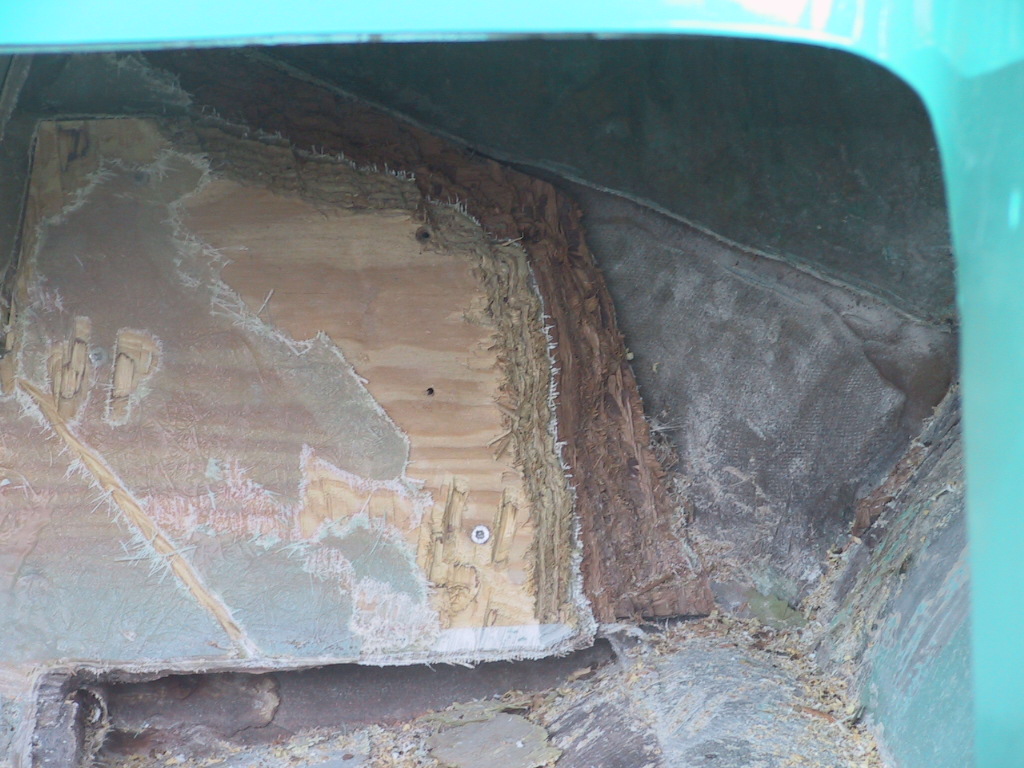
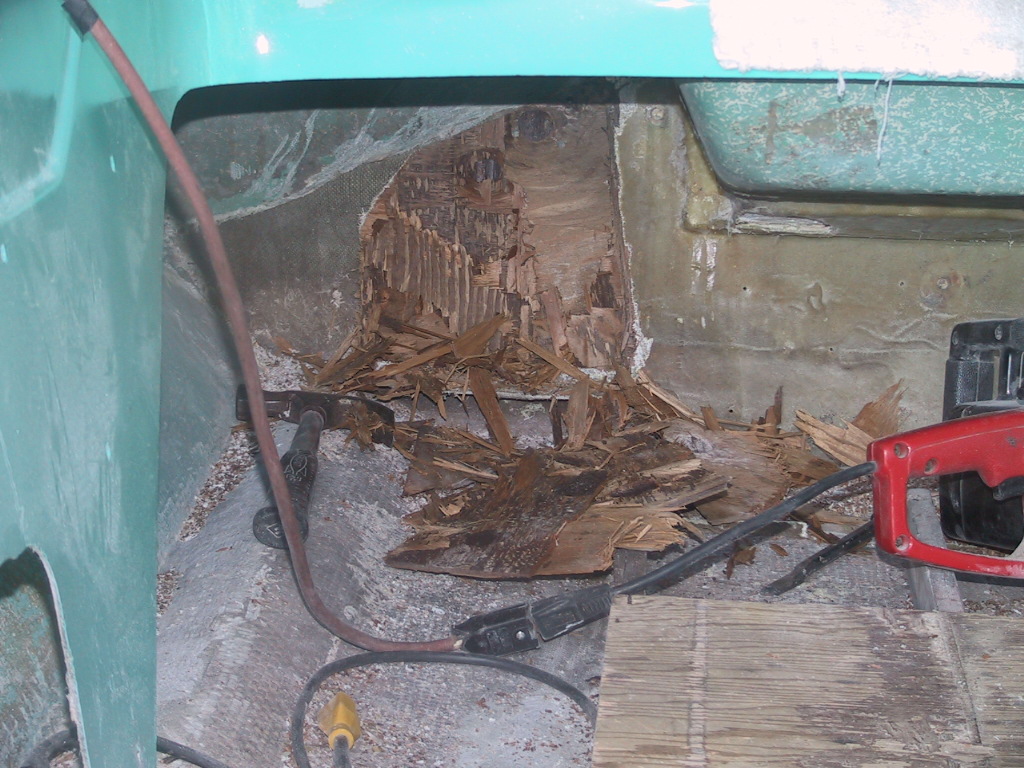
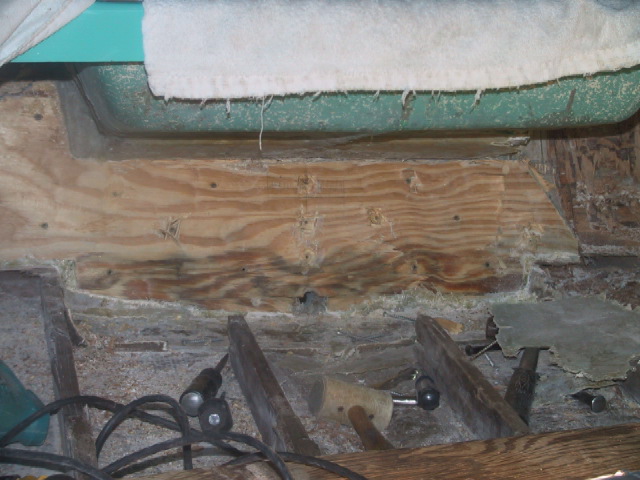
I was grinding some internal sections in the transom area to provide smooth surfaces for painting and discovered that the outer ends of the original transom board were wet and delaminated. These were sandwiched between the new transom reinforcement board and the outer skin of the hull. Starboard Marine claimed to have bonded the new transom center section to the original outer ends. That claim appears to be false as I did not find resin between the parts and resin would probably not adhere to the wet, delaminated wood.

Full transom view showing the removal of the outer ends of the original transom board.

I used my electric chain saw to cut out the new transom reinforcement and the remains of the original transom board. The new reinforcement already had discoloration along the bottom, indicating that it had been wet, and the boat had never yet been in the water, just the rain storm. Evidently the new board was not adequately sealed with resin when being installed.

The port rear corner showing the end of the original transom board sandwiched between the new reinforcing board and the outer transom skin of the hull.

Starboard rear corner showing the delaminated layers of the original transom board. The board had no remaining strength.

The new reinforcing board shows discoloration and evidence of water penetration even though the boat has never been in the water, probably as a result of the rainy trip. The new board was evidently not adequately sealed all around.

I will be redesigning the transom board structure to spread the motor loads out to the outer sections of the transom and will post pictures of the new design.

The lesson I learned and one that may help others is to choose a restoration shop carefully and be certain that their standard of workmanship and quality is up to the standards you desire for your project. Starboard did not work to my standards and it has caused a great deal of extra work and delay in the project along with extra costs. In retrospect, I probably would have been better off to cut out the old transom and rebuild it myself.

With all the internal work and getting into and out of the hull with tools, I wanted to prevent damage to the new deck paint. I went to a fabric store and bought some inexpensive felt material and covered the decking. I then added a top layer of clear vinyl (not shown) to prevent dust from penetrating the felt and falling through to the deck paint.

Please Log in or Create an account to join the conversation.

Re:1963 Glastron V143 JetFlite Restoration 11 years 4 hours ago #83407

  • 63 Sabre
  • 63 Sabre's Avatar
  • Offline
  • Contributing Member
  • Contributing Member
  • Posts: 4676
  • Karma: 147
  • Thank you received: 167
Sad turn of events my friend but it looks like you have a handle on it. She's a beaut, three steps forward, one step back. Keep pluggin' away.

Please Log in or Create an account to join the conversation.

Re:1963 Glastron V143 JetFlite Restoration 10 years 11 months ago #83756

  • Kern
  • Offline
  • Junior Boarder
  • Junior Boarder
  • Posts: 105
  • Karma: 17
  • Thank you received: 1
The grunt work of rebuilding is significantly impacting the fun work of putting the boat back together. However, all the best cosmetics will not make up for a lack of basic structure. So I continue to dig into what holds this thing together. I am certainly glad that the boat is no bigger than it is. It is turning out to be enough of a project in its current size.

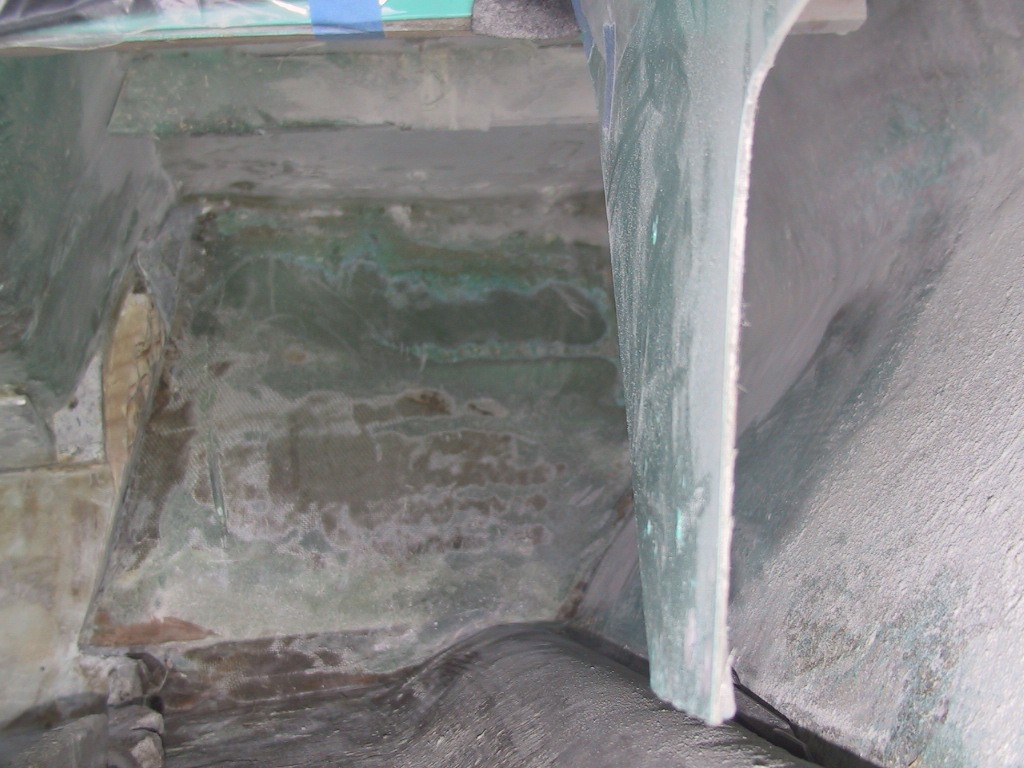
I am continuing to clean up the transom area to prepare for installation of new structure to spread the motor torque loads over as large an area as reasonable. In the cleanup, I removed all the old transom board sides and the new reinforcing board. Then the insides of the hull transom fiberglass was ground smooth preparatory to bonding to those surfaces. The pictures below show the rear corners after cleanup and grinding away excess material.

The port rear corner with the chine at lower right and the motor well at upper left.

The starboard rear corner, ready for new structure.

The upper edges of the transom still need smoothing and cleaning and this will be left until later when the hull will be mounted on a rotisserie structure so it can be easily rotated about its longitudinal axis and inverted for better access.

While the hull is still sitting on the cradle, the stringer replacement will be tackled. The floor was cut away to expose the starboard outboard stringer up to the floor step. The fiberglass material attaching the side of the stringer to the bottom was crude and not carefully installed so this will be cleaned up and made neater and stronger. The front portion of the stringer appears to still be well bonded to the bottom so the replacement of the stringer will only be that section that is not bonded to the bottom or that is not adding strength to the structure.

A view forward of the starboard outboard stringer. The chine is along the right edge.

A closer view of the stringer attachment. The rough and crude fiberglass work is visible upon close examination.
Attachments:

Please Log in or Create an account to join the conversation.

Re:1963 Glastron V143 JetFlite Restoration 10 years 11 months ago #83759

  • MarkS
  • MarkS's Avatar
  • Offline
  • Moderator
  • Moderator
  • Posts: 5348
  • Karma: 118
  • Thank you received: 5
Bless your heart Kern, I can't imagine thinking you were that close to completion of this project THEN finding this mess! Kudo's to you for keeping a good attitude, and addressing the problem head on my friend. Finding questionable workmanship from the factory is one thing, but having paid good money and finding this kind of mess is something else. Wish I were closer, I'd come over and give you a hand.

Please Log in or Create an account to join the conversation.

Mark

Re:1963 Glastron V143 JetFlite Restoration 10 years 11 months ago #83771

  • Kern
  • Offline
  • Junior Boarder
  • Junior Boarder
  • Posts: 105
  • Karma: 17
  • Thank you received: 1
Mark,
Thank you for the kind words. At this point I could not back out of the project, even if I wanted. The financial hit would probably be enormous, however, the hit to my desire to see a finished product would probably be worse. My attitude toward the project is helped by being somewhat mature and having the time and finances to devote to completion of the project to the desired level of quality, appearance, and function.

Where are you located? I would welcome a visit, even though you might not be able to stay long enough to provide a lot of assistance. I anticipate this project will carry through next spring, and possibly summer, as my to do list is quite long and I will be fabricating many new items.

Please Log in or Create an account to join the conversation.

Re:1963 Glastron V143 JetFlite Restoration 10 years 11 months ago #83777

  • 63 Sabre
  • 63 Sabre's Avatar
  • Offline
  • Contributing Member
  • Contributing Member
  • Posts: 4676
  • Karma: 147
  • Thank you received: 167
You are indeed setting yourself up for a few trophies. Better than it would ever come from the factory. Sorry to say we couldn't all come over to help but moral support and encouragement of your over the top workmanship in just a keyboard away if it gets overwhelming. I've always found that a few days off from the project helps to revitalize the enthusiasm when you reach a breaking point. Keep us posted. By the way, what is the name of the shop that did the work? Seems like they could use some bad press.
Cal

Please Log in or Create an account to join the conversation.

Re:1963 Glastron V143 JetFlite Restoration 10 years 11 months ago #83795

  • MarkS
  • MarkS's Avatar
  • Offline
  • Moderator
  • Moderator
  • Posts: 5348
  • Karma: 118
  • Thank you received: 5
Well stated, and very true, Cal!

I'm just south of Atlanta, GA Kern. I hope to make a mid-west trip next year (for the Glastron Classic in Red Wing, MN), maybe it will work out so that I could swing by on my way up or back. Still have a couple brothers living in eastern IA I haven't seen in a long time.

Please Log in or Create an account to join the conversation.

Mark

Re:1963 Glastron V143 JetFlite Restoration 10 years 11 months ago #83829

I see this type of "repair" all too often. Makes me so angry. Plus a safety issue. What happened to at least try to be a Craftsman?.The joy of doing the job correctly? On the other hand your project is way way ahead of mine!!
Kern wrote:

I was grinding some internal sections in the transom area to provide smooth surfaces for painting and discovered that the outer ends of the original transom board were wet and delaminated. These were sandwiched between the new transom reinforcement board and the outer skin of the hull. Starboard Marine claimed to have bonded the new transom center section to the original outer ends. That claim appears to be false as I did not find resin between the parts and resin would probably not adhere to the wet, delaminated wood.


Full transom view showing the removal of the outer ends of the original transom board.

I used my electric chain saw to cut out the new transom reinforcement and the remains of the original transom board. The new reinforcement already had discoloration along the bottom, indicating that it had been wet, and the boat had never yet been in the water, just the rain storm. Evidently the new board was not adequately sealed with resin when being installed.


The port rear corner showing the end of the original transom board sandwiched between the new reinforcing board and the outer transom skin of the hull.


Starboard rear corner showing the delaminated layers of the original transom board. The board had no remaining strength.


The new reinforcing board shows discoloration and evidence of water penetration even though the boat has never been in the water, probably as a result of the rainy trip. The new board was evidently not adequately sealed all around.

I will be redesigning the transom board structure to spread the motor loads out to the outer sections of the transom and will post pictures of the new design.

The lesson I learned and one that may help others is to choose a restoration shop carefully and be certain that their standard of workmanship and quality is up to the standards you desire for your project. Starboard did not work to my standards and it has caused a great deal of extra work and delay in the project along with extra costs. In retrospect, I probably would have been better off to cut out the old transom and rebuild it myself.

With all the internal work and getting into and out of the hull with tools, I wanted to prevent damage to the new deck paint. I went to a fabric store and bought some inexpensive felt material and covered the decking. I then added a top layer of clear vinyl (not shown) to prevent dust from penetrating the felt and falling through to the deck paint.

Please Log in or Create an account to join the conversation.

Florida's Amphicar restoration destination

Re:1963 Glastron V143 JetFlite Restoration 10 years 11 months ago #83868

I would be looking for blood on this one.. That is a disgrace. This is a reason why I like to do my own work, if I have a problem I can only blame myself. They cheated and you took the hit better than I would have. That replaced plywood looks more than just a rainy ride. Looks like it spent 6 months in the weather. It shouldn't be that gray, and was the glass delaminating off the wood? I did a lot of garage build downs that the customer swore they would paint instead of letting me cap it. From not painting it the wood would go gray in a couple weeks in the sun like that.

I'm sick in my stomach just seeing that...

I cut the whole back off my boat to do the transom from a piss poor repair done a decade or two before I was born (1981). I seriously think crappy amateur's night repairs done to save time or money are the worst problem with well aged glass boats. Mine was loaded with them. I think I ground off 2 gallons of duraglass that they used to patch the structure of the keel and transom.

My brother still remembers the old man injecting epoxy in the old Owens Cabin Cruiser 26' wood back in the 1970s. It didn't help that old tub.

Me at age 4 a week before the old man chopped it up.
https://www.facebook.com/photo.php?fbid=18907189639&l=6bc69d19d8[\img] Or my brother's sailboat that some idiot glassed over. He started to repair their damage but gave up. Me at age 5 Boat is still in my backyard under a heavy circus tarp. [img]https://www.facebook.com/photo.php?fbid=39918384639&l=eabd91ffa4[\img] Don't give up on it! You'll make it right![img] www.facebook.com/photo.php?fbid=18907189639&l=6bc69d19d8 [\img]

Or my brother's sailboat that some idiot glassed over. He started to repair their damage but gave up.

Me at age 5 Boat is still in my backyard under a heavy circus tarp.
https://www.facebook.com/photo.php?fbid=39918384639&l=eabd91ffa4[\img] Don't give up on it! You'll make it right![img] www.facebook.com/photo.php?fbid=39918384639&l=eabd91ffa4 [\img]

Don't give up on it! You'll make it right!

Please Log in or Create an account to join the conversation.

Re:1963 Glastron V143 JetFlite Restoration 10 years 11 months ago #84050

  • Kern
  • Offline
  • Junior Boarder
  • Junior Boarder
  • Posts: 105
  • Karma: 17
  • Thank you received: 1
Hey Guys,
Thank you for the words of encouragement. In response to some of your statements, I offer the following:

Cal, I do not yet feel overwhelmed by the project. I am a graduate mechanical engineer with a goodly amount of patience, so this is just a series of issues that have to be addressed and they will take some time and effort. The challenge is interesting and fun and the creativity in upgrading the boat is stimulating.

The shop that repaired the transom was Starboard Marine Restorations in Grand Haven, MI. They were mentioned earlier in the thread as the first shop I had working on the boat.

If I collect some trophies, that will be OK. However, I have many awards from some of my other endeavors and that is not the motivation here. I just want to see this gal looking good, being able to be used again, and save a unique part of Glastron history.

Mark, where do your brothers live in Iowa? I grew up in eastern Iowa in a town called DeWitt, my mother still lives there, and my brother lives in Bettendorf.

Oldhornjunkie, I am planning to work out some compensation for the workmanship issue from Starboard Marine. He also misplaced some transom castings that are unique to the '61-'63 JetFlites so I may have to duplicate those, as I doubt that I can find any.

I will be seeking a fair settlement with Starboard but do not plan to get overly heavy handed as the goals and budget changed in the middle of the project and that had some effect. Also, he has a serious health issue (Big C) and I do not want to create any more stress in his life than necessary.

Please Log in or Create an account to join the conversation.

Re:1963 Glastron V143 JetFlite Restoration 10 years 11 months ago #84057

  • MarkS
  • MarkS's Avatar
  • Offline
  • Moderator
  • Moderator
  • Posts: 5348
  • Karma: 118
  • Thank you received: 5
We were practically neighbors then Kern. My family was originally from Coggon, just north of Cedar Rapids on Hwy 13. One brother now lives in Marion (suburb of CR), and the other in Center Point.

I admire your attitude on the situation, and commend your compassion for the fellow at Starboard Marine. Best wishes to you on some fair compensation to help defray the costs on completing the project, sir.

Looking forward to future updates. ;)

Please Log in or Create an account to join the conversation.

Mark

Re:1963 Glastron V143 JetFlite Restoration 10 years 11 months ago #84229

  • Kern
  • Offline
  • Junior Boarder
  • Junior Boarder
  • Posts: 105
  • Karma: 17
  • Thank you received: 1
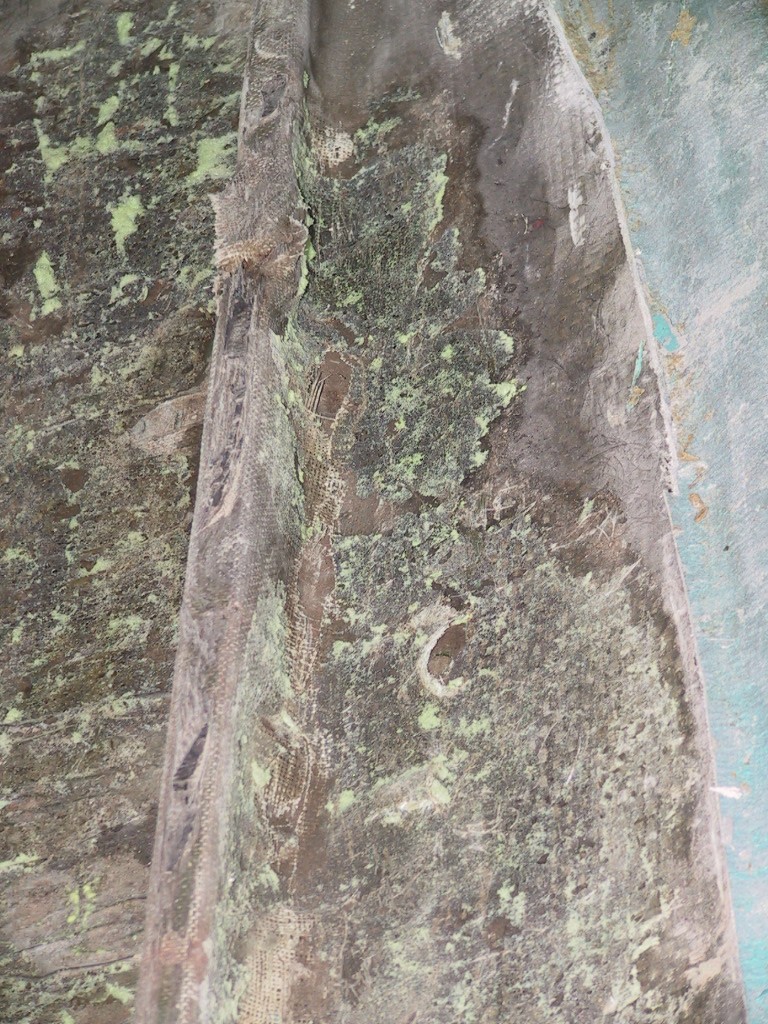
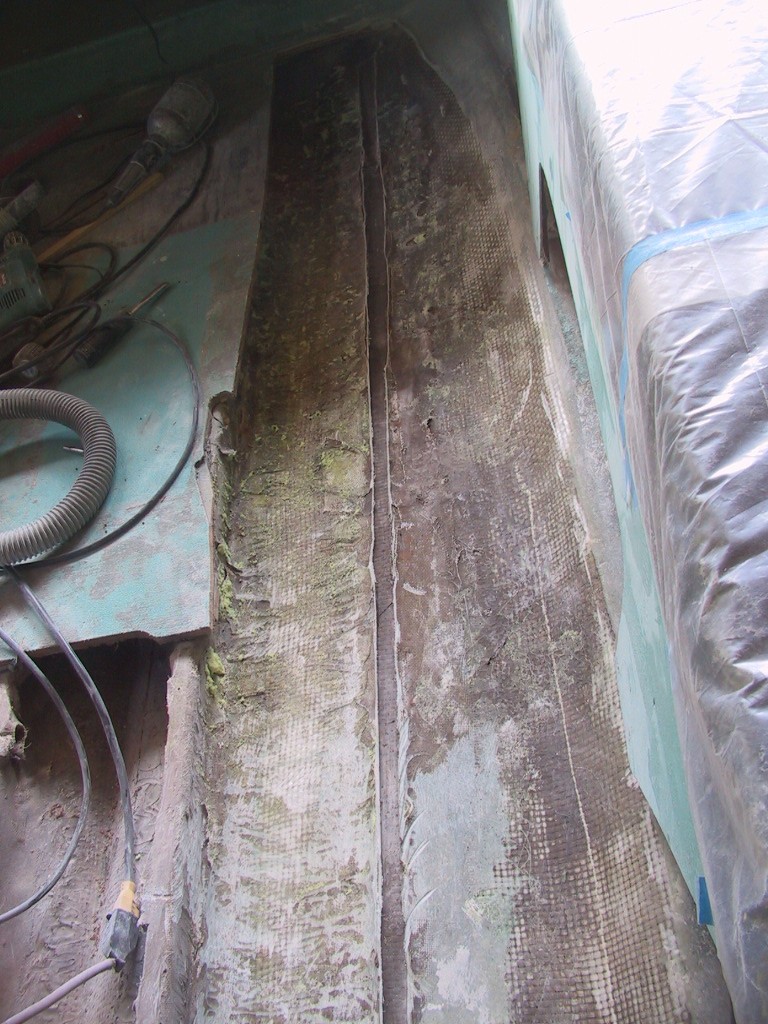
The transom area is on hold so work is progressing on replacing the stringers and floor. The stringers will be cut out one at a time, replaced with new wood and bonded to the bottom.

The fiberglass stringer caps were cut along the bottom and removed. There was no significant bond to the stringers. After the cap removal, the stringer was lifted out of its position. There was no bonding material between the stringer and the bottom, the cap was the only thing holding it in place.

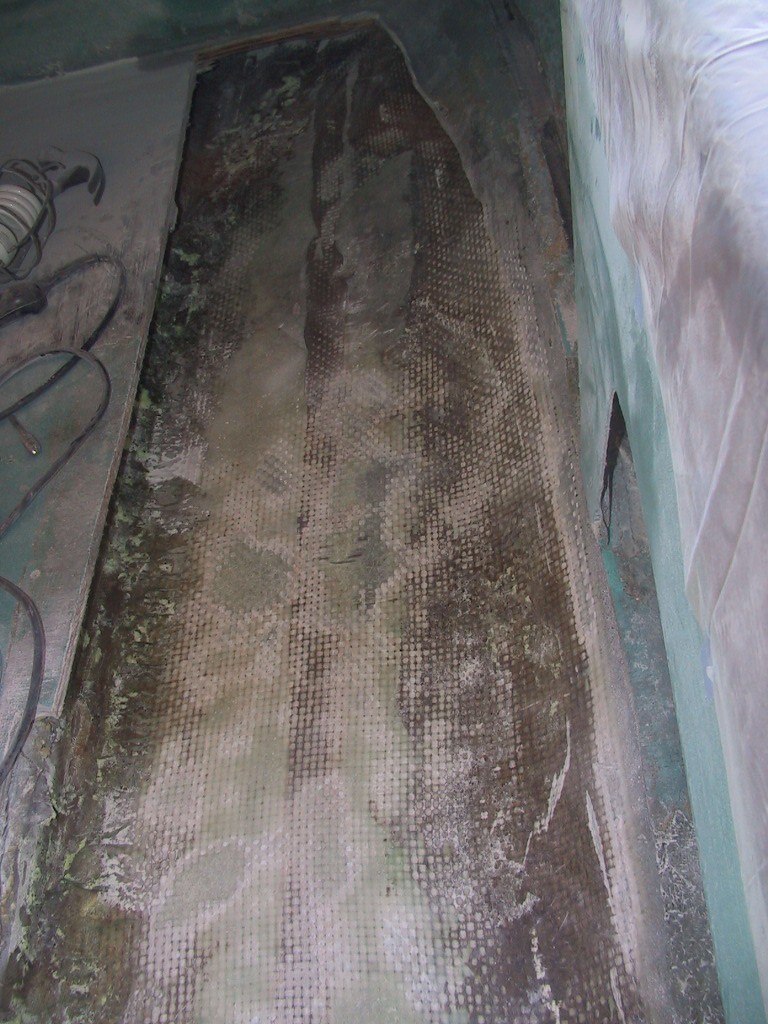
The floor area after stringer removal. Note the clean track where the stringer was located.

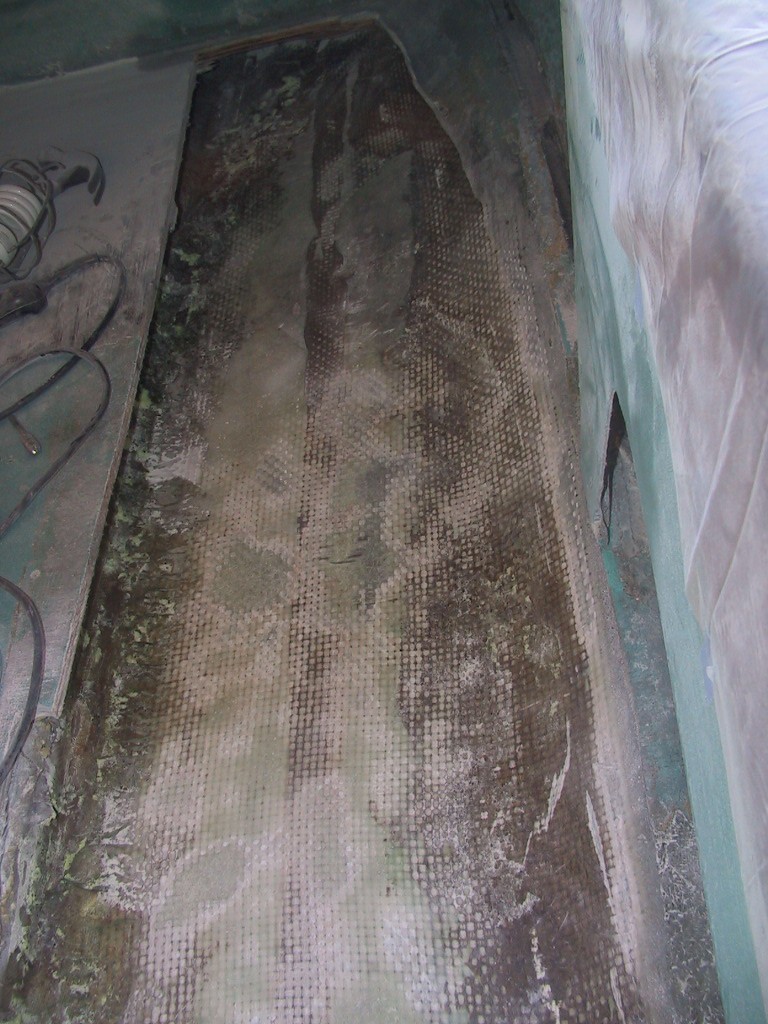
To provide a clean, smooth surface for bonding the new stringer in place, the old resin and glass cloth was ground away until the hull fiberglass structure was exposed. This also removed the weight of this material to prevent the new materials from making the hull too heavy and affecting performance.

Most of the old material has been ground away. A portion near the front still exists to show the process.

To provide a straight, firm support for the bottom, a T beam was constructed. It will be placed under the bottom at each stringer location in sequence while fitting and bonding the new stringers.

The T beam support under the location of the starboard outboard stringer. The port side has been lifted off the working cradle and is being supported by two jack stands.

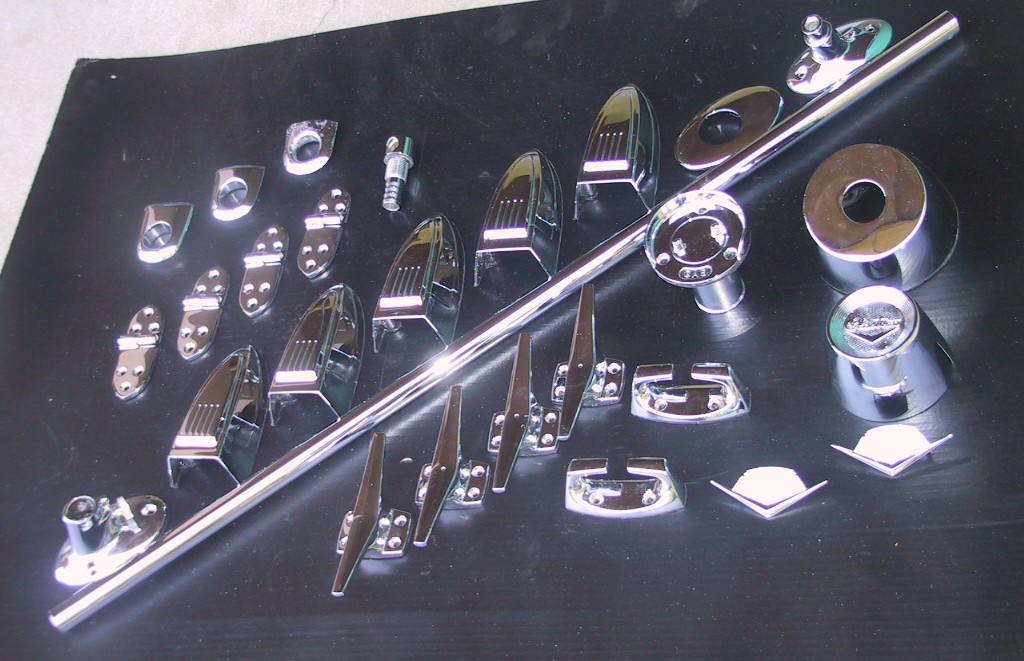
While the hull work continues, the second batch of chrome parts was retrieved from the polishing and plating shop and fitted with gaskets. There are still other parts that have to be fabricated and then polished and plated. They will be shown in later pictures.

The finished hull "jewelry" ready for completion of hull preparation to be installed.

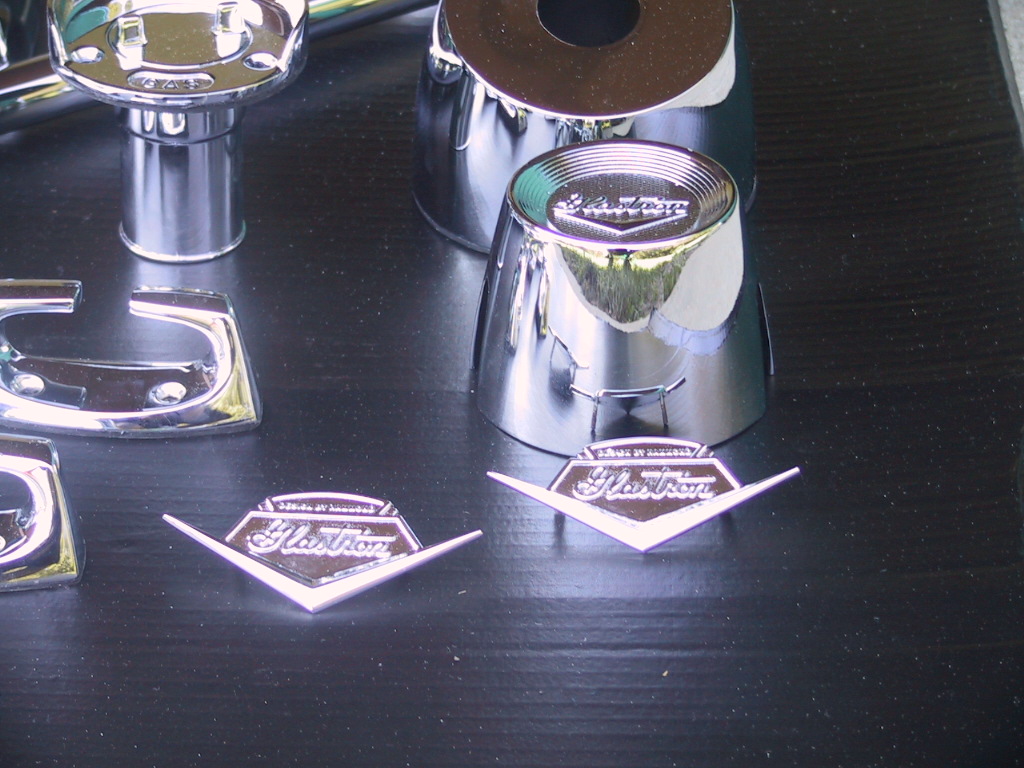
Detail of the emblems after polishing and plating. Maintaining the design was an example of the care and workmanship of this polishing and plating shop.

Please Log in or Create an account to join the conversation.

Re:1963 Glastron V143 JetFlite Restoration 10 years 11 months ago #84234

  • Shelby18
  • Shelby18's Avatar
  • Offline
  • Contributing Member
  • Contributing Member
  • Posts: 436
  • Karma: 18
  • Thank you received: 0
How many times can a guy thank you for your updated post on the restoration? I'm lovin' it!

Please Log in or Create an account to join the conversation.

Great to be on board.
Rick

Re:1963 Glastron V143 JetFlite Restoration 10 years 11 months ago #84257

  • Kern
  • Offline
  • Junior Boarder
  • Junior Boarder
  • Posts: 105
  • Karma: 17
  • Thank you received: 1
Rick,

Thank you for your complimentary comments. I am posting the restoration information on this site and the Classic Glastron site primarily to show others what processes I am using so that it might aid some other restorer out there. I am not an experienced boat restorer but my engineering background is a great help in this project. If anyone wants to know more details of what I am doing, I would be glad to talk with them. My office phone number is: 630-232-6063. If I am unavailable, the answering machine picks up and I will gladly call back.

I am also keeping a detailed restoration log book on the boat as I am spending more time and money than is probably justified. However, if anyone or a potential buyer (later) wants to know where the funds were spent, it will be documented. The finished product will be rare and should fall into the collector category.

Please Log in or Create an account to join the conversation.

Re:1963 Glastron V143 JetFlite Restoration 10 years 10 months ago #84916

  • Kern
  • Offline
  • Junior Boarder
  • Junior Boarder
  • Posts: 105
  • Karma: 17
  • Thank you received: 1
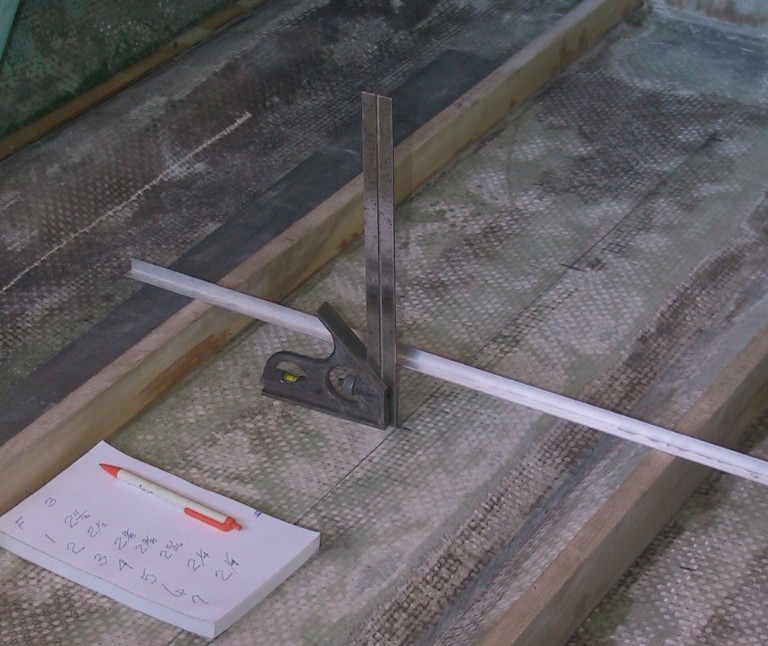
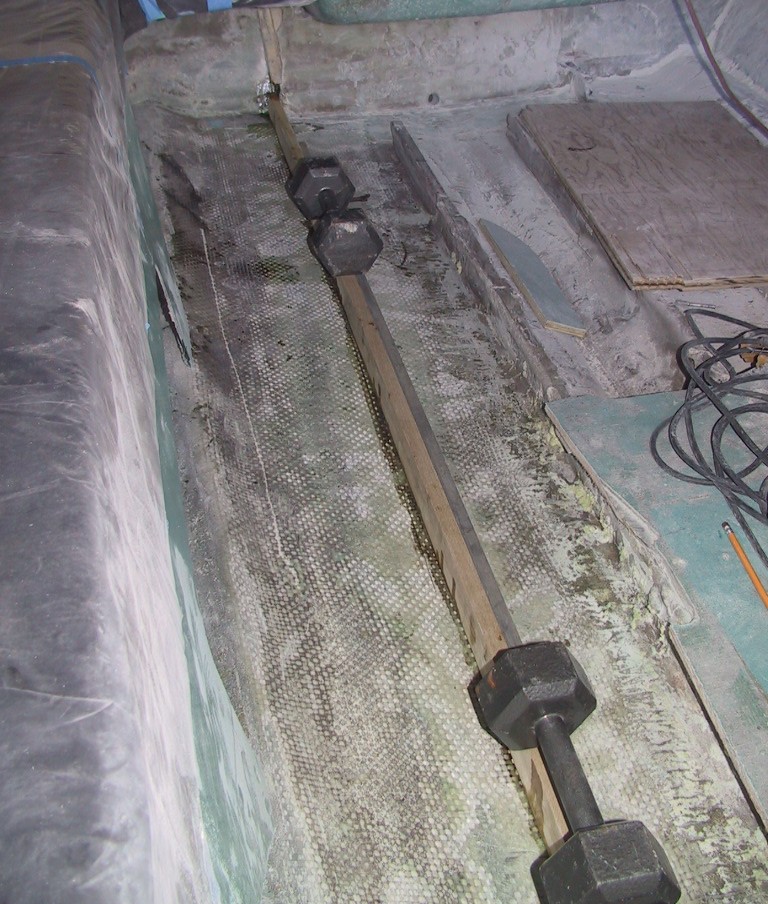
The original stringers did not fit tightly to the bottom so they were not used as patterns. The shape of the new stringers was determined by measurements to the bottom, A line was drawn on the bottom along the path of the stringer. This was marked at one foot intervals. The floor level at front and rear was defined and a straight edge was positioned at that height. The distance to the bottom from the straight edge was measured and the thickness of the floor was subtracted to determine the height of the stringer at that point.

The outer stringer heights were defined as above. Then the inner stringer heights were defined from the tops of the outers.

Measuring one height value for an inner stringer.

The wood chosen for the stringers is poplar and sanded boards are available with straight, clear grain structure. Oak would have been another choice.

The heights were marked on the stringer board and it was cut to the defined contour. The bottom was not perfectly smooth so some sanding was required to get the stringer at the final height. It did not fit the bottom precisely but the small gaps will be filled with epoxy resin.

Installing the first stringer. Epoxy resin was applied to the bottom of the stringer and to the boat bottom along the stringer path. The weights were applied to hold the stringer tightly to the boat bottom during cure.

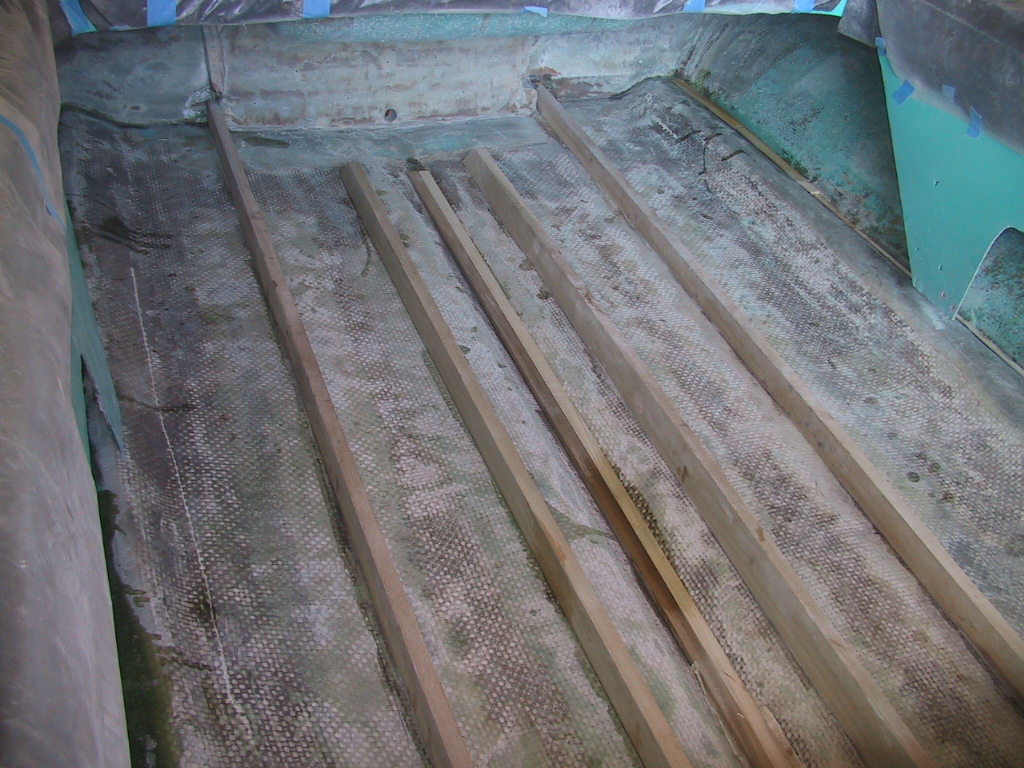
All the stringers bonded into place. After the hull is mounted on the rotisserie, strips of fiberglass cloth will be bonded to the stringer/bottom joints on each side to further strengthen the stringer to bottom bond.

I decided to use epoxy rather than polyester even though it is more expensive. The epoxy provides a better bond to a variety of materials. I chose the Total Boat 5:1 epoxy system from Jamestown Distributors. Their pump kit makes it very simple to get the correct ratio for any batch size. I have no affiliation with Jamestown other than as a satisfied customer.

The inner stringers went forward under the raised floor at the front of the hull. That section of floor was left in place and I did not want to remove the stringers, even though they could probably have been pulled out from under the floor. The hydrodynamic loads in that forward area are not as great as further astern so the existing structure was felt to be adequate.

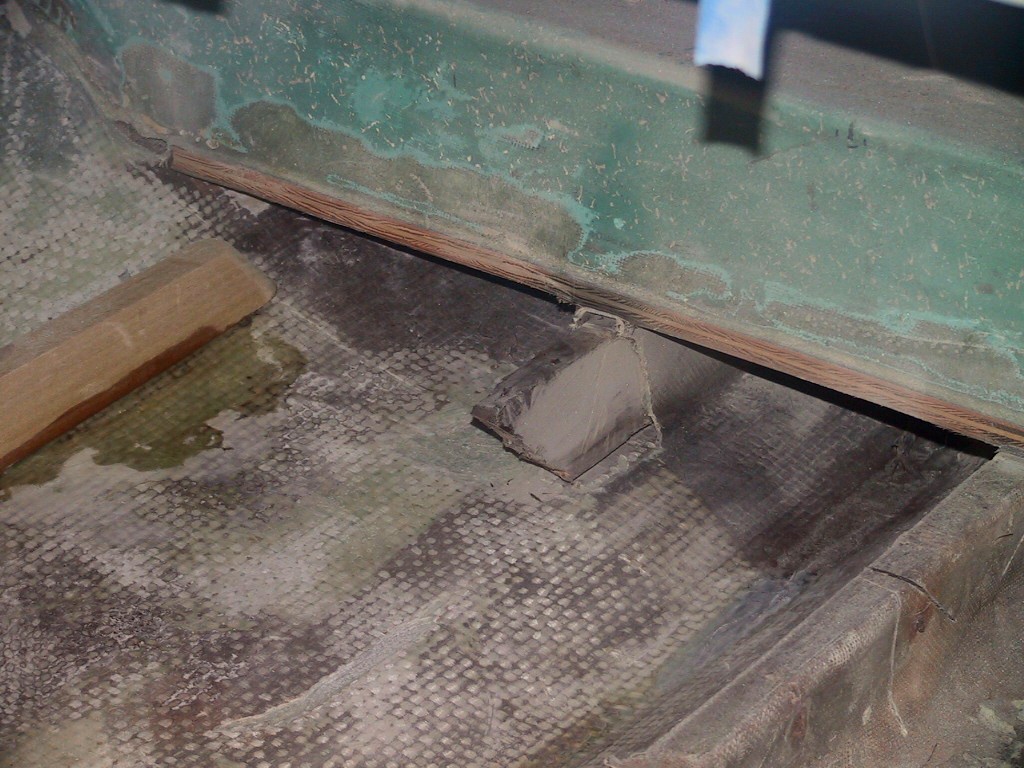
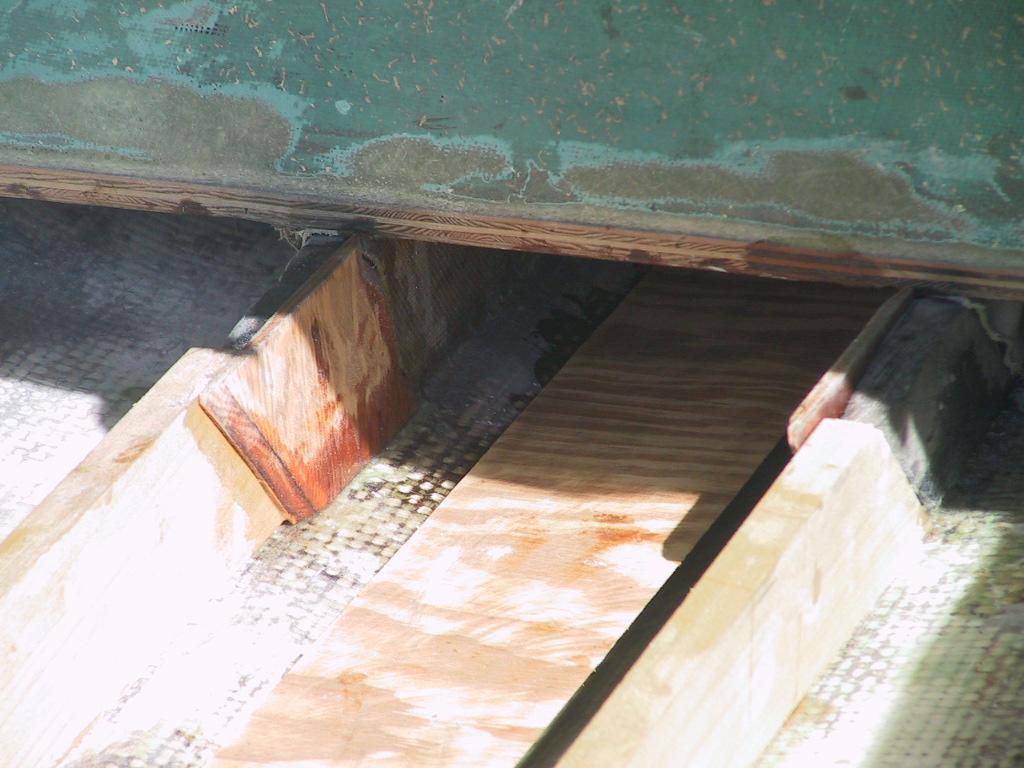
When the inner stringers were cut just aft of the floor step, they were cut at an angle. Any dynamic loads on the stringers are upward and by angling the cut, the loads on the new stringer will be transferred into the stub of the old stringer. To strengthen the joint between the new and old sections, small sections of ¼ inch plywood will be bonded to each side at the stringer joint. The outer ends of these plywood pieces are ground at an angle to provide a good blend for the fiberglass cloth that will be laid along the sides of the stringer to add to the floor/stringer strength. Any gaps in the fit between the stringer ends and the plywood pieces will be filled with epoxy resin.

The angle cut of the inner stringer just aft of the floor step.

The inner plywood reinforcement pieces bonded into place at the stringer joint. When the hull is on the rotisserie and can be rotated, the outer reinforcement will be added and all cavities at the joint will be filled with epoxy.

As noted earlier, the hull had no keel board. Since the boat rests on keel rollers on the trailer, it was decided to add some extra strength to the keel and also fill the channel so the bottom will be flat in that area for easier fitting of the flotation foam. Strips were made from the stringer scraps, laid into the keel channel and bonded in place. The bottom layer is a narrow strip, the second layer is two wider strips, and the top layer is plywood. End joints were staggered. The side gaps will be filled with fiberglass cloth strips and resin to form a solid core for the keel channel.

The wood filler strips in the keel channel.

Please Log in or Create an account to join the conversation.

Re:1963 Glastron V143 JetFlite Restoration 10 years 10 months ago #85156

  • Kern
  • Offline
  • Junior Boarder
  • Junior Boarder
  • Posts: 105
  • Karma: 17
  • Thank you received: 1
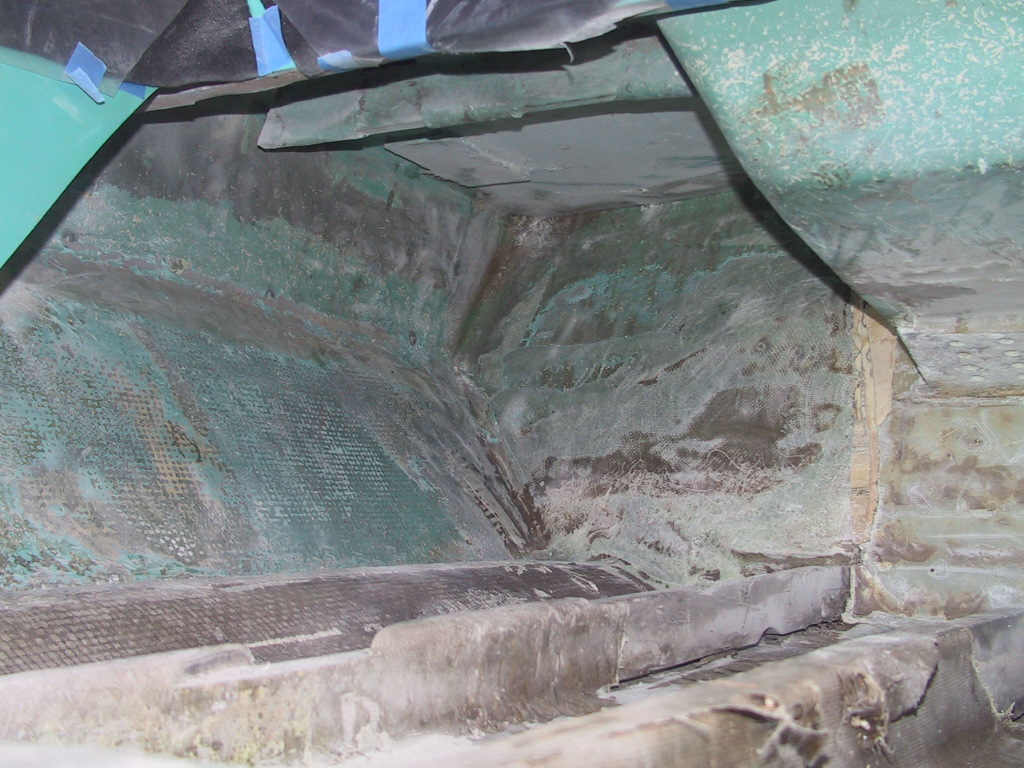
As the project moves forward, I have incidents of “shipwrights disease” (Google it). While on the cradle, I continued to sand the interior of the hull to create a smooth surface for adding the flotation foam and later the interior paint. This also has the advantage of improving the appearance of the inside of the hull (even though it mostly will not be seen - I know what is in there) and removing some weight from the hull. It just involves many hours of dusty sanding and grinding.

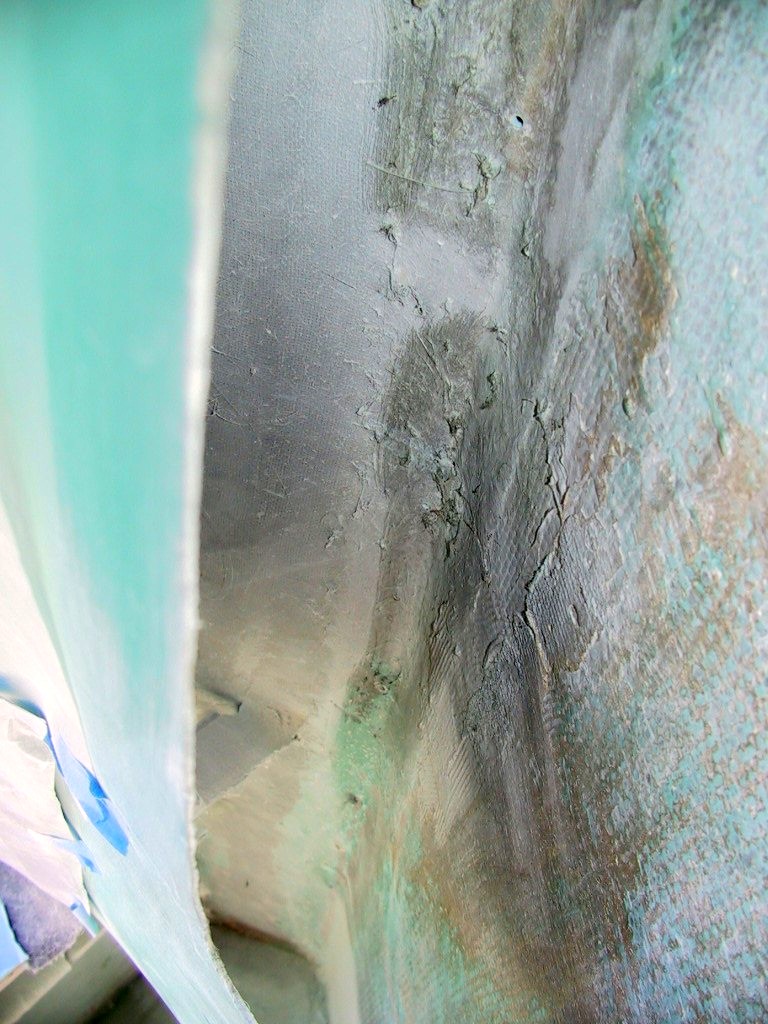
A view of the port side under deck area, looking aft. The V shaped joint is the hull side to upper deck joint. Note the rough, crude fiberglass work. At the bottom center of the picture, toward the aft end of the boat, is the sanded surface.


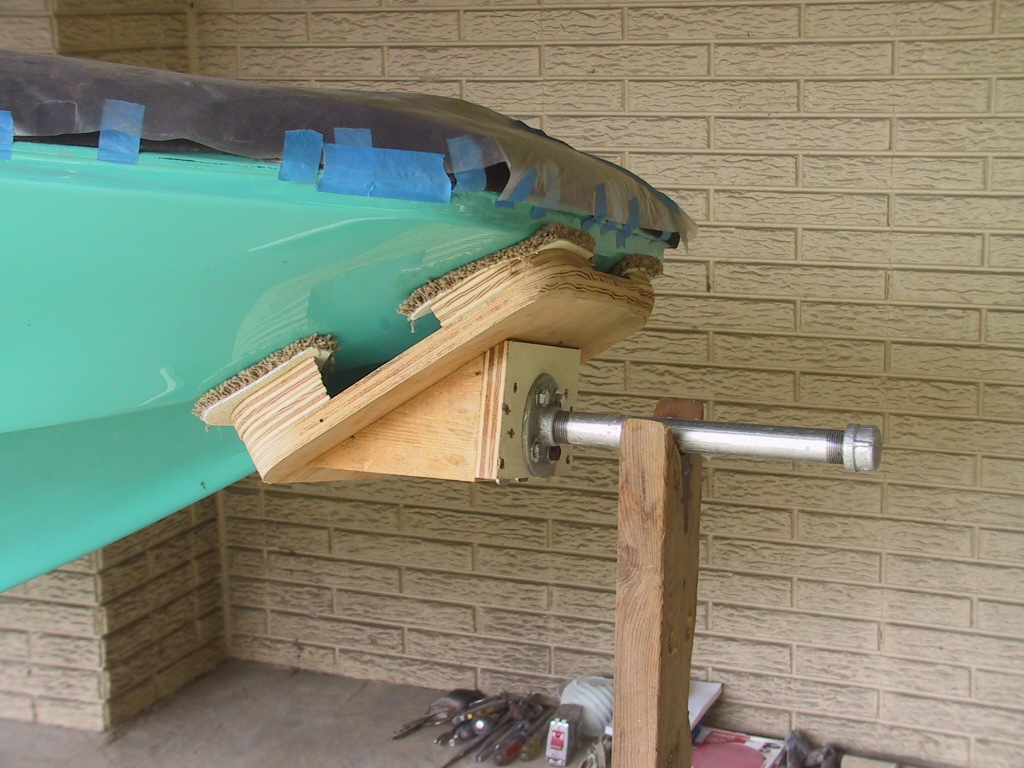
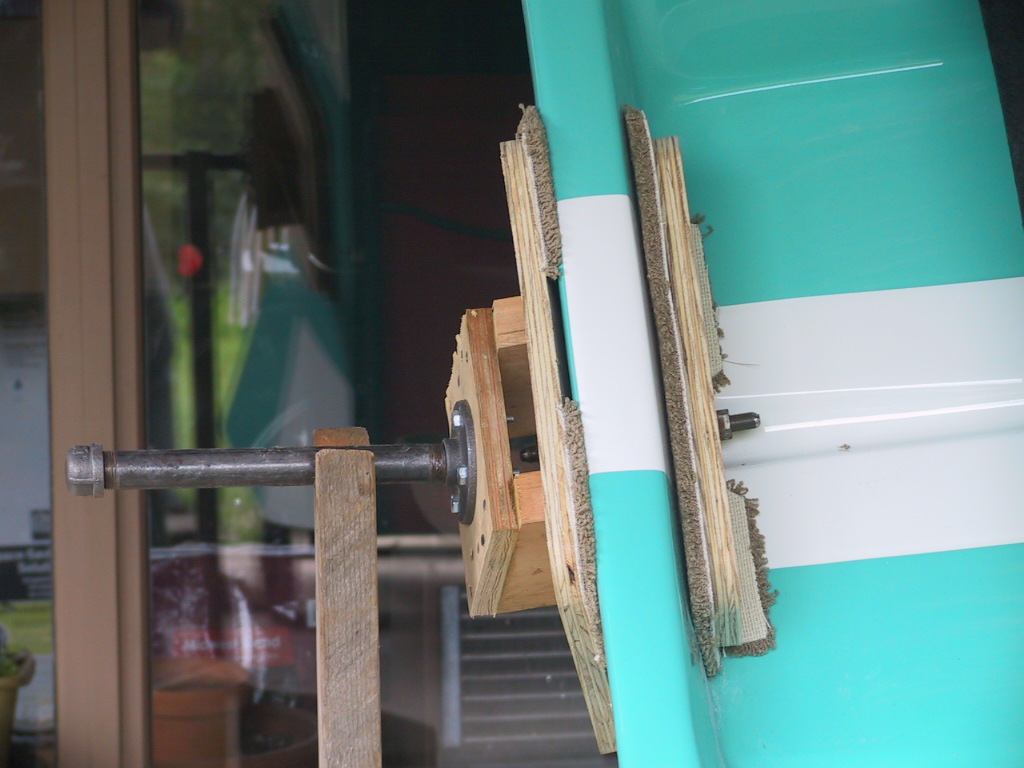
To ease being able to change the angle of the hull for various operations, a rotisserie fixture was designed and built. This type of fixture is a common item in the car restoration business. This boat is relatively small so it is not too heavy and the supports can be simple. A larger, heavier boat would require a stronger and more extensive support system. Both pivots were built with adequate padding to protect the new paint.

The hull supported by the rotisserie posts. The angle shown would be typical of that used to glass in the port side stringer/bottom joint.

The bow pivot assembly. All wood joints were glued and screwed together to insure adequate strength. The assembly is attached to the bow by a 3/8 inch stud through the bow eye hole.

The stern pivot assembly. This assembly is attached to the transom by a 1/2 inch stud through the motor well drain hole.

Two surprises occurred once the boat was mounted on the rotisserie. I did not calculate where the pivots should be to have good balance. The end result turned out quite well balanced and is very easy to rotate through a full roll. The other surprise was that the starboard side of the boat is heavier than the port side, probably due to more and thicker resin on that side. The difference is not great but it exists.

At present there are no brakes or index pins to hold the desired angle for working so supports are placed under the sides to hold the desired position. A method of braking or locking the pivots may be designed for the future.

To test the adequacy of the design, I added my weight on each end to simulate when I am on board to work inside. During these tests I had the working cradle, well padded, still under the hull to catch it if the supports broke and allowed it to fall.

A downside of the rotisserie is that the posts had to be tall enough to allow full rotation and that places the hull quite high off the floor. A step stool is now required to get into and out of the hull for working on it, whereas on the cradle I could just climb over the side from the floor. The tradeoff is worth it.
Attachments:

Please Log in or Create an account to join the conversation.

Time to create page: 0.412 seconds

Donate

Please consider supporting our efforts.

FG Login

FiberGoogle

Who's Online

We have 6288 guests and one member online